Description
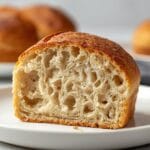
This tutorial guides you through making high hydration sourdough bread with a beautiful open crumb. It covers each step from mixing to baking, focusing on techniques to achieve a light, airy texture and demystifying the process for home bakers.
Ingredients
Instructions
1. Autolyse and Initial Mix: In a large bowl, combine the bread flour and 350 grams of the warm water. Mix until no dry flour remains, forming a shaggy dough. Cover the bowl and let it rest for 30-60 minutes. This “autolyse” step allows the flour to fully hydrate and gluten development to begin naturally. After the autolyse, add your active sourdough starter to the dough and gently mix it in until fully incorporated.
2. Adding Salt and First Stretch and Fold: Sprinkle the salt over the dough. Add the remaining 25 grams of warm water, pouring it directly over the salt to help it dissolve. Use your hands to gently squeeze and fold the dough for about 2-3 minutes, ensuring the salt and water are evenly distributed. The dough will feel sticky. Cover and let rest for 30 minutes.
3. Building Strength with Stretch and Folds (3-4 sets): Over the next 2-3 hours, perform 3-4 sets of stretch and folds, spaced 30-45 minutes apart. To do a stretch and fold, wet your hands slightly, grab a portion of the dough from one side, stretch it upwards, and fold it over to the center. Rotate the bowl a quarter turn and repeat this action 3-4 times until you’ve worked your way around the dough. You’ll notice the dough becoming smoother, more elastic, and holding its shape better with each set.
4. Bulk Fermentation (First Rise): After the final set of stretch and folds, cover the bowl and let the dough rest at room temperature (ideally 72-78 F or 22-25 C) for the remainder of the bulk fermentation, typically another 2-3 hours. The dough should increase in volume by about 30-50% and show signs of activity like small bubbles on the surface. This is a critical stage for flavor development and crumb structure.
5. Pre-Shaping and Bench Rest: Gently turn the dough out onto a lightly floured surface. Using a bench scraper, gently shape the dough into a loose round or rectangle. Avoid deflating the dough too much. Cover it with a clean kitchen towel and let it rest for 20-30 minutes. This “bench rest” allows the gluten to relax, making the final shaping easier.
6. Final Shaping and Cold Proof: Lightly flour your hands and the work surface. Gently shape the dough into your desired final shape (banneton or Dutch oven shape), creating tension on the surface. Transfer the shaped dough seam-side up into a floured banneton or a bowl lined with a floured kitchen towel. Cover the banneton/bowl with plastic wrap or a shower cap and refrigerate for 8-12 hours, or up to 24 hours. The cold proof slows down fermentation, developing deeper flavors and making the dough easier to score and handle.
7. Baking Your Sourdough: Preheat your oven to 475 F (245 C) with a Dutch oven inside for at least 30 minutes. Carefully remove the hot Dutch oven. Gently invert the cold dough into the hot Dutch oven. Score the top of the dough with a sharp razor blade or lame. Cover the Dutch oven and bake for 20 minutes. Remove the lid, reduce the oven temperature to 450 F (230 C), and continue baking for another 25-30 minutes, or until the crust is deeply golden brown.
8. Cooling for the Perfect Crumb: This step is crucial for the open crumb! Once baked, immediately transfer the bread to a wire rack and let it cool completely for at least 2-3 hours before slicing. Slicing too early traps steam, leading to a gummy texture and hindering the development of that beautiful open crumb.
- Prep Time: 20-30 minutes
- Cook Time: 40-50 minutes
- Category: bread
- Method: baking
- Cuisine: european
Nutrition
- Serving Size: 1 slice
Keywords: sourdough, bread, open crumb, high hydration, baking, artisan bread, homemade bread, fermentation, starter, gluten