Description
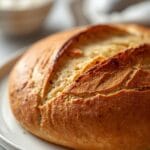
This guide simplifies the essential steps of shaping and scoring no-knead sourdough, helping beginners achieve a beautiful, rustic loaf with a desirable round shape and impressive crust. It focuses on approachable techniques for transforming bulk-fermented dough into a bakery-worthy masterpiece.
Ingredients
Instructions
1. 1. Prepare Your Work Surface and Proofing Basket: Lightly dust your clean work surface with rice flour or all-purpose flour. If using a proofing basket (banneton), dust it generously with rice flour to prevent sticking. If using a bowl with a tea towel, flour the tea towel well.
2. 2. Gently Release the Dough: Carefully tip your bulk-fermented sourdough dough out of its container onto the floured work surface. Try to disturb it as little as possible to retain the air bubbles. It will likely be a shaggy, somewhat sticky mass.
3. 3. First Shaping (Pre-shape): Using a bench scraper or your floured hands, gently fold the edges of the dough towards the center, working your way around the perimeter. This helps to build some initial tension. Flip the dough over so the seam side is down. Cup your hands around the dough and gently pull it towards you, creating a round shape with some surface tension. Let it rest for 10-15 minutes. This rest allows the gluten to relax, making the final shaping easier.
4. 4. Final Shaping for a Round Loaf (Batard or Boule): After the rest, dust the dough lightly again. For a round loaf (boule), gently cup your hands around the dough and rotate it, pulling it slightly towards you in a circular motion. This action creates surface tension, forming a tight skin on top. For an oval loaf (batard), gently stretch the dough into an oval, then fold the top third down, the bottom third up, and then fold it in half lengthwise, sealing the seam. Roll it gently to create an even oval. The key is to create a tight “skin” on the outside of the dough.
5. 5. Transfer to Proofing Basket: Carefully transfer your shaped dough, seam-side up, into the generously floured proofing basket. The seam-side up placement means the smooth, taut surface will be on the bottom during proofing and will become the top crust when baked.
6. 6. Scoring Your Loaf: Once your dough has completed its final proof (it should feel light and airy, but still have some spring when gently poked), carefully invert it onto a piece of parchment paper or directly into your preheated Dutch oven. Using a sharp lame or a very sharp razor blade, make quick, confident cuts on the surface of the dough. A simple cross, a single long slash, or a few parallel lines are great for beginners. The cuts should be about 1/2 inch deep. This scoring allows the bread to expand predictably in the oven, creating a beautiful “ear” and preventing uncontrolled cracking.
- Prep Time: 10-15 minutes
- Cook Time: 30-45 minutes
- Category: bread
- Method: baking
- Cuisine: american
Nutrition
- Serving Size: 1 slice
Keywords: sourdough, no-knead, shaping, scoring, bread, baking, rustic, homemade, beginner, crusty