Description
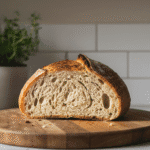
This easy no-knead sourdough-style bread recipe is perfect for beginners, using active dry yeast to create a delicious artisan loaf with minimal effort. It’s a stress-free approach to home baking, resulting in a beautiful, crusty bread with a chewy interior.
Ingredients
Instructions
1. 1. Combine Dry Ingredients: In a large mixing bowl, whisk together the all-purpose flour, active dry yeast, and salt until they are well combined. This ensures the yeast and salt are evenly distributed throughout the flour, which is crucial for a consistent rise.
2. 2. Add Warm Water: Pour the warm water into the bowl with the dry ingredients. Using a wooden spoon or a sturdy spatula, mix everything together until a shaggy, sticky dough forms. There’s no need to knead; just ensure all the flour is incorporated and there are no dry patches. The dough will look quite wet and uneven at this stage, which is perfectly normal.
3. 3. First Rise (Bulk Fermentation): Cover the bowl tightly with plastic wrap or a clean kitchen towel. Place the bowl in a warm spot in your kitchen, away from drafts. Let the dough rise for 2 to 3 hours, or until it has roughly doubled in size and has a bubbly surface. The longer it rises within this timeframe, the more flavor it will develop.
4. 4. Preheat Oven and Dutch Oven: About 30 minutes before the end of the first rise, place your Dutch oven with its lid into your oven. Preheat the oven to 450 F (232 C). Heating the Dutch oven ensures a super-hot surface for the dough, creating that amazing crust.
5. 5. Shape the Dough and Second Rise: Once the dough has risen, gently scrape it out onto a lightly floured surface. With floured hands, gently fold the edges of the dough towards the center a few times to form a round ball. Avoid overworking the dough. Place the shaped dough onto a piece of parchment paper. This makes transferring it to the hot Dutch oven much easier. Cover the dough loosely with plastic wrap or a kitchen towel and let it rest for another 30 minutes while the oven finishes preheating.
6. 6. Bake the Loaf: Carefully remove the hot Dutch oven from the oven (use oven mitts!). Lift the dough by the parchment paper and gently lower it into the hot Dutch oven. Score the top of the dough with a sharp knife or a bread lame (optional, but creates a nice aesthetic and helps with expansion). Place the lid back on the Dutch oven and return it to the oven. Bake for 30 minutes with the lid on.
7. 7. Finish Baking: After 30 minutes, carefully remove the lid from the Dutch oven. Reduce the oven temperature to 400 F (200 C) and continue to bake for another 15-20 minutes, or until the crust is deeply golden brown and sounds hollow when tapped on the bottom.
8. 8. Cool Completely: Once baked, carefully remove the bread from the Dutch oven and transfer it to a wire rack to cool completely before slicing. This step is crucial for the internal structure to set and for the crust to remain crisp. Slicing too early can result in a gummy texture.
- Prep Time: 10 minutes
- Cook Time: 45-50 minutes
- Category: bread
- Method: baking
- Cuisine: american
Nutrition
- Serving Size: 1 slice
Keywords: no-knead, sourdough-style, beginner-friendly, artisan bread, homemade bread, yeast bread, crusty bread, easy bread, dutch oven, simple baking