Description
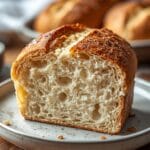
Learn to bake delicious, crusty sourdough bread without a Dutch oven using simple techniques and readily available kitchen items. This recipe focuses on creating a steamy environment in a regular oven to achieve a fantastic loaf.
Ingredients
Instructions
1. 1. Mixing the Dough: In a large bowl, combine the active sourdough starter and warm water. Stir until the starter is mostly dissolved. Add the flour and salt. Mix with a spoon or your hands until no dry flour remains and a shaggy dough forms. Cover the bowl with a damp towel or plastic wrap and let it rest for 30 minutes (autolyse).
2. 2. Performing Stretch and Folds: After the rest, perform your first set of stretch and folds. With wet hands, grab a portion of the dough from the edge, stretch it upwards, and fold it over the center. Rotate the bowl a quarter turn and repeat. Do this 4-6 times until the dough tightens. Repeat this process every 30-45 minutes for a total of 3-4 sets over 2-3 hours. This builds strength in the dough.
3. 3. Bulk Fermentation: After the stretch and folds, let the dough rest, covered, at room temperature for another 2-5 hours, or until it has increased in volume by about 30-50% and feels airy. The exact time depends on your room temperature and starter activity.
4. 4. Shaping the Loaf: Gently turn the dough out onto a lightly floured surface. Shape it into a round or oval loaf. You want to create tension on the surface of the dough. If using a proofing basket (banneton), dust it generously with rice flour or all-purpose flour. Place the shaped dough seam-side up into the basket.
5. 5. Cold Proofing: Cover the proofing basket with plastic wrap or a damp towel and refrigerate for 8-16 hours. This slows down fermentation, develops flavor, and makes the dough easier to handle.
6. 6. Preheating Your Oven and Baking Surface: About an hour before baking, place your chosen baking surface (a heavy baking sheet, pizza stone, or cast iron skillet) in the oven. Preheat the oven to 475 F (245 C). Crucially, place a separate oven-safe pan (like a cast iron skillet or broiler pan) on the bottom rack of your oven.
7. 7. Creating Steam and Baking: Carefully remove the hot baking surface from the oven. Gently invert your cold-proofed dough onto it. Score the top of the dough with a sharp razor blade or knife. Immediately transfer the baking surface with the dough back into the hot oven. Pour about 1 cup of boiling water into the hot pan on the bottom rack (be careful of the steam!). Quickly close the oven door.
8. 8. Finishing the Bake: Bake for 20 minutes with the steam. Then, carefully remove the pan of water from the oven. Reduce the oven temperature to 450 F (230 C) and continue baking for another 15-20 minutes, or until the crust is deep golden brown and sounds hollow when tapped on the bottom. Let the bread cool completely on a wire rack before slicing.
- Prep Time: 20-30 minutes
- Cook Time: 30-40 minutes
- Category: bread
- Method: baking
- Cuisine: american
Nutrition
- Serving Size: 1/10 loaf
Keywords: sourdough, bread, no dutch oven, homemade, baking, crusty, easy, starter, fermentation, yeast-free