Description
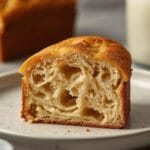
This recipe is designed to be straightforward and rewarding, delivering a delicious gluten-free sourdough loaf that’s perfect for all your favorite meals. Whether you’re new to gluten-free baking or a seasoned pro, you’ll find this method simple and satisfying. This homemade GF sourdough bread offers a wonderful texture and a delightful tang, making it an excellent choice for everything from hearty sandwiches to a simple piece of toast with your morning coffee.
Ingredients
Instructions
1. Prepare the Starter Mixture: In a large mixing bowl, combine the active gluten-free sourdough starter, warm water, psyllium husk powder, olive oil, honey (or maple syrup), and apple cider vinegar. Whisk everything together until the psyllium husk powder is fully incorporated and the mixture looks slightly thickened and uniform. The psyllium husk will absorb liquid and create a gel-like consistency, which is important for the structure of gluten-free bread.
2. Combine Dry Ingredients: In a separate medium bowl, whisk together the gluten-free all-purpose flour blend, salt, and baking soda. Make sure to distribute the salt and baking soda evenly throughout the flour.
3. Mix the Dough: Add the dry ingredients to the wet starter mixture. Use a sturdy spoon or a stand mixer with a paddle attachment to mix until a shaggy, cohesive dough forms. It will be stickier than traditional wheat dough but should hold together. Mix for about 3-5 minutes on medium speed if using a stand mixer, or vigorously by hand, until no dry streaks of flour remain.
4. First Fermentation (Bulk Rise): Lightly oil a clean large bowl with olive oil. Transfer the dough to the oiled bowl, turning it once to coat the entire surface. Cover the bowl tightly with plastic wrap or a damp kitchen towel. Let the dough ferment at room temperature (around 70-75F) for 8-12 hours, or until it has visibly increased in size by about 50-75% and shows some bubbles on the surface. Overnight fermentation works wonderfully for this step.
5. Shape and Second Proof: Gently turn the dough out onto a lightly floured surface (using gluten-free flour). Shape it into a round or oval loaf. You can use a banneton basket dusted with gluten-free flour for proofing, or place it on a piece of parchment paper on a baking sheet. Cover loosely with plastic wrap or a damp towel and let it proof for another 2-4 hours at room temperature. The dough should look slightly puffy and feel airy, but not overly gassy.
6. Preheat Oven and Bake: About 30 minutes before baking, preheat your oven to 450 F (232 C) with a Dutch oven or a heavy baking pot inside. Carefully remove the hot Dutch oven from the oven. Gently transfer the dough (on the parchment paper, if using) into the hot Dutch oven. Score the top of the dough with a sharp knife or razor blade to allow for expansion during baking.
7. Initial Bake (Covered): Cover the Dutch oven with its lid and bake for 30 minutes. This creates a steamy environment crucial for a good crust.
8. Final Bake (Uncovered) and Cool: Remove the lid and continue baking for another 20-30 minutes, or until the crust is deeply golden brown and the internal temperature reaches 200-210 F (93-99 C). Carefully remove the bread from the Dutch oven and transfer it to a wire rack. Let it cool completely for at least 2 hours before slicing. This cooling period is critical for the internal structure to set; slicing too early can result in a gummy texture.
- Prep Time: 20 minutes
- Cook Time: 50-60 minutes
- Category: main dish
- Method: baking
- Cuisine: american
Nutrition
- Serving Size: 1 slice
Keywords: gluten-free, sourdough, bread, baking, homemade, easy, healthy, sandwich, toast, dairy-free