Description
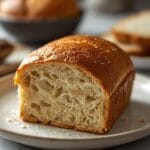
This guide provides practical, easy-to-follow steps for shaping sourdough dough into beautiful boules or batards, focusing on creating tension and structure for an excellent rise and open crumb. It covers pre-shaping, final shaping for both round and oval loaves, and tips for successful proofing.
Ingredients
Instructions
1. 1. Prepare Your Work Surface and Dough: Lightly dust your clean work surface with flour. Gently scrape your fermented sourdough dough out of its bulk fermentation container onto the floured surface. Try to disturb the dough as little as possible to retain the air pockets.
2. 2. Pre-Shape (for Boule or Batard): For a boule (round loaf), gently gather the edges of the dough towards the center, forming a rough ball. Flip it seam-side down and, using the palms of your hands, gently drag the dough towards you across the surface. This action creates surface tension. For a batard (oval loaf), gently form it into a loose rectangle. Let the dough rest, covered, for 20-30 minutes. This is called the “bench rest” and allows the gluten to relax, making the final shaping much easier.
3. 3. Final Shaping for a Boule (Round Loaf): After the bench rest, gently flip the dough over so the sticky side is up. Take the top edge of the dough and fold it down about two-thirds of the way towards the center. Press gently to seal. Then, take the left and right sides and fold them towards the center, overlapping slightly. Finally, take the bottom edge and fold it up and over the previous folds, creating a tight package. Flip the dough seam-side down and, using cupped hands, rotate it while gently dragging it towards you to create a taut, smooth surface. The dough should feel firm and hold its shape.
4. 4. Final Shaping for a Batard (Oval Loaf): After the bench rest, gently flip the dough over. Take the top edge and fold it down about two-thirds of the way. Press gently to seal. Then, take the left side and fold it over about one-third of the way, followed by the right side overlapping the left. You should have a roughly rectangular shape. Starting from the top, tightly roll the dough downwards, tucking the dough in as you go, until you reach the bottom. Pinch the seam closed along the entire length. Gently cup your hands around the ends and roll the batard back and forth a few times to even out the shape and create more tension.
5. 5. Place in Proofing Basket (Banneton): Once shaped, lightly dust your banneton (or a bowl lined with a floured tea towel) with flour. Carefully transfer your shaped dough, seam-side up, into the prepared banneton. The seam-side up placement allows the dough to expand freely during proofing.
6. 6. Final Proofing: Cover the banneton with a clean kitchen towel or plastic wrap and place it in the refrigerator for its final proof (cold proof). This slow proofing develops flavor and makes the dough easier to handle when scoring.
- Prep Time: 5-10 minutes
- Cook Time: 0 minutes
- Category: baking
- Method: shaping
- Cuisine: european
Nutrition
- Serving Size: 1 slice
Keywords: sourdough, shaping, baking, bread, boule, batard, technique, gluten, proofing, homemade