Description
This guide helps sourdough bakers understand and analyze the internal structure (crumb) of their bread to improve baking techniques. It provides a framework for observing and interpreting crumb characteristics, connecting them to hydration, fermentation, and shaping processes.
Ingredients
Instructions
1. 1. Ensure Your Bread Is Fully Cooled: This is critical. Slicing warm bread will compress the crumb, making it appear gummy and dense, even if it’s perfectly baked. Always allow your bread to cool completely before slicing. Wait at least 2-4 hours after baking, or even overnight, for the bread to cool completely.
2. 2. Prepare Your Slicing Area: Place your cooled loaf on a stable cutting board. Ensure you have good, natural light to clearly see the internal structure.
3. 3. Make a Clean Slice: Using a sharp, serrated bread knife, slice the loaf roughly in the middle. Aim for a clean, even cut that reveals a cross-section of the entire loaf. Avoid sawing motions that might tear or distort the crumb.
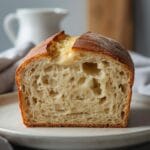
4. 4. Observe the Overall Structure: Look at the entire slice. Is the crumb uniform, or are there large, irregular holes? Is it dense and tight, or open and airy? Notice the distribution of the air pockets.
5. 5. Examine Individual Air Pockets (Alveoli): Pay attention to the size, shape, and distribution of the holes. Are they small and consistent, or large and varied? Are there tunnels or very large, isolated holes?
6. 6. Assess the Texture of the Crumb: Gently touch the crumb. Does it feel moist and elastic, or dry and brittle? Is it gummy or chewy? A good sourdough crumb should feel tender and slightly moist.
7. 7. Compare to Your Crumb Chart: Use a reliable sourdough crumb chart (which you would have printed or pulled up on a screen) to match your observations. Look for descriptions and images that most closely resemble your loaf. This comparison will help you identify what went well and what might need adjustment in your next bake.
8. 8. Document Your Findings: Take notes or even a photo of your crumb. Compare it with your baking notes from that specific loaf. This practice builds a valuable personal database for continuous improvement.
- Prep Time: 1-2 minutes
- Cook Time: 0 minutes
- Category: baking guide
- Method: observational analysis
- Cuisine: sourdough
Nutrition
- Serving Size: 1 loaf
Keywords: sourdough, crumb, baking, guide, bread, analysis, fermentation, hydration, shaping, texture