Description
This guide helps bakers understand and diagnose their sourdough loaf’s internal structure, known as the crumb. By analyzing the crumb, bakers can identify issues related to fermentation, hydration, and handling, leading to consistent improvement in their sourdough baking. It covers various crumb textures, common problems like overproofing, and practical advice for achieving an ideal open, airy, and delicious loaf.
Ingredients
Instructions
1. 1. Allow Your Loaf to Cool Completely: This is perhaps the most crucial step. Slicing into a warm loaf will compress the crumb, making it appear denser than it actually is and potentially ruining its true structure. Wait at least 2-3 hours, or even overnight, for your loaf to cool down to room temperature.
2. 2. Slice the Loaf in Half: Using a sharp bread knife, cut your cooled sourdough loaf directly in half, from top to bottom, through the center. This gives you the best cross-section for examination.
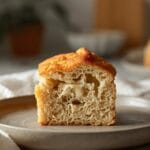
3. 3. Observe the Overall Structure: Look at the exposed surface. Is it uniform, or are there large, irregular holes? Is the crumb dense and heavy, or light and airy? Take a mental note of your initial impressions.
4. 4. Examine the Hole Distribution: Pay close attention to the size and distribution of the air pockets (alveoli). Are they evenly spread throughout the loaf? Are there large tunnels, or is it a tight, uniform network of small holes?
5. 5. Assess the Crumb Texture: Gently press the crumb with your finger. Does it spring back easily, or does it feel gummy and dense? A good crumb should be soft, moist, and resilient.
6. 6. Check for Any Dense Spots or Tunnels: Look for areas that are significantly denser than the rest of the loaf, particularly at the bottom or edges. Conversely, note if there are very large, isolated tunnels, often referred to as “flying crust.
7. 7. Compare with Ideal Crumb Characteristics: Mentally (or physically, if you have reference photos) compare your loaf’s crumb to what is generally considered an ideal sourdough crumb: an open, irregular, but well-distributed network of holes, a moist and tender texture, and no large, dense patches.
- Prep Time: 5-10 minutes
- Cook Time: 0 minutes
- Category: baking
- Method: observation
- Cuisine: european
Nutrition
- Serving Size: 1 slice
Keywords: sourdough, baking, crumb, analysis, bread, fermentation, hydration, proofing, technique, guide