Description
This guide helps sourdough bakers understand and evaluate their bread’s crumb structure, offering insights to consistently achieve an open, airy, and consistent texture. It’s a practical tool for troubleshooting and improving homemade sourdough loaves.
Ingredients
Instructions
1. Allow Your Bread to Cool Completely: This is the most crucial first step. Slicing warm sourdough can compress the crumb, making it appear denser than it truly is and giving a false impression of its structure. Wait at least 2-4 hours, or even overnight, for the bread to fully cool.
2. Slice Through the Center of the Loaf: Use a sharp bread knife to make a clean, straight cut right through the middle of your loaf. This central slice will give you the most accurate representation of the overall crumb structure. Avoid tearing or sawing motions that can distort the crumb.
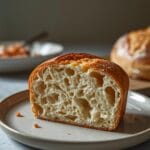
3. Observe the Overall Distribution of Holes (Alveoli): Look at the entire cross-section. Are the holes evenly distributed, or are there large, irregular tunnels with dense areas around them? A good crumb typically has a relatively even distribution, though some artisanal loaves might have a few larger, more irregular holes.
4. Examine the Size and Shape of the Holes: Are the holes small and uniform, or a mix of small and large? Are they round, or more elongated? Small, uniform holes often indicate a tighter crumb, while a mix of sizes, including some larger, irregular ones, suggests a more open crumb. Elongated holes can sometimes point to issues with shaping or gas retention.
5. Assess the Texture and Sheen of the Crumb: Gently press the crumb with your finger. Does it spring back? Is it moist and slightly translucent, or dry and opaque? A well-fermented and baked crumb should be soft, elastic, and have a slight sheen, indicating good gelatinization of starches. A gummy or overly wet crumb suggests underbaking or over-proofing.
6. Compare Your Crumb to a Crumb Chart (Mental or Physical): Now, compare your observations to a typical sourdough crumb chart (which you can find online or create mentally based on experience). Identify where your crumb falls on the spectrum from dense to very open. Note down what you see.
7. Connect Crumb Observations to Your Baking Process: This is where the real learning happens. Based on your crumb’s characteristics, think back to your process: hydration level, starter activity, mixing, bulk fermentation, shaping, proofing, and baking. For example, a dense crumb might suggest an under-active starter, insufficient fermentation, or under-proofing. An overly open, uneven crumb could point to issues with shaping or gas retention.
8. Formulate a Plan for Improvement: Based on your analysis, decide what single variable you might adjust in your next bake. Don’t try to change everything at once. Focus on one aspect, like increasing bulk fermentation time slightly, or refining your shaping technique.
- Prep Time: 5 minutes
- Cook Time: 0 minutes
- Category: baking
- Method: evaluation
- Cuisine: american
Nutrition
- Serving Size: 1 slice
Keywords: sourdough, crumb, baking, bread, evaluation, texture, homemade, troubleshooting, guide, fermentation