Description
This guide helps you understand and interpret the crumb texture of your homemade sourdough bread, offering insights to troubleshoot common issues and improve your baking results. It’s a diagnostic tool for bakers to achieve their ideal sourdough crumb.
Ingredients
Instructions
1. Allow Your Loaf to Cool Completely: This is crucial. Slicing warm sourdough can compress the crumb, making it difficult to accurately assess its true texture. Wait at least 2-4 hours, or even overnight, for the bread to fully cool.
2. Make a Clean Slice: Using a sharp bread knife, cut a slice from the center of your loaf. A clean cut prevents tearing or squishing the crumb, allowing for a clear view of its internal structure.
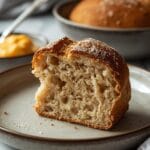
3. Examine the Overall Structure: Hold the slice up to good light. Look at the distribution of holes (alveoli). Are they evenly spread, or are there large, irregular tunnels? Is the crumb dense and uniform, or open and airy?
4. Assess Hole Size and Shape: Note the size and shape of the holes. Small, tight holes often indicate under-proofing or insufficient gluten development. Large, irregular holes can point to over-proofing or issues with shaping.
5. Look for Consistency: Is the crumb consistent throughout the slice, or does it vary significantly from the center to the edges? Inconsistent crumb can suggest uneven fermentation or shaping problems.
6. Feel the Texture: Gently press and feel the crumb. Does it spring back? Is it gummy, dry, or perfectly moist and tender? A gummy texture often indicates under-baking or too much moisture.
7. Compare to Reference Images: Use visual references (like those found in comprehensive sourdough guides) to compare your crumb to examples of ideal, under-proofed, over-proofed, or under-kneaded crumbs. This helps you identify specific issues.
8. Document Your Findings: Take a photo of your crumb and make notes about what you observe. This creates a valuable record for tracking your progress and understanding the impact of changes in your baking process.
- Prep Time: 1-2 minutes
- Cook Time: 0 minutes
- Category: baking guide
- Method: observation
- Cuisine: sourdough
Nutrition
- Serving Size: 1 loaf
Keywords: sourdough, crumb, baking, guide, bread, texture, analysis, homemade, troubleshooting, fermentation