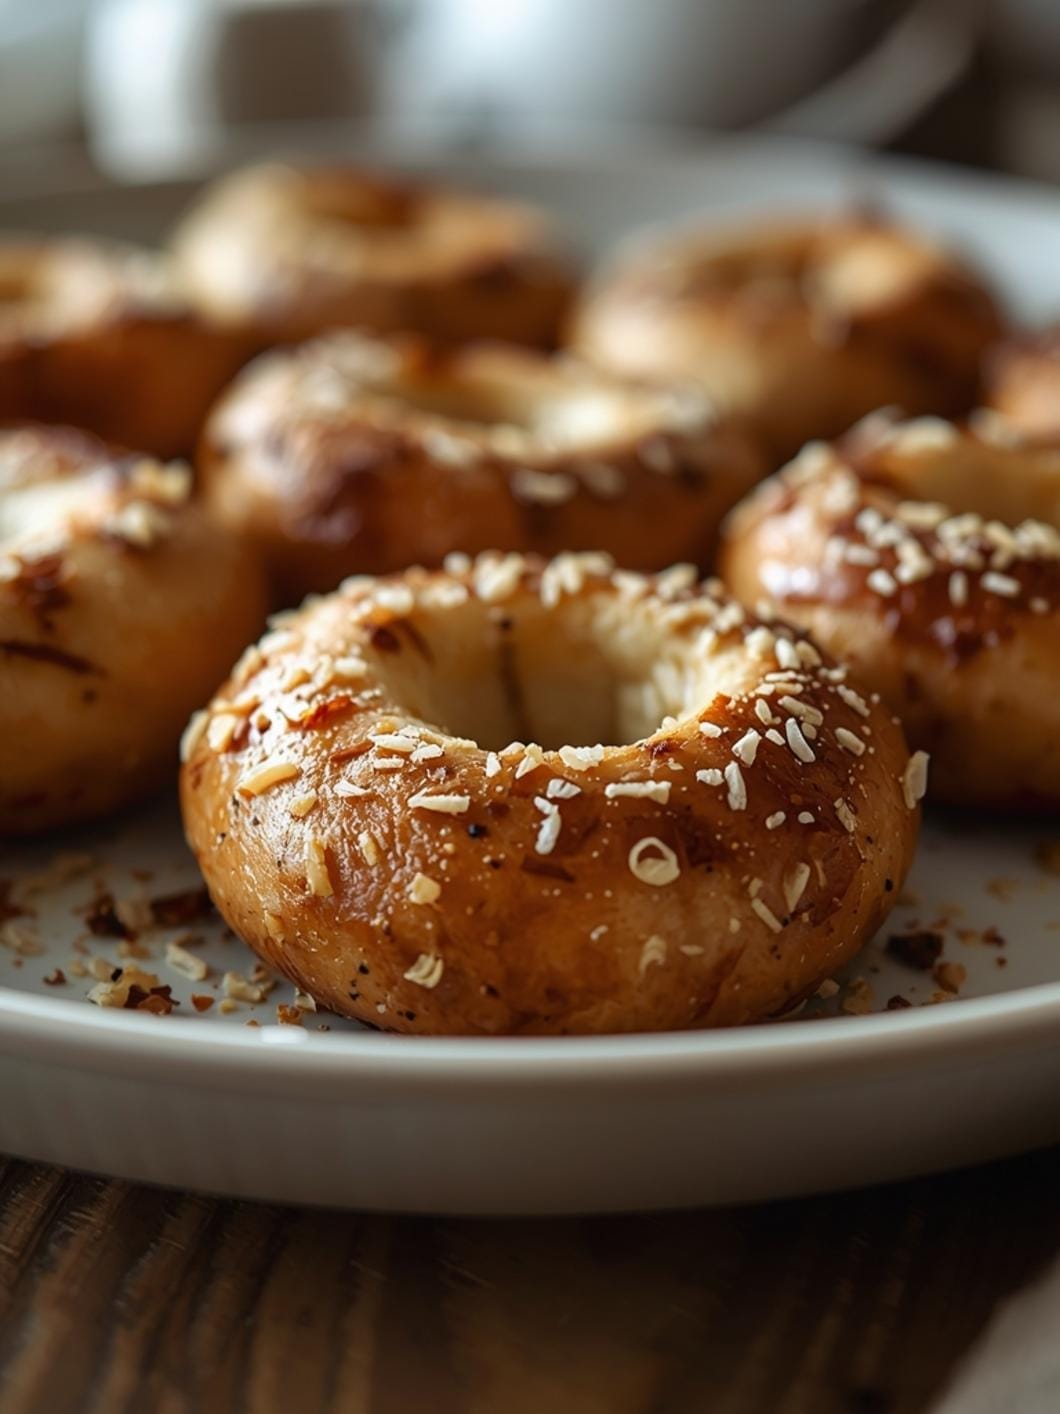
Craving that perfect chewy bagel with a savory crunch, but don’t want to spend hours in the kitchen? This recipe for Chewy Sesame Sourdough Bagels, topped with a flavorful everything seasoning, brings the authentic bakery experience right to your home. It’s a rewarding project that yields incredibly delicious results, perfect for breakfast, brunch, or a satisfying snack.

Get ready to dive into the wonderful world of homemade bagels. This recipe focuses on creating that signature chewy texture using a sourdough base, then elevating it with the beloved “everything” topping. Whether you’re a seasoned baker or just starting your sourdough journey, these bagels are surprisingly achievable and utterly irresistible.
Table of Contents
- What You’ll Love About This Quick And Easy Recipe
- Everything You Need To Make This Recipe Without Stress
- Time Needed From Start To Finish
- How To Make It Step By Step With Visual Cues
- Easy Variations And Serving Ideas That Fit Real Life
- Common Slip-Ups And How To Avoid Them
- How To Store It And Make It Ahead Without Ruining Texture

Chewy Everything Sourdough Bagels
- Total Time: 12-24 hours
- Yield: 8-10 bagels 1x
Description
This recipe for Chewy Everything Sourdough Bagels brings the authentic bakery experience right to your home. It’s a rewarding project that yields incredibly delicious results, perfect for breakfast, brunch, or a satisfying snack. This recipe focuses on creating that signature chewy texture using a sourdough base, then elevating it with the beloved “everything” topping. Whether you’re a seasoned baker or just starting your sourdough journey, these bagels are surprisingly achievable and utterly irresistible.
Ingredients
Instructions
1. Mixing the Dough: In a large bowl, combine the active sourdough starter, warm water, bread flour, 10 grams of salt, and 1 tablespoon of sugar or malt powder. Mix with a spoon or your hands until a shaggy dough forms and no dry flour remains. Cover the bowl with a damp cloth or plastic wrap and let it rest for 30 minutes (autolyse).
2. Developing the Dough: After the rest, knead the dough on a lightly floured surface for 8-10 minutes until it becomes smooth and elastic. Alternatively, use a stand mixer with a dough hook on medium speed for 5-7 minutes. Place the dough back in the lightly oiled bowl, cover, and let it bulk ferment at room temperature for 4-8 hours, performing 2-3 sets of stretch and folds during the first 2 hours. The dough should become slightly puffy.
3. Shaping the Bagels: Gently turn the dough out onto a lightly floured surface. Divide it into 8-10 equal pieces (about 100-120 grams each). Roll each piece into a tight ball, then use your thumb to poke a hole through the center. Gently stretch the hole to about 1-1.5 inches in diameter, trying to keep the bagel even in thickness. Place the shaped bagels on a parchment-lined baking sheet.
4. Cold Fermentation (Overnight Proof): Cover the baking sheet loosely with plastic wrap and refrigerate the bagels for 8-12 hours, or overnight. This slow, cold fermentation develops deeper flavor and a chewier texture.
5. Prepare for Boiling and Baking: Preheat your oven to 425 F (220 C) with a baking stone or inverted baking sheet inside, if you have one, to ensure a crispy bottom. Bring a large pot of water to a rolling boil. Add the baking soda and the remaining 2 tablespoons of sugar or malt powder to the boiling water. Line another baking sheet with parchment paper.
6. Boiling and Topping: Carefully drop 2-3 bagels into the boiling water at a time, ensuring they don’t overcrowd the pot. Boil for 30-60 seconds per side. The longer they boil, the chewier they will be. Remove them with a slotted spoon, letting excess water drain, and place them on the prepared baking sheet. Brush the tops of the boiled bagels with the lightly beaten egg white and generously sprinkle with the everything bagel seasoning.
7. Baking the Bagels: Transfer the baking sheet with the topped bagels to the preheated oven. Bake for 18-25 minutes, or until golden brown and cooked through. If using a baking stone, carefully transfer the bagels directly onto the stone. Rotate the baking sheet halfway through baking for even browning.
8. Cooling and Serving: Once baked, transfer the bagels to a wire rack to cool completely. This cooling period is crucial for the texture to set. Enjoy them warm or at room temperature.
- Prep Time: 20-30 minutes
- Cook Time: 25-30 minutes
- Category: bread
- Method: baking
- Cuisine: american
Nutrition
- Serving Size: 1 bagel
Keywords: sourdough, bagels, everything bagel, chewy, breakfast, brunch, bread, homemade, baking, savory
What You’ll Love About This Quick And Easy Recipe
This recipe is a true gem for anyone who appreciates the depth of flavor that sourdough brings, combined with the satisfying chew of a perfectly baked bagel. It’s ideal for home bakers looking to expand their skills beyond basic bread, offering a project that feels special without being overly complicated. You’ll love the hands-on process of shaping the bagels and watching them transform in the oven. These bagels are fantastic for weekend breakfasts, impressive enough for a brunch spread, or simply to enjoy toasted with your favorite cream cheese any day of the week. The “everything” seasoning adds a burst of garlic, onion, and sesame, making every bite an adventure.
Everything You Need To Make This Recipe Without Stress
Gathering your ingredients before you start ensures a smooth and enjoyable baking process. While sourdough might sound intimidating, the ingredients themselves are quite straightforward, focusing on pantry staples.
INGREDIENTS:

- 150 grams active sourdough starter (fed and bubbly)
- 300 grams warm water (around 90-100°F / 32-38°C)
- 500 grams bread flour
- 10 grams fine sea salt
- 1 tablespoon granulated sugar or malt powder (for the dough)
- 1 tablespoon baking soda (for the boiling water)
- 2 tablespoons granulated sugar or malt powder (for the boiling water)
- 1 large egg white, lightly beaten (for egg wash)
- 1/2 cup everything bagel seasoning
For the bread flour, using a high-protein variety is key to developing that characteristic chewy texture. If you don’t have malt powder, granulated sugar works perfectly well in both the dough and the boiling water bath, contributing to browning and flavor. The everything bagel seasoning can be store-bought or easily made at home by combining dried minced garlic, dried minced onion, white sesame seeds, black sesame seeds, poppy seeds, and flaky sea salt.
Time Needed From Start To Finish
- Prep Time: 20-30 minutes (mixing dough, shaping bagels)
- Bulk Fermentation: 4-8 hours (depending on starter activity and room temperature)
- Cold Fermentation (Optional but Recommended): 8-12 hours or overnight
- Boiling and Baking Time: 25-30 minutes
- Total Active Time: Approximately 45-60 minutes
- Total Overall Time (including fermentation): 12-24 hours
How To Make It Step By Step With Visual Cues

Creating these chewy sourdough bagels is a rewarding process. Follow these steps for perfect results.
- Mixing the Dough: In a large bowl, combine the active sourdough starter, warm water, bread flour, 10 grams of salt, and 1 tablespoon of sugar or malt powder. Mix with a spoon or your hands until a shaggy dough forms and no dry flour remains. Cover the bowl with a damp cloth or plastic wrap and let it rest for 30 minutes (autolyse).
- Developing the Dough: After the rest, knead the dough on a lightly floured surface for 8-10 minutes until it becomes smooth and elastic. Alternatively, use a stand mixer with a dough hook on medium speed for 5-7 minutes. Place the dough back in the lightly oiled bowl, cover, and let it bulk ferment at room temperature for 4-8 hours, performing 2-3 sets of stretch and folds during the first 2 hours. The dough should become slightly puffy.
- Shaping the Bagels: Gently turn the dough out onto a lightly floured surface. Divide it into 8-10 equal pieces (about 100-120 grams each). Roll each piece into a tight ball, then use your thumb to poke a hole through the center. Gently stretch the hole to about 1-1.5 inches in diameter, trying to keep the bagel even in thickness. Place the shaped bagels on a parchment-lined baking sheet.
- Cold Fermentation (Overnight Proof): Cover the baking sheet loosely with plastic wrap and refrigerate the bagels for 8-12 hours, or overnight. This slow, cold fermentation develops deeper flavor and a chewier texture.
- Prepare for Boiling and Baking: Preheat your oven to 425°F (220°C) with a baking stone or inverted baking sheet inside, if you have one, to ensure a crispy bottom. Bring a large pot of water to a rolling boil. Add the baking soda and the remaining 2 tablespoons of sugar or malt powder to the boiling water. Line another baking sheet with parchment paper.
- Boiling and Topping: Carefully drop 2-3 bagels into the boiling water at a time, ensuring they don’t overcrowd the pot. Boil for 30-60 seconds per side. The longer they boil, the chewier they will be. Remove them with a slotted spoon, letting excess water drain, and place them on the prepared baking sheet. Brush the tops of the boiled bagels with the lightly beaten egg white and generously sprinkle with the everything bagel seasoning.
- Baking the Bagels: Transfer the baking sheet with the topped bagels to the preheated oven. Bake for 18-25 minutes, or until golden brown and cooked through. If using a baking stone, carefully transfer the bagels directly onto the stone. Rotate the baking sheet halfway through baking for even browning.
- Cooling and Serving: Once baked, transfer the bagels to a wire rack to cool completely. This cooling period is crucial for the texture to set. Enjoy them warm or at room temperature.
Easy Variations And Serving Ideas That Fit Real Life
These sourdough everything bagels are incredibly versatile and can be adapted to suit various tastes and occasions. For a kid-friendly twist, you could skip the everything seasoning on some bagels and instead top them with plain sesame seeds or a sprinkle of flaky salt. You can also experiment with different toppings entirely – poppy seeds, plain sesame seeds, or even a cinnamon-sugar mixture for a sweeter option (just omit the egg wash and brush with melted butter before sprinkling).
These bagels are perfect for a weekend brunch spread, served alongside cream cheese, smoked salmon, capers, and sliced red onion. They make excellent breakfast sandwiches with eggs, cheese, and bacon. For a quick lunch, try them with avocado and a sprinkle of red pepper flakes, or as the base for a mini pizza. Don’t forget the classic schmear – plain, chive, or even a sweet strawberry cream cheese.
Common Slip-Ups And How To Avoid Them
Even experienced bakers can encounter small issues, but knowing what to look for can prevent common mistakes.
- Under-proofed or Over-proofed Dough: If your dough doesn’t rise much during bulk fermentation, it might be under-proofed, leading to dense bagels. If it’s too sticky and hard to handle, it might be over-proofed. Pay attention to the “jiggle test” – gently shake the bowl; the dough should jiggle slightly. Adjust fermentation time based on your room temperature and starter activity.
- Holes Closing Up: If the hole in your bagel disappears during boiling or baking, it means you didn’t stretch it wide enough initially. Aim for a 1 to 1.5-inch hole that’s stretched evenly.
- Bagels Sticking to Parchment: Ensure your parchment paper is lightly floured or oiled, especially after the cold fermentation, to prevent sticking when transferring to the boiling water.
- Flat Bagels: This can be due to too much water in the dough, under-kneading, or over-proofing. Make sure your dough is firm and elastic after kneading.
- Uneven Browning: Rotating your baking sheet halfway through the baking process helps ensure all sides of the bagels get evenly golden.
How To Store It And Make It Ahead Without Ruining Texture
Homemade bagels are best enjoyed fresh, but they can certainly be stored and even made ahead for convenience.
- Short-Term Storage: Once completely cooled, store bagels in an airtight container or a plastic bag at room temperature for up to 2-3 days. To refresh, simply slice and toast them.
- Freezing for Longer Storage: For longer storage, slice the cooled bagels in half, then place them in a freezer-safe bag. They will keep well in the freezer for up to 3 months. When ready to eat, you can toast them directly from frozen, or let them thaw at room temperature for a

FAQs
- Can I make these ahead? Yes—prep ahead, refrigerate, then serve when ready.
- How long do leftovers last? Store covered in the fridge for 3–4 days for best texture.
- Can I adjust sweetness? Yes—add more or less sweetener to taste.
- Can I change the fruit? Yes—swap strawberries for blueberries, raspberries, or sliced banana.