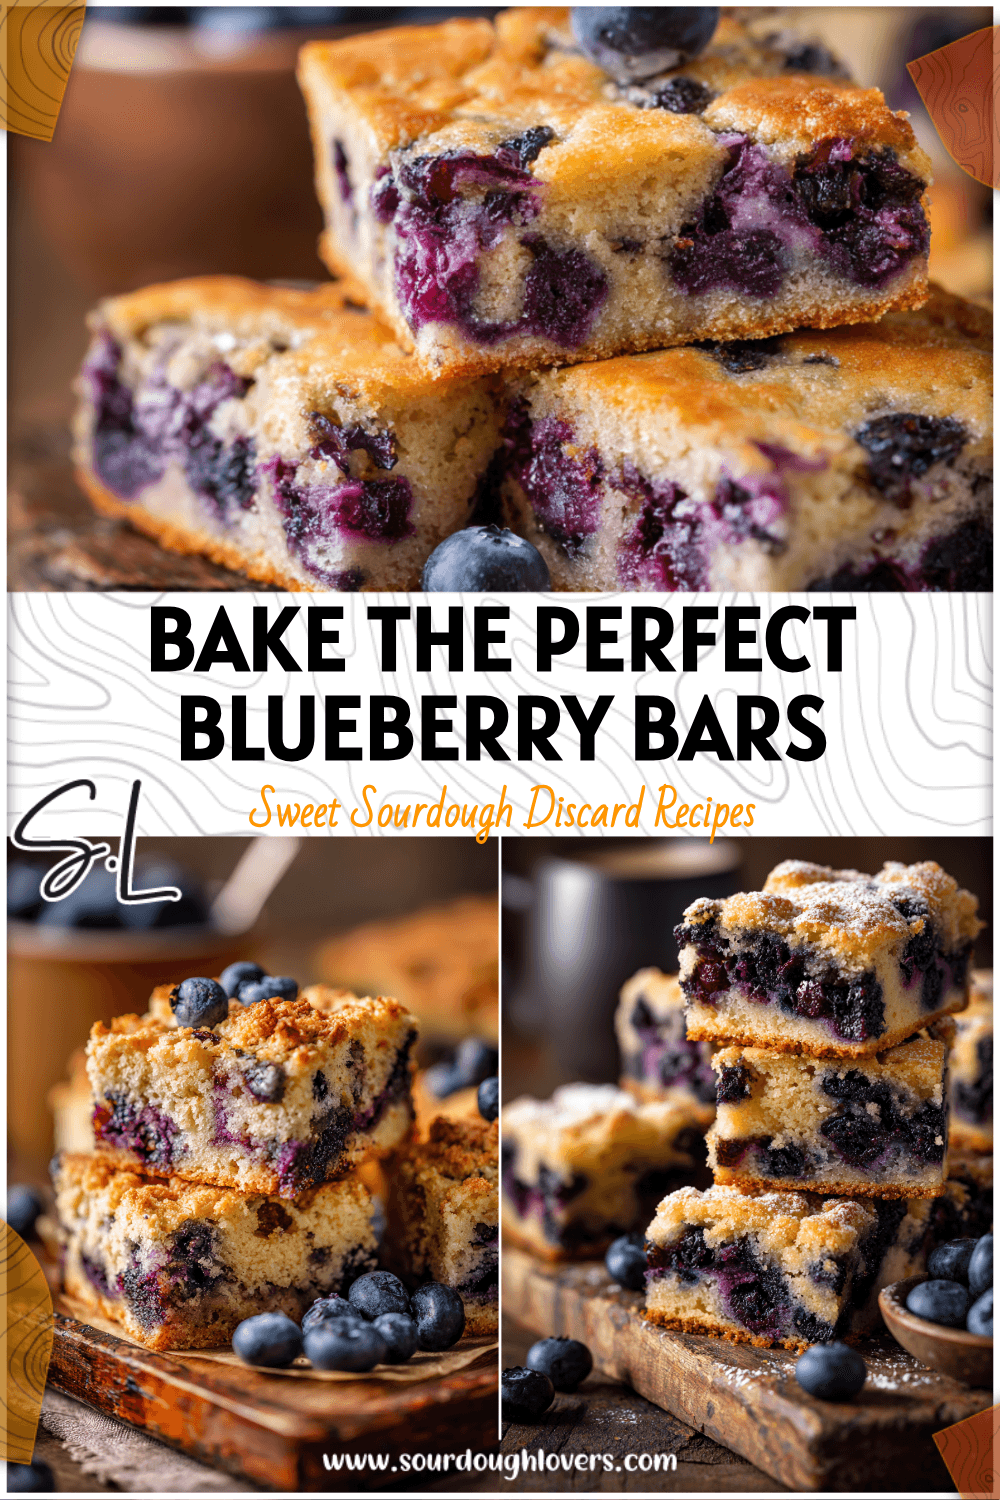
Craving a sweet treat that fits nearly every dietary need? These delicious blueberry crumble bars are here to save the day! They’re incredibly easy to whip up, making them perfect for busy weeknights, last-minute potlucks, or simply satisfying that dessert craving without any fuss.

This recipe delivers a delightful balance of sweet, juicy blueberries nestled between a tender, crumbly crust and topping. Best of all, it’s completely gluten-free, dairy-free, vegan, and nut-free, ensuring everyone at your table can enjoy a guilt-free indulgence.
Table of Contents
- What You’ll Love About This Quick And Easy Recipe
- Everything You Need To Make This Recipe Without Stress
- Time Needed From Start To Finish
- How To Make It Step By Step With Visual Cues
- Easy Variations And Serving Ideas That Fit Real Life
- Common Slip-Ups And How To Avoid Them
- How To Store It And Make It Ahead Without Ruining Texture
- Questions People Always Ask Before Making This Recipe

Gluten-Free Dairy-Free Blueberry Crumble Bars
- Total Time: 1 hour 20 minutes - 1 hour 55 minutes
- Yield: 16 bars 1x
Description
These easy-to-make blueberry crumble bars are gluten-free, dairy-free, vegan, and nut-free, making them a perfect treat for almost any dietary need. They feature a sweet and juicy blueberry filling nestled between a tender, crumbly crust and topping, ideal for busy weeknights or potlucks.
Ingredients
Instructions
1. Preheat your oven to 375 F (190 C). Line an 8×8-inch square baking pan with parchment paper, leaving an overhang on two sides to easily lift the bars out later. Lightly grease the parchment paper.
2. In a large bowl, whisk together the gluten-free flour blend, rolled oats, granulated sugar, brown sugar, baking powder, and salt until well combined.
3. Add the cold, cubed dairy-free butter to the dry ingredients. Use a pastry blender, your fingertips, or a fork to cut the butter into the flour mixture until it resembles coarse crumbs with some pea-sized pieces remaining. Stir in the vanilla extract.
4. Press about two-thirds of the crumble mixture evenly into the bottom of the prepared baking pan. Use the back of a spoon or your hands to create a firm, compact base.
5. In a separate medium bowl, gently toss the blueberries (fresh or frozen, unthawed) with the lemon juice and cornstarch (or arrowroot powder) until the blueberries are lightly coated.
6. Spread the blueberry filling evenly over the pressed crumble base in the pan. Then, sprinkle the remaining one-third of the crumble mixture over the blueberry layer, creating the top crust.
7. Place the baking pan in the preheated oven and bake for 35-40 minutes, or until the top is golden brown and the blueberry filling is bubbly.
8. Remove the pan from the oven and place it on a wire rack to cool completely. The bars need to be fully cooled (at least 30-60 minutes, or even longer) before slicing to ensure they hold their shape. Once cooled, use the parchment paper overhang to lift the entire slab of bars out of the pan and cut into squares.
- Prep Time: 15 minutes
- Cook Time: 35-40 minutes
- Category: dessert
- Method: baking
- Cuisine: american
Nutrition
- Serving Size: 1 bar
Keywords: blueberry, crumble, bars, gluten-free, dairy-free, vegan, nut-free, dessert, easy, bake
What You’ll Love About This Quick And Easy Recipe
This recipe is a true winner for so many reasons. It’s designed for the home cook who wants maximum flavor with minimal effort, making it ideal for beginners and seasoned bakers alike. You’ll appreciate how straightforward the ingredient list is and how quickly these bars come together. They’re perfect for a casual family dessert, a lunchbox treat, or a contribution to a school bake sale where dietary restrictions are often a concern. The sweet-tart burst of blueberries combined with the satisfying crumble texture is simply irresistible, and because it’s free from so many common allergens, it’s a dish you can confidently share with almost anyone.
Everything You Need To Make This Recipe Without Stress
Gathering your ingredients for these blueberry crumble bars is a breeze. Most items are likely already in your pantry, and any specialty flours or dairy-free alternatives are widely available in most grocery stores. The beauty of this recipe lies in its simplicity and accessibility.
INGREDIENTS:

- 1 ½ cups gluten-free all-purpose flour blend (with xanthan gum)
- ½ cup rolled oats (certified gluten-free)
- ½ cup granulated sugar
- ½ cup packed light brown sugar
- 1 teaspoon baking powder
- ½ teaspoon salt
- ¾ cup cold dairy-free butter, cut into small pieces
- 1 teaspoon vanilla extract
- 2 cups fresh or frozen blueberries
- 2 tablespoons lemon juice
- 1 tablespoon cornstarch or arrowroot powder
When selecting your gluten-free flour blend, ensure it contains xanthan gum, as this helps with the structure and texture of the bars. If your blend doesn’t include it, you might add ¼ teaspoon per cup of flour. For the dairy-free butter, choose a stick-style vegan butter alternative that is firm when cold, as this will yield the best crumble texture. Fresh blueberries are wonderful when in season, but frozen blueberries work just as well; just don’t thaw them before mixing.
Time Needed From Start To Finish
Preparing these delightful blueberry crumble bars is a relatively quick process, perfect for when you want a homemade treat without spending hours in the kitchen.
- Preparation time: 15 minutes
- Baking time: 35-40 minutes
- Cooling time: 30-60 minutes (essential for firm bars)
- Total time: Approximately 1 hour 20 minutes to 1 hour 55 minutes
While the active prep and bake time are under an hour, allowing the bars to cool completely is crucial for them to set properly and be easy to cut. Don’t rush this step!
How To Make It Step By Step With Visual Cues

Making these blueberry crumble bars is a straightforward process. Follow these simple steps for a perfect batch every time.
- Prepare your baking dish and oven: Preheat your oven to 375°F (190°C). Line an 8×8-inch square baking pan with parchment paper, leaving an overhang on two sides to easily lift the bars out later. Lightly grease the parchment paper.
- Combine dry ingredients for the crumble: In a large bowl, whisk together the gluten-free flour blend, rolled oats, granulated sugar, brown sugar, baking powder, and salt until well combined.
- Cut in the dairy-free butter: Add the cold, cubed dairy-free butter to the dry ingredients. Use a pastry blender, your fingertips, or a fork to cut the butter into the flour mixture until it resembles coarse crumbs with some pea-sized pieces remaining. Stir in the vanilla extract.
- Form the base layer: Press about two-thirds of the crumble mixture evenly into the bottom of the prepared baking pan. Use the back of a spoon or your hands to create a firm, compact base.
- Prepare the blueberry filling: In a separate medium bowl, gently toss the blueberries (fresh or frozen, unthawed) with the lemon juice and cornstarch (or arrowroot powder) until the blueberries are lightly coated.
- Assemble the layers: Spread the blueberry filling evenly over the pressed crumble base in the pan. Then, sprinkle the remaining one-third of the crumble mixture over the blueberry layer, creating the top crust.
- Bake the bars: Place the baking pan in the preheated oven and bake for 35-40 minutes, or until the top is golden brown and the blueberry filling is bubbly.
- Cool completely before slicing: Remove the pan from the oven and place it on a wire rack to cool completely. This is a critical step; the bars need to be fully cooled (at least 30-60 minutes, or even longer) before slicing to ensure they hold their shape. Once cooled, use the parchment paper overhang to lift the entire slab of bars out of the pan and cut into squares.
Easy Variations And Serving Ideas That Fit Real Life
These blueberry crumble bars are wonderfully versatile and can be adapted to suit different tastes or occasions. For a fun twist, consider swapping out half of the blueberries for raspberries or blackberries for a mixed berry crumble. If you’re not strictly nut-free, a sprinkle of chopped pecans or walnuts in the crumble topping before baking can add a delightful crunch.
For serving, these bars are fantastic on their own, but a scoop of dairy-free vanilla ice cream or a dollop of coconut whipped cream takes them to the next level. They make an excellent addition to a brunch spread, a simple dessert after dinner, or even a grab-and-go breakfast bar. Kids especially love them in their lunchboxes or as an after-school snack. You can also dust them with a little powdered sugar just before serving for an extra touch of elegance.
Common Slip-Ups And How To Avoid Them
Even simple recipes can have small pitfalls. Here are a few common mistakes to watch out for when making these blueberry crumble bars:
- Not chilling the dairy-free butter: Using cold butter is essential for a crumbly texture. If your butter is too soft, the crumble will be more like a dough. If it warms up too much while you’re mixing, pop it back in the fridge for a few minutes.
- Overworking the crumble mixture: When cutting in the butter, avoid overmixing. You want coarse crumbs, not a smooth dough. Overworking can lead to a tough crust.
- Not pressing the base firmly enough: A loose base layer can fall apart when you cut the bars. Make sure to press it down well with a spoon or your hands.
- Thawing frozen blueberries: If using frozen blueberries, do not thaw them before tossing with cornstarch and lemon juice. Adding them frozen helps prevent the filling from becoming too watery during baking.
- Cutting the bars too soon: This is perhaps the most common mistake. The bars need to cool completely for the filling to set and the crust to firm up. If you cut them while warm, they will likely crumble and fall apart. Patience is key here!
- Forgetting the parchment paper: While not a disaster, using parchment paper makes lifting the entire batch out of the pan incredibly easy, preventing sticking and making clean cuts.
How To Store It And Make It Ahead Without Ruining Texture
These blueberry crumble bars are fantastic for making ahead and storing, making them an excellent option for meal prep or entertaining.
Once completely cooled, store the bars in an airtight container at room temperature for up to 3 days. If you want to extend their freshness, you can store them in the refrigerator for up to 5-7 days. Just be aware that refrigeration might make the crust a little firmer.
For longer storage, these bars freeze beautifully. Once completely cooled, cut them into individual squares. Place them in a single layer on a baking sheet and freeze until solid (about 1-2 hours). Then, transfer the frozen bars to a freezer-safe bag or container, separating layers with parchment paper, for up to 3 months. To enjoy, simply thaw them at room temperature or warm them gently in the microwave or oven until heated through.
Questions People Always Ask Before Making This Recipe
Can I use a different fruit instead of blueberries? Absolutely! This recipe is very adaptable. You can use other berries like raspberries, blackberries, or even a mix. Just ensure the fruit is tossed with cornstarch to manage moisture.
What if my gluten-free flour blend doesn’t have xanthan gum? If your blend doesn’t include xanthan gum, add about ¼ teaspoon of xanthan gum per cup of flour (so, approximately ⅜ teaspoon for this recipe) to help with the structure and binding.
Can I make this recipe sugar-free? While this recipe relies on sugar for both sweetness and texture, you could experiment with granulated sugar substitutes. However, the texture of the crumble may vary

FAQs
- Can I make these ahead? Yes—prep ahead, refrigerate, then serve when ready.
- How long do leftovers last? Store covered in the fridge for 3–4 days for best texture.
- Can I adjust sweetness? Yes—add more or less sweetener to taste.
- Can I change the fruit? Yes—swap strawberries for blueberries, raspberries, or sliced banana.