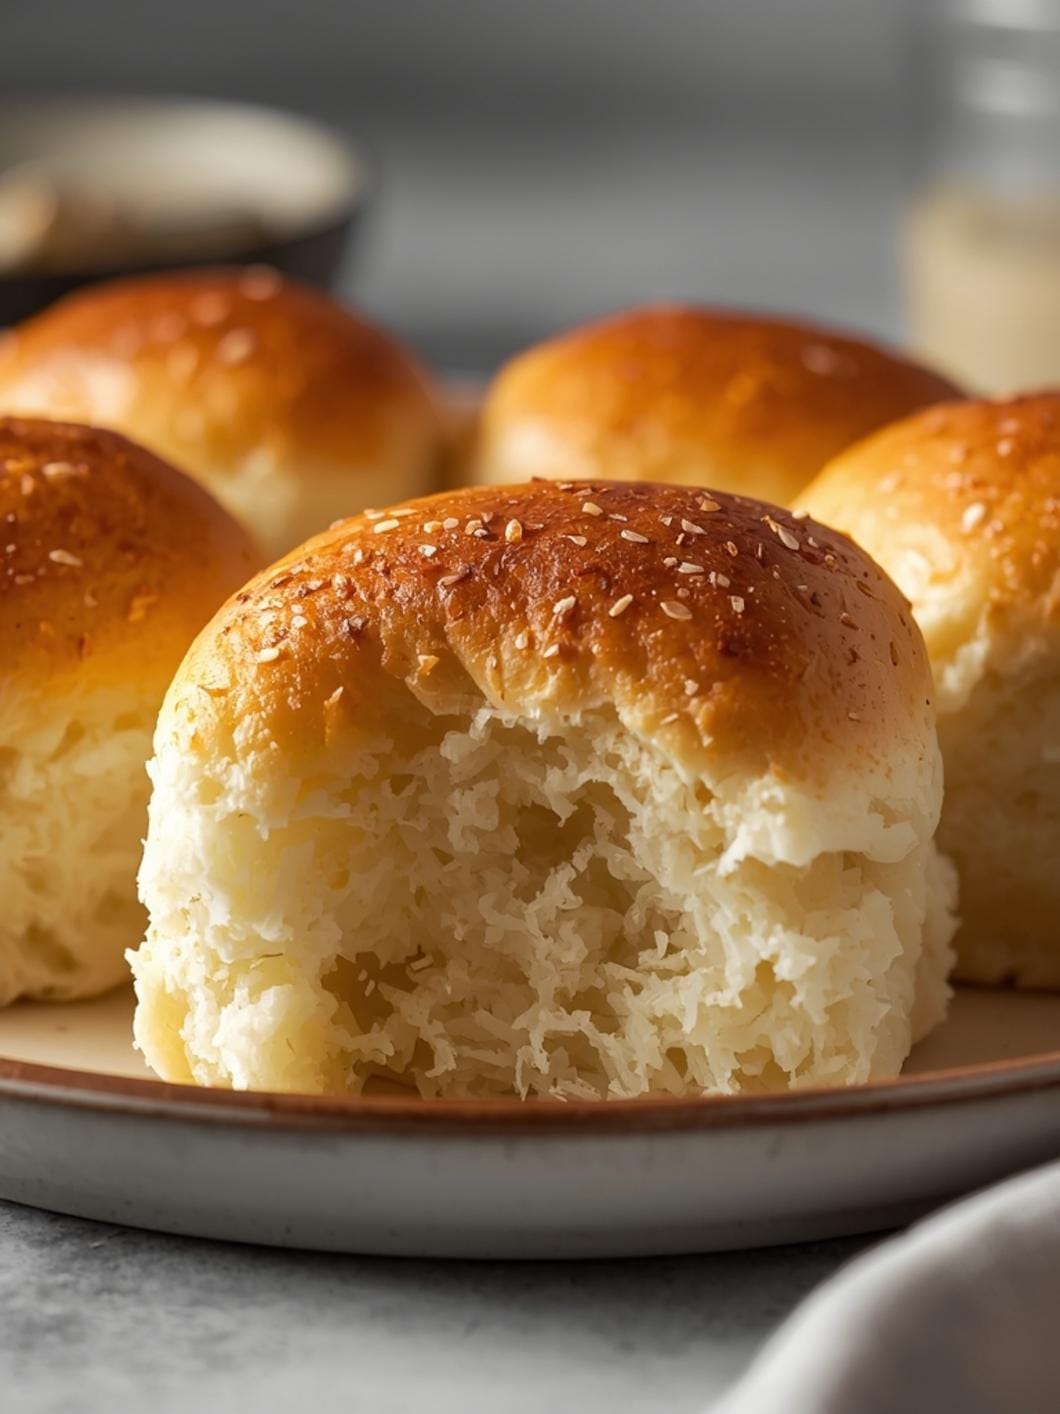
Making delicious gluten-free sourdough bread squares at home is much simpler than you might imagine.
 11")
This recipe is designed for ease, allowing you to transform your gluten-free sourdough starter into savory, satisfying bread squares that are perfect for any occasion. Whether you’re new to gluten-free baking or a seasoned pro, you’ll appreciate how straightforward and rewarding this process is.
These homemade gluten-free sourdough bread squares offer a wonderful texture and a subtle tang that complements a wide range of meals. They’re ideal for a quick snack, a side dish with dinner, or even as a base for appetizers. Get ready to enjoy the rich flavors and wholesome goodness of freshly baked gluten-free bread right from your own kitchen.
Table of Contents
- What You’ll Love About This Quick And Easy Recipe
- Everything You Need To Make This Recipe Without Stress
- Time Needed From Start To Finish
- How To Make It Step By Step With Visual Cues
- Easy Variations And Serving Ideas That Fit Real Life
- Common Slip-Ups And How To Avoid Them
- How To Store It And Make It Ahead Without Ruining Texture
 12")
Gluten-Free Sourdough Bread Squares
- Total Time: 35-40 minutes
- Yield: 9 squares 1x
Description
This easy recipe transforms gluten-free sourdough starter into savory, satisfying bread squares, perfect for any occasion. Ideal for new and experienced gluten-free bakers, these versatile squares offer a wonderful texture and subtle tang, great as a snack, side dish, or appetizer base.
Ingredients
Instructions
1. Activate Your Starter and Combine Wet Ingredients: In a large mixing bowl, combine your active gluten-free sourdough starter, warm water, olive oil, and honey or maple syrup. Whisk these ingredients together until they are well combined and the honey has dissolved. The mixture should be slightly bubbly from the active starter.
2. Mix Dry Ingredients: In a separate medium bowl, whisk together the gluten-free all-purpose flour blend, salt, and baking powder. If you’re adding dried herbs, mix them in now as well, ensuring they are evenly distributed throughout the flour.
3. Combine Wet and Dry Mixtures: Gradually add the dry ingredient mixture to the wet ingredients in the large bowl, mixing with a wooden spoon or spatula until a soft, sticky dough forms. Be careful not to overmix; just combine until there are no dry streaks of flour. The dough will be softer and stickier than traditional wheat-based dough.
4. Prepare Baking Pan: Lightly grease an 8×8 inch or 9×9 inch baking pan with olive oil. You can also line it with parchment paper for easier removal, leaving an overhang on the sides to lift the squares out later.
5. Spread the Dough: Transfer the sticky dough into the prepared baking pan. Using a rubber spatula or your lightly oiled hands, gently press and spread the dough evenly across the bottom of the pan. The dough should be about 1/2 to 3/4 inch thick.
6. Add Toppings (Optional) and Bake: If desired, sprinkle the top of the dough with a little extra olive oil and a pinch of flaky sea salt or more dried herbs. Preheat your oven to 375 F (190 C). Bake for 20-25 minutes, or until the bread squares are golden brown on top and cooked through. A toothpick inserted into the center should come out clean.
7. Cool and Cut: Once baked, remove the pan from the oven and let the bread cool in the pan for about 10-15 minutes before carefully lifting it out onto a cutting board. Cut the bread into squares of your desired size. Serve warm and enjoy!
- Prep Time: 15 minutes
- Cook Time: 20-25 minutes
- Category: bread
- Method: baking
- Cuisine: american
Nutrition
- Serving Size: 1 square
Keywords: gluten-free, sourdough, bread, squares, easy, savory, baking, homemade, snack, side dish
What You’ll Love About This Quick And Easy Recipe
This recipe is a game-changer for anyone looking to incorporate more homemade gluten-free options into their diet without a lot of fuss. You’ll love it because it’s incredibly forgiving and uses your active gluten-free sourdough starter, which means you’re already halfway to amazing bread. It’s perfect for busy parents, new bakers, or anyone who wants a delicious gluten-free bread option without spending hours in the kitchen. The squares are wonderfully versatile, making them suitable for breakfast, lunch, or dinner. Serve them alongside a hearty soup, with a fresh salad, or simply enjoy them on their own with a smear of butter or your favorite dip. This recipe truly delivers on flavor and convenience, making gluten-free baking accessible and enjoyable for everyone.
Everything You Need To Make This Recipe Without Stress
Gathering your ingredients before you start baking will make the process smooth and enjoyable. This recipe relies on common gluten-free pantry staples, ensuring you won’t need to hunt for obscure items. The star of the show is your active gluten-free sourdough starter, which provides both leavening and that signature tangy flavor.
INGREDIENTS:
 13")
- 1 cup active gluten-free sourdough starter
- 1/2 cup warm water (about 100-110°F)
- 1 tablespoon olive oil, plus more for greasing
- 1 teaspoon honey or maple syrup
- 1 teaspoon salt
- 1 1/2 cups gluten-free all-purpose flour blend (with xanthan gum)
- 1 teaspoon baking powder
- Optional: 1 tablespoon dried herbs (rosemary, oregano, or Italian blend)
- Optional: Flaky sea salt for topping
When choosing your gluten-free all-purpose flour blend, look for one that specifically states it contains xanthan gum. This gum acts as a binder, replacing the elasticity that gluten provides, which is crucial for the texture of your bread squares. If your blend does not contain xanthan gum, you may need to add about 1/2 teaspoon per cup of flour. For the olive oil, any good quality extra virgin olive oil will work well, adding a nice richness to the bread. Feel free to experiment with different dried herbs to match your taste preferences; rosemary and garlic powder are particularly delicious additions.
Time Needed From Start To Finish
This recipe is designed to be relatively quick and efficient, making it ideal for a weeknight meal or a spontaneous baking session. The hands-on time is minimal, allowing the oven to do most of the work.
- Preparation Time: 15 minutes
- Baking Time: 20-25 minutes
- Total Time: Approximately 35-40 minutes
The preparation time includes mixing your ingredients and spreading the dough. The baking time can vary slightly depending on your oven, so always keep an eye on the squares for that perfect golden-brown finish.
How To Make It Step By Step With Visual Cues
 14")
Follow these simple steps to create your delicious gluten-free sourdough bread squares. The process is straightforward, even for beginner bakers.
- Activate Your Starter and Combine Wet Ingredients: In a large mixing bowl, combine your active gluten-free sourdough starter, warm water, olive oil, and honey or maple syrup. Whisk these ingredients together until they are well combined and the honey has dissolved. The mixture should be slightly bubbly from the active starter.
- Mix Dry Ingredients: In a separate medium bowl, whisk together the gluten-free all-purpose flour blend, salt, and baking powder. If you’re adding dried herbs, mix them in now as well, ensuring they are evenly distributed throughout the flour.
- Combine Wet and Dry Mixtures: Gradually add the dry ingredient mixture to the wet ingredients in the large bowl, mixing with a wooden spoon or spatula until a soft, sticky dough forms. Be careful not to overmix; just combine until there are no dry streaks of flour. The dough will be softer and stickier than traditional wheat-based dough.
- Prepare Baking Pan: Lightly grease an 8×8 inch or 9×9 inch baking pan with olive oil. You can also line it with parchment paper for easier removal, leaving an overhang on the sides to lift the squares out later.
- Spread the Dough: Transfer the sticky dough into the prepared baking pan. Using a rubber spatula or your lightly oiled hands, gently press and spread the dough evenly across the bottom of the pan. The dough should be about 1/2 to 3/4 inch thick.
- Add Toppings (Optional) and Bake: If desired, sprinkle the top of the dough with a little extra olive oil and a pinch of flaky sea salt or more dried herbs. Preheat your oven to 375°F (190°C). Bake for 20-25 minutes, or until the bread squares are golden brown on top and cooked through. A toothpick inserted into the center should come out clean.
- Cool and Cut: Once baked, remove the pan from the oven and let the bread cool in the pan for about 10-15 minutes before carefully lifting it out onto a cutting board. Cut the bread into squares of your desired size. Serve warm and enjoy!
Easy Variations And Serving Ideas That Fit Real Life
These gluten-free sourdough bread squares are incredibly versatile, making them a fantastic addition to almost any meal or snack.
- Mini Pizza Squares: Top the dough with a thin layer of tomato sauce, a sprinkle of mozzarella cheese, and a few mini pepperoni slices before baking for a fun, bite-sized pizza.
- Garlic Bread Sticks: Brush the baked squares with melted butter mixed with garlic powder and a pinch of parsley.
- Dipping Fun: Serve the squares with a side of marinara sauce, hummus, or a mild ranch dip for easy dipping.
- Cheesy Goodness: Mix 1/4 cup shredded cheddar or Parmesan cheese into the dough before baking, or sprinkle it on top during the last 5 minutes of baking.
- Herb Garden Freshness: Instead of dried herbs, finely chop 1-2 tablespoons of fresh herbs like rosemary, thyme, or chives and mix them into the dough.
- Spicy Kick: Add a pinch of red pepper flakes to the dough for a subtle heat.
- Onion & Garlic: Sauté 1/4 cup finely diced onion and 1 clove minced garlic until softened, then mix into the dough.
- Cut the squares into smaller, bite-sized pieces for easy grabbing.
- Arrange them on a platter with a variety of dips like pesto, olive tapenade, or a creamy spinach dip.
- Use them as a base for open-faced sandwiches with cream cheese and smoked salmon, or avocado and everything bagel seasoning.
Common Slip-Ups And How To Avoid Them
Even with a simple recipe, a few common mistakes can impact the outcome. Here’s how to ensure your gluten-free sourdough bread squares turn out perfectly every time.
- Using Inactive Starter: The most crucial element is an active sourdough starter. If your starter isn’t bubbly and active, your bread won’t rise properly. Feed your starter 4-12 hours before you plan to bake and ensure it’s at its peak activity.
- Overmixing the Dough: Gluten-free doughs don’t benefit from extensive mixing like wheat doughs do. Overmixing can lead to a tougher texture. Mix just until the ingredients are combined and no dry flour remains.
- Not Greasing the Pan Enough: Gluten-free bread can be prone to sticking. Be generous with the olive oil when greasing your pan, or use parchment paper, especially if you’re worried about sticking.
- Baking at the Wrong Temperature: An oven that’s too cool will result in dense bread, while one that’s too hot might burn the outside before the inside is cooked. Ensure your oven is preheated to the correct temperature. An oven thermometer can be a useful tool.
- Cutting Too Soon: While tempting, cutting the bread immediately after it comes out of the oven can make it crumbly and difficult to handle. Allow it to cool for at least 10-15 minutes in the pan; this helps the structure set.
How To Store It And Make It Ahead Without Ruining Texture
Proper storage is key to keeping your gluten-free sourdough bread squares fresh and delicious.
- **Storing at Room Temperature
 15")
FAQs
- Can I make these ahead? Yes—prep ahead, refrigerate, then serve when ready.
- How long do leftovers last? Store covered in the fridge for 3–4 days for best texture.
- Can I adjust sweetness? Yes—add more or less sweetener to taste.
- Can I change the fruit? Yes—swap strawberries for blueberries, raspberries, or sliced banana.