There’s something incredibly satisfying about freshly baked bread, especially when it fills your home with an irresistible aroma.

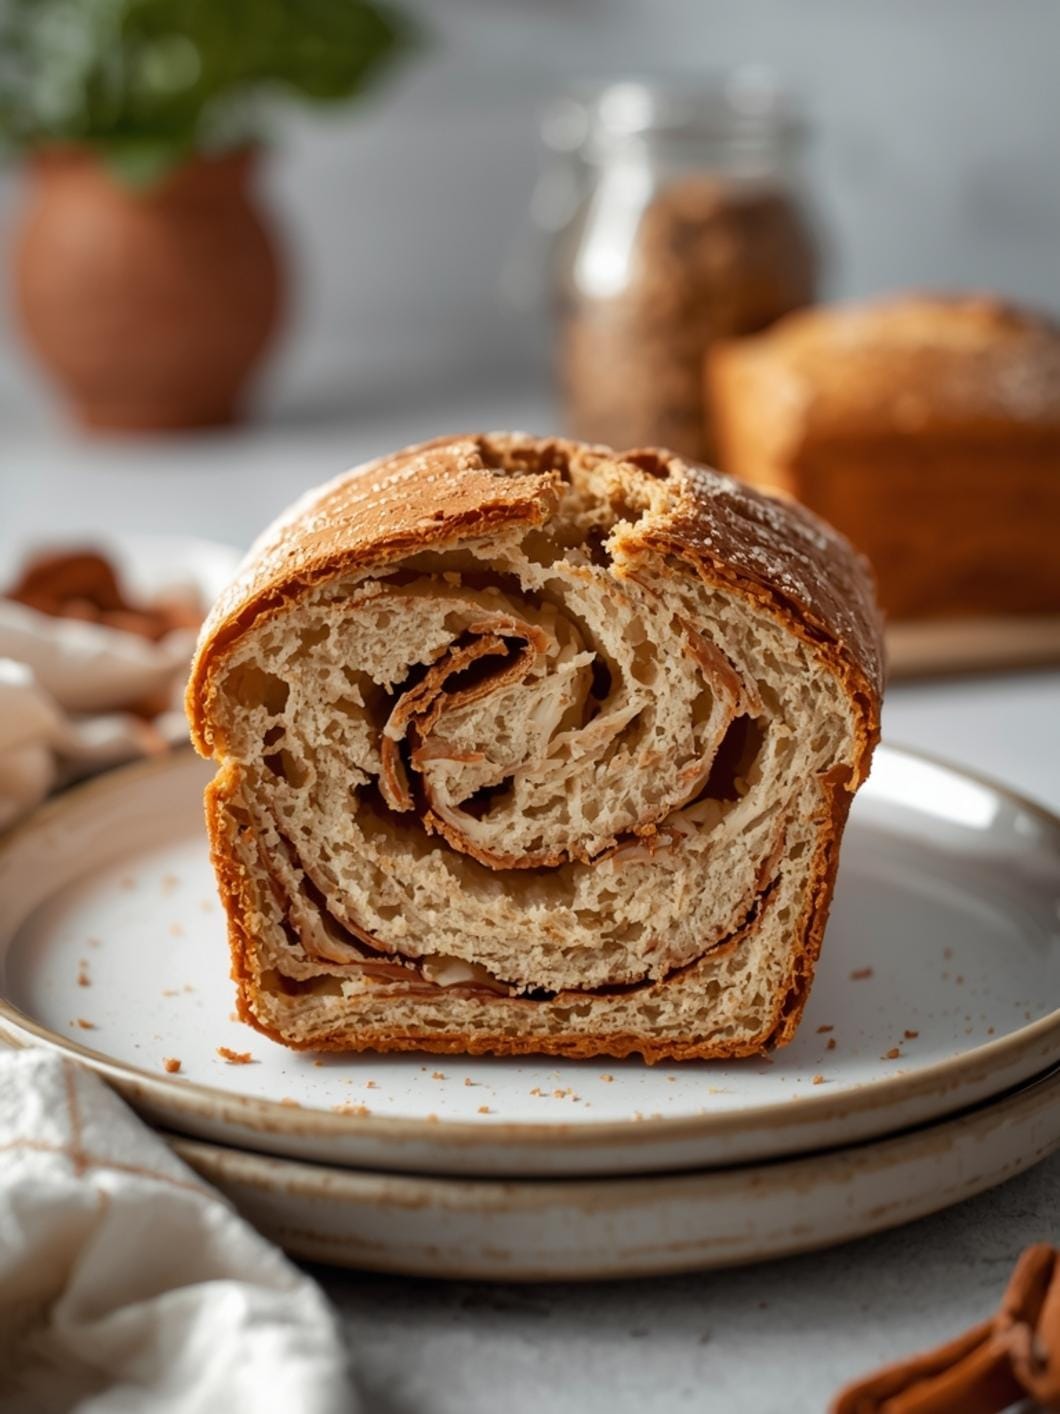
But for many home cooks, the idea of baking bread from scratch, with all the kneading and rising, can feel a bit daunting. That’s where this easy no-knead olive bread recipe comes in. It’s designed specifically for beginners, allowing you to achieve a beautiful, artisan-style loaf without any complicated techniques or special equipment.
This recipe simplifies the process, focusing on minimal effort for maximum flavor. You’ll be amazed at how a few basic ingredients can transform into a crusty, flavorful bread studded with briny olives. It’s the perfect introduction to bread baking and a fantastic way to enjoy homemade goodness with very little fuss.

Easy No-Knead Olive Bread
- Total Time: 13-19 hours (mostly hands-off)
- Yield: 1 loaf 1x
Description
This easy no-knead olive bread recipe is perfect for beginners, allowing you to achieve a beautiful, artisan-style loaf without complicated techniques or special equipment. It simplifies the process, focusing on minimal effort for maximum flavor, transforming basic ingredients into a crusty, flavorful bread studded with briny olives. It’s a versatile addition to almost any meal, great for sandwiches, dipping in olive oil, or serving with soups and stews.
Ingredients
Instructions
1. 1. Combine Dry Ingredients: In a large mixing bowl, whisk together the flour, salt, and yeast until well combined. This ensures the yeast is evenly distributed.
2. 2. Add Wet Ingredients and Olives: Pour the warm water into the dry ingredients. Add the chopped olives. Using a wooden spoon or a spatula, mix everything together until just combined. The dough will be shaggy and sticky, not smooth like traditional bread dough. Avoid overmixing.
3. 3. First Rise (Overnight Magic): Lightly grease another large bowl with olive oil, or use the same bowl if it’s large enough. Transfer the dough to the greased bowl, cover it tightly with plastic wrap, and let it rest at room temperature (ideally around 70F) for 12 to 18 hours. The dough should double in size and be bubbly on the surface. This long, slow rise is key to developing flavor and texture.
4. 4. Preheat Oven and Dutch Oven: About 30 minutes before you’re ready to bake, place a 6-quart Dutch oven with its lid into your oven and preheat it to 450F (230C). Heating the Dutch oven ensures a super-crispy crust.
5. 5. Shape the Dough: Lightly flour your work surface. Gently scrape the dough out of the bowl onto the floured surface. Fold the edges of the dough towards the center a few times to form a rough ball. Do not knead it aggressively; just enough to create some surface tension.
6. 6. Bake the Bread: Carefully remove the hot Dutch oven from the oven. Gently transfer the dough into the hot Dutch oven. Cover with the lid and bake for 30 minutes.
7. 7. Finish Baking: After 30 minutes, remove the lid from the Dutch oven. This allows the crust to brown and crisp up. Continue baking for another 15-25 minutes, or until the crust is a deep golden brown and the internal temperature reaches 200-210F (93-99C) with an instant-read thermometer.
8. 8. Cool Completely: Carefully remove the bread from the Dutch oven and transfer it to a wire rack to cool completely before slicing. This is crucial for the texture and flavor to set properly. Slicing too early can result in a gummy interior.
- Prep Time: 10 minutes
- Cook Time: 45-55 minutes
- Category: bread
- Method: baking
- Cuisine: european
Nutrition
- Serving Size: 1 slice
Keywords: no-knead, olive bread, easy bread, homemade bread, artisan bread, beginner friendly, crusty bread, savory bread
What You’ll Love About This Quick And Easy Recipe
This no-knead olive bread recipe is a true game-changer for anyone who loves the idea of homemade bread but shies away from the traditional effort. It’s perfect for busy weeknights, lazy weekends, or when you want to impress guests without spending hours in the kitchen. The beauty of this recipe lies in its simplicity: no heavy-duty mixers are required, no endless kneading, and very little hands-on time. It’s ideal for beginner bakers looking to build confidence, and for seasoned cooks who appreciate an easy yet delicious staple. Serve it as an appetizer with olive oil and balsamic vinegar, alongside a hearty soup or salad, or simply as a delightful snack any time of day. Its rustic charm and incredible flavor make it a versatile addition to almost any meal.
Everything You Need To Make This Recipe Without Stress
Gathering your ingredients for this no-knead olive bread is straightforward, and most items are likely already in your pantry. The quality of your olives will shine through, so choose ones you genuinely enjoy.
INGREDIENTS:

- 3 cups all-purpose flour
- 1 teaspoon salt
- 1/2 teaspoon instant or active dry yeast
- 1 1/2 cups warm water (about 105-115°F)
- 1 cup pitted olives, roughly chopped (such as Kalamata, Castelvetrano, or a mix)
- 1 tablespoon olive oil, plus extra for greasing the bowl
For the flour, standard all-purpose flour works perfectly here. There’s no need for bread flour unless you prefer it, but it won’t significantly change the outcome for this recipe. When it comes to salt, kosher salt or sea salt are great choices for their flavor, but table salt will also work; just be mindful that table salt is finer and might be slightly saltier by volume, so you might use a tiny bit less. For the yeast, instant yeast is convenient as it can be mixed directly with the dry ingredients, but active dry yeast will also work; if using active dry, you can proof it in the warm water for 5-10 minutes before adding to the dry ingredients, though with no-knead recipes it often activates just fine mixed in. As for the olives, feel free to use your favorite variety. Kalamata olives offer a rich, briny flavor, while Castelvetrano olives are milder and buttery. A mix can add complexity. Ensure they are pitted and roughly chopped to distribute evenly throughout the dough.
Time Needed From Start To Finish
This recipe is designed for minimal active work, but it does require some patience for the dough to rise.
- Prep Time: 10 minutes
- Resting/Rising Time: 12-18 hours (overnight is ideal)
- Baking Time: 45-55 minutes
- Total Time: Approximately 13-19 hours (mostly hands-off)
While the total time might seem long, the vast majority of it is inactive, allowing the yeast to work its magic slowly, developing incredible flavor and texture.
How To Make It Step By Step With Visual Cues

Making this no-knead olive bread is incredibly simple. Follow these steps for a perfect loaf every time.
- Combine Dry Ingredients: In a large mixing bowl, whisk together the flour, salt, and yeast until well combined. This ensures the yeast is evenly distributed.
- Add Wet Ingredients and Olives: Pour the warm water into the dry ingredients. Add the chopped olives. Using a wooden spoon or a spatula, mix everything together until just combined. The dough will be shaggy and sticky, not smooth like traditional bread dough. Avoid overmixing.
- First Rise (Overnight Magic): Lightly grease another large bowl with olive oil, or use the same bowl if it’s large enough. Transfer the dough to the greased bowl, cover it tightly with plastic wrap, and let it rest at room temperature (ideally around 70°F) for 12 to 18 hours. The dough should double in size and be bubbly on the surface. This long, slow rise is key to developing flavor and texture.
- Preheat Oven and Dutch Oven: About 30 minutes before you’re ready to bake, place a 6-quart Dutch oven with its lid into your oven and preheat it to 450°F (230°C). Heating the Dutch oven ensures a super-crispy crust.
- Shape the Dough: Lightly flour your work surface. Gently scrape the dough out of the bowl onto the floured surface. Fold the edges of the dough towards the center a few times to form a rough ball. Do not knead it aggressively; just enough to create some surface tension.
- Bake the Bread: Carefully remove the hot Dutch oven from the oven. Gently transfer the dough into the hot Dutch oven. Cover with the lid and bake for 30 minutes.
- Finish Baking: After 30 minutes, remove the lid from the Dutch oven. This allows the crust to brown and crisp up. Continue baking for another 15-25 minutes, or until the crust is a deep golden brown and the internal temperature reaches 200-210°F (93-99°C) with an instant-read thermometer.
- Cool Completely: Carefully remove the bread from the Dutch oven and transfer it to a wire rack to cool completely before slicing. This is crucial for the texture and flavor to set properly. Slicing too early can result in a gummy interior.
Easy Variations And Serving Ideas That Fit Real Life
This no-knead olive bread is wonderfully versatile and can be adapted to suit your family’s preferences or what you have on hand. For a different flavor profile, consider adding 1-2 tablespoons of fresh rosemary or thyme, finely chopped, to the dough along with the olives. Sun-dried tomatoes, drained and chopped, are another excellent addition, offering a sweet and tangy contrast to the briny olives. You could also sprinkle some everything bagel seasoning on top of the loaf before baking for an extra layer of flavor and crunch.
When it comes to serving, this bread shines in many roles. It’s fantastic sliced thick for sandwiches, especially with deli meats and cheeses. For a simple appetizer, serve it with a good quality olive oil for dipping, perhaps with a sprinkle of red pepper flakes. It pairs beautifully with hearty stews, chili, or any creamy soup, perfect for soaking up every last drop. For a party or buffet, arrange slices on a platter with a selection of cheeses, cured meats, and extra olives for a rustic and appealing spread. Kids often love dipping bread, so a side of marinara sauce or even just butter can make it a hit with the younger crowd.
Common Slip-Ups And How To Avoid Them
Even with a simple recipe like this, a few common mistakes can impact your final loaf. Being aware of them will help you achieve perfect results every time.
One frequent issue is using water that is too hot or too cold. Water that is too hot can kill the yeast, preventing your dough from rising. Water that is too cold will slow down the yeast activity significantly, leading to a very long or incomplete rise. Aim for warm water, between 105-115°F (40-46°C), which feels comfortably warm to the touch, like a baby’s bath.
Another common slip-up is overworking the dough when shaping. With no-knead bread, the goal is to handle the dough as little as possible. Aggressively kneading or shaping it will deflate the air bubbles that have formed during the long rise, resulting in a dense loaf. A few gentle folds are all that’s needed to create a round shape.
Not preheating the Dutch oven long enough can also lead to a less-than-perfect crust. The super-hot Dutch oven is crucial for creating that initial burst of steam and a crispy crust. Make sure your Dutch oven is in the oven for at least 30 minutes while it preheats to ensure it’s scorching hot.
Finally, slicing the bread before it has cooled completely is a common mistake that affects texture. While the aroma of fresh bread is intoxicating, slicing it while it’s still hot can make the interior gummy and moist. The bread continues to cook and set as it cools, so patience is key for the best texture. Let it cool on a wire rack for at least an hour, or even longer, before cutting into it.

FAQs
- Can I make these ahead? Yes—prep ahead, refrigerate, then serve when ready.
- How long do leftovers last? Store covered in the fridge for 3–4 days for best texture.
- Can I adjust sweetness? Yes—add more or less sweetener to taste.
- Can I change the fruit? Yes—swap strawberries for blueberries, raspberries, or sliced banana.