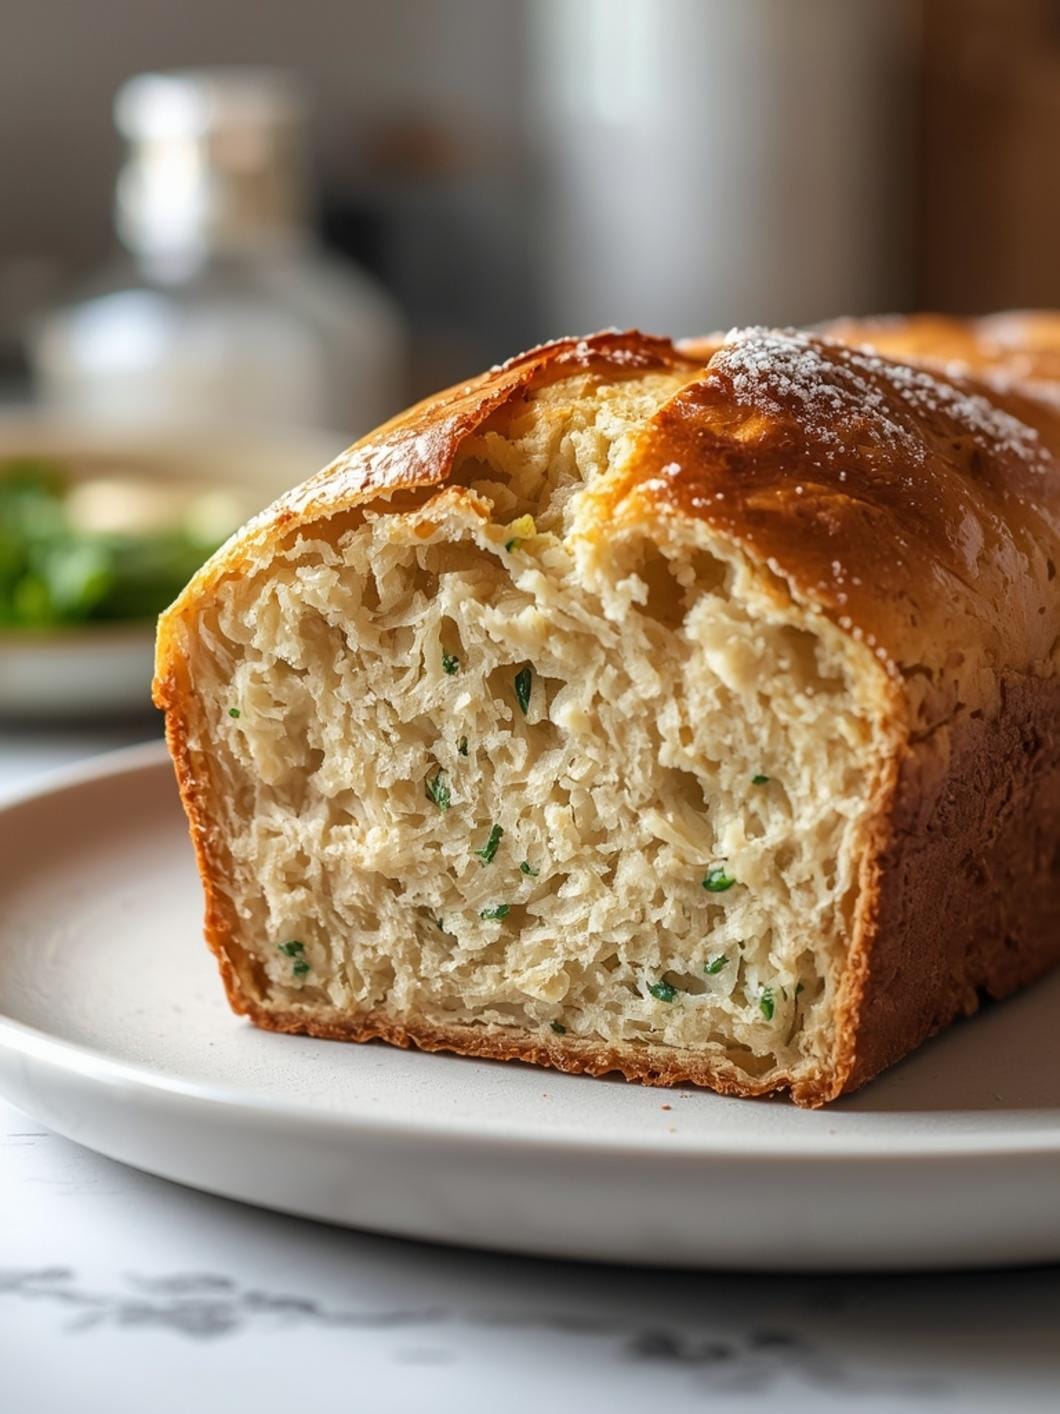
Baking a beautiful, rustic sourdough loaf might seem intimidating, but with this easy sourdough bread recipe, you’ll be creating delicious artisan bread right in your own kitchen.

Perfect for beginners and seasoned bakers alike, this method simplifies the process, ensuring a fantastic result every time. Get ready to impress yourself and your family with homemade goodness!
This recipe focuses on straightforward steps and readily available tools, making the joy of baking accessible to everyone. Forget complicated techniques and endless waiting; we’re streamlining the journey to a perfectly crusted, wonderfully chewy sourdough loaf, all baked conveniently in your Dutch oven. Let’s dive into the details and discover how truly simple artisan bread can be.

Easy Sourdough Bread Recipe (Dutch Oven)
- Total Time: 10-12 hours (mostly inactive)
- Yield: 1 loaf 1x
Description
Bake a beautiful, rustic sourdough loaf with this easy recipe, perfect for beginners and seasoned bakers. This method simplifies the process, ensuring a fantastic result every time with a perfectly crusted, wonderfully chewy sourdough loaf, all baked conveniently in your Dutch oven.
Ingredients
Instructions
1. Combine Ingredients: In a large mixing bowl, gently mix your active sourdough starter with the warm water until the starter is mostly dissolved. Add the flour and salt, then mix with a wooden spoon or your hands until a shaggy dough forms and no dry flour remains. Cover the bowl with a damp cloth or plastic wrap and let it rest for 30 minutes. This resting period, called autolyse, helps the flour absorb water and begin gluten development.
2. Perform Stretch and Folds: After the rest, begin the first set of stretch and folds. With wet hands, grab a portion of the dough from one side, stretch it upwards, and fold it over to the opposite side of the bowl. Rotate the bowl a quarter turn and repeat. Do this 4-6 times until you’ve worked your way around the dough. Cover and let rest for 30 minutes. Repeat this stretch and fold process three more times, for a total of four sets, each 30 minutes apart. The dough will become smoother and more elastic with each set.
3. Bulk Fermentation: After the last stretch and fold, cover the bowl and let the dough bulk ferment at room temperature (around 70-75 F) for 6-8 hours, or until it has visibly increased in volume by about 30-50% and looks bubbly. Alternatively, you can place it in the refrigerator for 8-12 hours (or overnight) for a slower, colder fermentation, which can enhance flavor.
4. Shape the Loaf: Lightly flour your work surface. Gently turn the dough out onto the floured surface. Carefully shape the dough into a round or oval loaf. You want to create tension on the surface of the dough without deflating it too much. Use a bench scraper to help you gather and tuck the edges underneath, creating a tight ball.
5. Second Proof (Cold Fermentation): Lightly flour a proofing basket (banneton) or a bowl lined with a floured kitchen towel. Carefully transfer the shaped dough, seam-side up, into the basket. Cover with plastic wrap and refrigerate for 8-12 hours (or overnight). This cold proof develops flavor and makes the dough easier to handle. If you’re in a hurry, you can proof at room temperature for 2-4 hours, but the cold proof is highly recommended.
6. Preheat and Bake: About an hour before you’re ready to bake, place your Dutch oven with its lid into your oven and preheat to 450 F (232 C). Once the oven and Dutch oven are fully preheated, carefully remove the hot Dutch oven. Gently invert the cold dough from the proofing basket into the hot Dutch oven. You can score the top of the dough with a sharp knife or razor blade (a lame) if desired, creating a decorative pattern and allowing for even expansion.
7. Bake with Lid On, Then Off: Place the lid back on the Dutch oven and bake for 30 minutes. After 30 minutes, carefully remove the lid and continue to bake for another 15-20 minutes, or until the crust is a deep golden brown and the internal temperature reaches 200-210 F (93-99 C).
8. Cool Completely: Carefully remove the bread from the Dutch oven and transfer it to a wire rack. This step is crucial! Let the loaf cool completely for at least 1-2 hours before slicing. Slicing too early will result in a gummy texture.
- Prep Time: 20 minutes
- Cook Time: 45-50 minutes
- Category: bread
- Method: baking
- Cuisine: american
Nutrition
- Serving Size: 1 slice
Keywords: sourdough, bread, dutch oven, baking, artisan, homemade, starter, rustic, easy, yeast-free
What You’ll Love About This Quick And Easy Recipe
This recipe is designed for anyone who dreams of baking their own sourdough but feels overwhelmed by the traditional methods. You’ll love its simplicity and the impressive results it delivers. It’s perfect for busy weeknights when you want to elevate your dinner with homemade bread, or for a relaxed weekend project that yields a stunning centerpiece for brunch. This method works because it focuses on a forgiving technique that minimizes fuss while maximizing flavor and texture. It’s ideal for new bakers eager to explore the world of sourdough without the steep learning curve, or for experienced bakers looking for a reliable, no-stress approach. Serve it warm with butter, alongside a hearty soup, or as the star of your next sandwich.
Everything You Need To Make This Recipe Without Stress
Gathering your ingredients and equipment beforehand makes the baking process smooth and enjoyable. This recipe uses common pantry staples and a Dutch oven, which is key to achieving that perfect crust and moist interior. Don’t worry if you don’t have a stand mixer; this dough is easily mixed by hand.
INGREDIENTS:

- 150 grams active sourdough starter (fed and bubbly)
- 350 grams warm water (around 90-95°F)
- 500 grams unbleached all-purpose flour or bread flour
- 10 grams fine sea salt
- Extra flour for dusting
For substitutions, you can use bread flour for a chewier crumb, though all-purpose flour works wonderfully too. If you don’t have fine sea salt, regular table salt can be used, but you might want to reduce the amount slightly as it can be saltier by volume. Ensure your sourdough starter is active and bubbly; this is crucial for a good rise. If your starter isn’t quite ready, give it another feeding and wait a few hours until it’s very active.
Time Needed From Start To Finish
This recipe is designed to be relatively hands-off, though it does require some waiting for the dough to ferment and proof.
- Active Prep Time: 15-20 minutes (mixing, folding)
- Bulk Fermentation Time: 6-8 hours (or overnight in the fridge)
- Proofing Time: 2-4 hours (or overnight in the fridge)
- Baking Time: 45-50 minutes
- Cooling Time: 1-2 hours (essential for best texture)
While the total process spans several hours, most of that time is inactive, allowing the dough to develop its flavor and structure. Your actual hands-on time is minimal, making it a perfect project to fit into a busy day.
How To Make It Step By Step With Visual Cues

Baking sourdough might seem complex, but breaking it down into simple steps makes it very manageable. Follow these instructions carefully for a beautiful loaf.
- Combine Ingredients: In a large mixing bowl, gently mix your active sourdough starter with the warm water until the starter is mostly dissolved. Add the flour and salt, then mix with a wooden spoon or your hands until a shaggy dough forms and no dry flour remains. Cover the bowl with a damp cloth or plastic wrap and let it rest for 30 minutes. This resting period, called autolyse, helps the flour absorb water and begin gluten development.
- Perform Stretch and Folds: After the rest, begin the first set of stretch and folds. With wet hands, grab a portion of the dough from one side, stretch it upwards, and fold it over to the opposite side of the bowl. Rotate the bowl a quarter turn and repeat. Do this 4-6 times until you’ve worked your way around the dough. Cover and let rest for 30 minutes. Repeat this stretch and fold process three more times, for a total of four sets, each 30 minutes apart. The dough will become smoother and more elastic with each set.
- Bulk Fermentation: After the last stretch and fold, cover the bowl and let the dough bulk ferment at room temperature (around 70-75°F) for 6-8 hours, or until it has visibly increased in volume by about 30-50% and looks bubbly. Alternatively, you can place it in the refrigerator for 8-12 hours (or overnight) for a slower, colder fermentation, which can enhance flavor.
- Shape the Loaf: Lightly flour your work surface. Gently turn the dough out onto the floured surface. Carefully shape the dough into a round or oval loaf. You want to create tension on the surface of the dough without deflating it too much. Use a bench scraper to help you gather and tuck the edges underneath, creating a tight ball.
- Second Proof (Cold Fermentation): Lightly flour a proofing basket (banneton) or a bowl lined with a floured kitchen towel. Carefully transfer the shaped dough, seam-side up, into the basket. Cover with plastic wrap and refrigerate for 8-12 hours (or overnight). This cold proof develops flavor and makes the dough easier to handle. If you’re in a hurry, you can proof at room temperature for 2-4 hours, but the cold proof is highly recommended.
- Preheat and Bake: About an hour before you’re ready to bake, place your Dutch oven with its lid into your oven and preheat to 450°F (232°C). Once the oven and Dutch oven are fully preheated, carefully remove the hot Dutch oven. Gently invert the cold dough from the proofing basket into the hot Dutch oven. You can score the top of the dough with a sharp knife or razor blade (a lame) if desired, creating a decorative pattern and allowing for even expansion.
- Bake with Lid On, Then Off: Place the lid back on the Dutch oven and bake for 30 minutes. After 30 minutes, carefully remove the lid and continue to bake for another 15-20 minutes, or until the crust is a deep golden brown and the internal temperature reaches 200-210°F (93-99°C).
- Cool Completely: Carefully remove the bread from the Dutch oven and transfer it to a wire rack. This step is crucial! Let the loaf cool completely for at least 1-2 hours before slicing. Slicing too early will result in a gummy texture.
Easy Variations And Serving Ideas That Fit Real Life
This basic sourdough recipe is a fantastic canvas for various additions and serving styles. For a savory twist, try incorporating a handful of chopped fresh rosemary and a quarter cup of finely grated Parmesan cheese into the dough during the first stretch and fold. For a slightly sweet and nutty flavor, add a quarter cup of toasted walnuts and a tablespoon of honey to the initial mix.
This rustic loaf is incredibly versatile. Serve thick slices alongside a hearty beef stew or a creamy tomato soup for a comforting meal. It makes an excellent base for avocado toast at breakfast or a gourmet sandwich at lunch. For a party or buffet, slice it and serve with a platter of cheeses, olives, and charcuterie. Kids often love sourdough with a simple spread of butter and jam, or toasted with a sprinkle of garlic powder and a drizzle of olive oil. Don’t be afraid to experiment with different toppings like everything bagel seasoning before baking for an extra layer of flavor and texture.
Common Slip-Ups And How To Avoid Them
Even experienced bakers encounter challenges, and sourdough is no exception. Knowing common mistakes can help you avoid them.
- Under-proving or Over-proving: This is one of the most common issues. Under-proved dough will be dense and lack air pockets, while over-proved dough will be sticky, hard to shape, and may collapse in the oven. Pay attention to the visual cues: the dough should be jiggly, bubbly, and have increased in volume as specified. When gently poked, it should slowly spring back.
- Not using an active starter: A weak or inactive starter won’t provide enough leavening, resulting in a flat, dense loaf. Always make sure your starter is fed, bubbly, and active before you begin mixing your dough. It should float if a small piece is dropped in water.
- Slicing too early: It’s tempting to cut into a warm, fragrant loaf, but resist! Slicing sourdough before it has completely cooled allows the internal structure to set and prevents a gummy texture. Patience is key here.
- Not preheating the Dutch oven enough: A super-hot Dutch oven creates the initial burst of steam and high heat needed for a good oven spring and a crispy crust. Ensure your

FAQs
- Can I make these ahead? Yes—prep ahead, refrigerate, then serve when ready.
- How long do leftovers last? Store covered in the fridge for 3–4 days for best texture.
- Can I adjust sweetness? Yes—add more or less sweetener to taste.
- Can I change the fruit? Yes—swap strawberries for blueberries, raspberries, or sliced banana.