Transforming your sourdough discard into something delicious has never been easier or more satisfying than with these cheesy skillet biscuits.
 11")
This quick recipe is a fantastic way to utilize that bubbling discard, turning it into a comforting side dish that’s perfect for any meal. Forget complicated baking; this is about simple ingredients coming together for maximum flavor with minimal fuss.
These biscuits are not only incredibly easy to make, but they also bring a wonderful texture and savory cheesy goodness to your table. Whether you’re looking for a last-minute addition to dinner or a tasty snack, this recipe is a true winner that will quickly become a family favorite.
Table of Contents
- What You’ll Love About This Quick And Easy Recipe
- Everything You Need To Make This Recipe Without Stress
- Time Needed From Start To Finish
- How To Make It Step By Step With Visual Cues
- Easy Variations And Serving Ideas That Fit Real Life
- Common Slip-Ups And How To Avoid Them
- How To Store It And Make It Ahead Without Ruining Texture
- Questions People Always Ask Before Making This Recipe
 12")
Sourdough Discard Cheesy Skillet Biscuits
- Total Time: 25-30 minutes
- Yield: 8-10 biscuits 1x
Description
Transform your sourdough discard into delicious, cheesy skillet biscuits with this quick and satisfying recipe. Perfect for a comforting side dish or snack, these biscuits are easy to make and bring a wonderful texture and savory flavor to any meal.
Ingredients
Instructions
1. 1. Preheat your oven to 400 F (200 C). Lightly grease a 9-inch cast-iron skillet or an 8×8 inch baking dish.
2. 2. In a large mixing bowl, whisk together the all-purpose flour, baking powder, baking soda, and salt.
3. 3. Add the cold, cubed butter to the dry ingredients. Using a pastry blender, two knives, or your fingertips, cut the butter into the flour mixture until it resembles coarse crumbs with some pea-sized pieces of butter remaining.
4. 4. Fold in the shredded cheddar cheese. Then, add the sourdough discard and ¼ cup of milk. Mix with a spoon or your hands until just combined. Do not overmix.
5. 5. Turn the dough out onto a lightly floured surface. Gently pat the dough into a round or square shape about ¾ to 1 inch thick. Cut the dough into 8-10 squares or wedges using a knife or bench scraper, or use a biscuit cutter for rounds.
6. 6. Place the biscuits snugly in the prepared skillet or baking dish. If desired, brush the tops with a little extra milk for a golden finish.
7. 7. Bake for 15-20 minutes, or until the tops are golden brown and the biscuits are cooked through.
8. 8. Remove the skillet from the oven and let the biscuits cool for a few minutes before serving. They are best enjoyed warm, straight from the skillet.
- Prep Time: 10 minutes
- Cook Time: 15-20 minutes
- Category: side dish
- Method: baking
- Cuisine: american
Nutrition
- Serving Size: 1 biscuit
Keywords: sourdough, biscuits, cheesy, skillet, discard, easy, quick, savory, comfort food, cheddar
What You’ll Love About This Quick And Easy Recipe
This recipe is a true gem for anyone looking to make the most of their sourdough discard without committing to a full sourdough bread project. It’s perfect for busy parents, beginner bakers, or anyone who appreciates a delicious, homemade touch to their meals without spending hours in the kitchen. The beauty of these cheesy skillet biscuits lies in their simplicity and versatility. You can whip them up in under 30 minutes, making them an ideal last-minute side for weeknight dinners, a quick addition to brunch, or a comforting snack any time of day. They offer a slightly tangy flavor from the sourdough discard, beautifully complemented by the sharp cheddar cheese, creating a taste profile that’s both familiar and exciting. Serve them warm from the skillet, and watch them disappear!
Everything You Need To Make This Recipe Without Stress
Gathering your ingredients for these cheesy skillet biscuits is straightforward, requiring items you likely already have on hand. The star, of course, is your sourdough discard, which adds a unique depth of flavor without the need for active leavening. This recipe is designed to be forgiving and adaptable, ensuring a successful bake even for those new to using sourdough discard.
INGREDIENTS:
 13")
- 1 ½ cups all-purpose flour
- 2 teaspoons baking powder
- ½ teaspoon baking soda
- ½ teaspoon salt
- 1 cup shredded sharp cheddar cheese
- ½ cup cold unsalted butter, cut into small cubes
- 1 cup sourdough discard (unfed, straight from the fridge)
- ¼ cup milk (plus extra for brushing, if desired)
For the flour, standard all-purpose flour works perfectly. If you prefer, you can use a 1:1 gluten-free all-purpose flour blend, though results may vary slightly in texture. When it comes to cheese, sharp cheddar offers the best flavor punch, but a medium cheddar or even a blend of cheddar and Monterey Jack would also be delicious. Make sure your butter is very cold; this is key to achieving flaky biscuits. If you don’t have milk, buttermilk can be used for an even tangier biscuit, or you can substitute with a non-dairy milk alternative like almond or soy milk.
Time Needed From Start To Finish
One of the best features of these sourdough discard cheesy skillet biscuits is how quickly they come together. You’ll be amazed at how little time it takes to go from mixing bowl to warm, cheesy goodness on your plate.
- Preparation time: 10 minutes
- Cooking time: 15-20 minutes
- Total time: 25-30 minutes
This makes them an excellent choice for those evenings when you need a quick side dish without a lot of fuss, or when unexpected guests drop by and you want to offer something warm and homemade.
How To Make It Step By Step With Visual Cues
 14")
Making these cheesy skillet biscuits is a simple process that yields impressive results. Follow these steps for perfectly golden, flaky, and cheesy biscuits every time.
- Preheat your oven and prepare the skillet: Preheat your oven to 400°F (200°C). Lightly grease a 9-inch cast-iron skillet or an 8×8 inch baking dish. This will help prevent sticking and ensure a nice golden crust.
- Combine dry ingredients: In a large mixing bowl, whisk together the all-purpose flour, baking powder, baking soda, and salt. Make sure these are well combined to ensure even leavening throughout the biscuits.
- Cut in the cold butter: Add the cold, cubed butter to the dry ingredients. Using a pastry blender, two knives, or your fingertips, cut the butter into the flour mixture until it resembles coarse crumbs with some pea-sized pieces of butter remaining. This is crucial for flakiness.
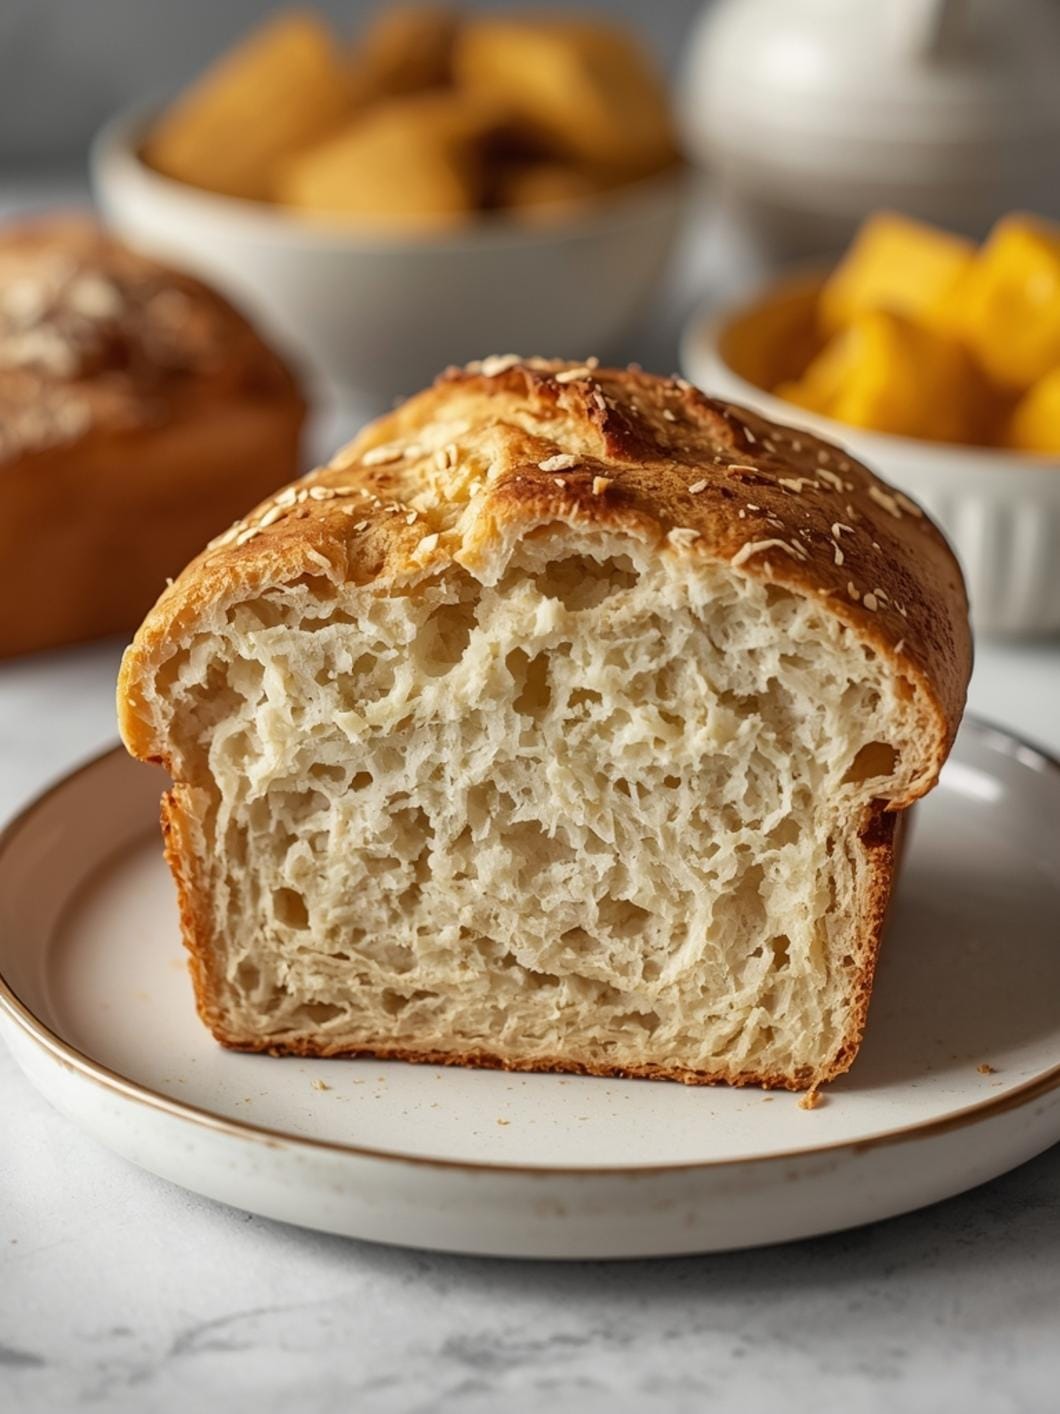
- Stir in the cheese and wet ingredients: Fold in the shredded cheddar cheese. Then, add the sourdough discard and ¼ cup of milk. Mix with a spoon or your hands until just combined. Be careful not to overmix, as this can lead to tough biscuits. The dough will be shaggy and a bit sticky.
- Form the biscuits: Turn the dough out onto a lightly floured surface. Gently pat the dough into a round or square shape about ¾ to 1 inch thick. You can use a biscuit cutter to cut out rounds, or simply cut the dough into 8-10 squares or wedges using a knife or bench scraper.
- Arrange and bake: Place the biscuits snugly in the prepared skillet or baking dish. If desired, brush the tops with a little extra milk for a golden finish.
- Bake until golden: Bake for 15-20 minutes, or until the tops are golden brown and the biscuits are cooked through. The exact time will depend on your oven and the size of your biscuits.
- Serve warm: Remove the skillet from the oven and let the biscuits cool for a few minutes before serving. They are best enjoyed warm, straight from the skillet.
Easy Variations And Serving Ideas That Fit Real Life
These cheesy skillet biscuits are incredibly versatile and can be adapted to suit various tastes and occasions. They are a fantastic base for creativity!
For a kid-friendly twist, consider adding a pinch of garlic powder or onion powder to the dry ingredients for an extra savory kick. You could also mix in some finely chopped cooked bacon or ham for a heartier biscuit. If you want to make them even cheesier, sprinkle a little extra shredded cheese on top during the last 5 minutes of baking.
These biscuits are perfect as a side dish for almost any meal. Serve them alongside a hearty chili, a comforting soup, or a simple roast chicken. They also make an excellent addition to a breakfast or brunch spread, especially when paired with scrambled eggs and fresh fruit. For a party or buffet, arrange them on a platter with a side of warm marinara sauce for dipping, or a creamy herb dip. They’re also delicious split and filled with a slice of ham and a fried egg for a quick sandwich.
Common Slip-Ups And How To Avoid Them
Even with a simple recipe like this, a few common mistakes can impact the final outcome. Knowing what to watch out for will help you achieve perfect biscuits every time.
One frequent slip-up is overmixing the dough. When you overmix, you develop the gluten in the flour too much, resulting in tough, dense biscuits instead of light and flaky ones. Mix only until the ingredients are just combined and no dry streaks of flour remain. The dough should still look a bit shaggy.
Another common error is using warm butter. Cold butter is essential for flaky biscuits. As the cold butter melts in the hot oven, it creates pockets of steam, which separate the layers of dough, resulting in that desirable flaky texture. If your butter is too warm, it will incorporate too fully into the flour, leading to a more cake-like texture. Always use butter straight from the fridge, and if your kitchen is warm, you can even pop the cut butter back into the freezer for a few minutes before adding it to the flour.
Finally, not preheating the oven properly can affect how your biscuits rise. A hot oven creates an initial burst of steam that helps the biscuits puff up quickly. Make sure your oven is fully preheated to the specified temperature before placing the skillet inside.
How To Store It And Make It Ahead Without Ruining Texture
These sourdough discard cheesy skillet biscuits are best enjoyed fresh and warm from the oven, but you can certainly store them or prepare them ahead of time with a few tips to maintain their delicious texture.
To store leftover baked biscuits, place them in an airtight container at room temperature for up to 2 days. For longer storage, you can refrigerate them for up to 4-5 days. To reheat, wrap them loosely in foil and warm them in a 300°F (150°C) oven for about 10-15 minutes, or until heated through. Alternatively, a quick zap in the microwave for 15-30 seconds can warm them up, though it might make them a little softer.
If you want to make them ahead, you can prepare the dough and cut out the biscuits, then place them on a parchment-lined baking sheet and freeze until solid. Once frozen, transfer the raw biscuits to a freezer-safe bag or container. They can be stored in the freezer for up to 1 month. When you’re ready to bake, you can bake them directly from frozen. Just add an extra 5-10 minutes to the baking time, keeping an eye on them until they are golden brown and cooked through. This is a fantastic way to have fresh, warm biscuits on demand!
Questions People Always Ask Before Making This Recipe
Can I use active sourdough starter instead
 15")
FAQs
- Can I make these ahead? Yes—prep ahead, refrigerate, then serve when ready.
- How long do leftovers last? Store covered in the fridge for 3–4 days for best texture.
- Can I adjust sweetness? Yes—add more or less sweetener to taste.
- Can I change the fruit? Yes—swap strawberries for blueberries, raspberries, or sliced banana.