Elevate your homemade sourdough with these simple scoring patterns that add a beautiful touch to every loaf.

Learning to score your bread isn’t just about aesthetics; it helps control how your loaf expands in the oven, ensuring a well-risen and beautifully structured crumb. With just a few basic tools and a little practice, you can transform a plain loaf into a work of art.
This guide focuses on easy, beginner-friendly designs that are both functional and visually appealing. You don’t need to be an expert baker to achieve stunning results. We’ll walk through classic cuts and simple decorative patterns that will make your next sourdough bake truly stand out, impressing family and friends alike.
Table of Contents
- What You’ll Love About This Quick And Easy Recipe
- Everything You Need To Make This Recipe Without Stress
- Time Needed From Start To Finish
- How To Make It Step By Step With Visual Cues
- Easy Variations And Serving Ideas That Fit Real Life
- Common Slip-Ups And How To Avoid Them
- How To Store It And Make It Ahead Without Ruining Texture

Sourdough Scoring Patterns: A Guide to Beautiful Loaves
- Total Time: 2-5 minutes active scoring time
- Yield: 1 loaf 1x
Description
Elevate your homemade sourdough with these simple scoring patterns that add a beautiful touch to every loaf. Learning to score your bread isn’t just about aesthetics; it helps control how your loaf expands in the oven, ensuring a well-risen and beautifully structured crumb. With just a few basic tools and a little practice, you can transform a plain loaf into a work of art. This guide focuses on easy, beginner-friendly designs that are both functional and visually appealing. You don’t need to be an expert baker to achieve stunning results. We’ll walk through classic cuts and simple decorative patterns that will make your next sourdough bake truly stand out, impressing family and friends alike.
Ingredients
Instructions
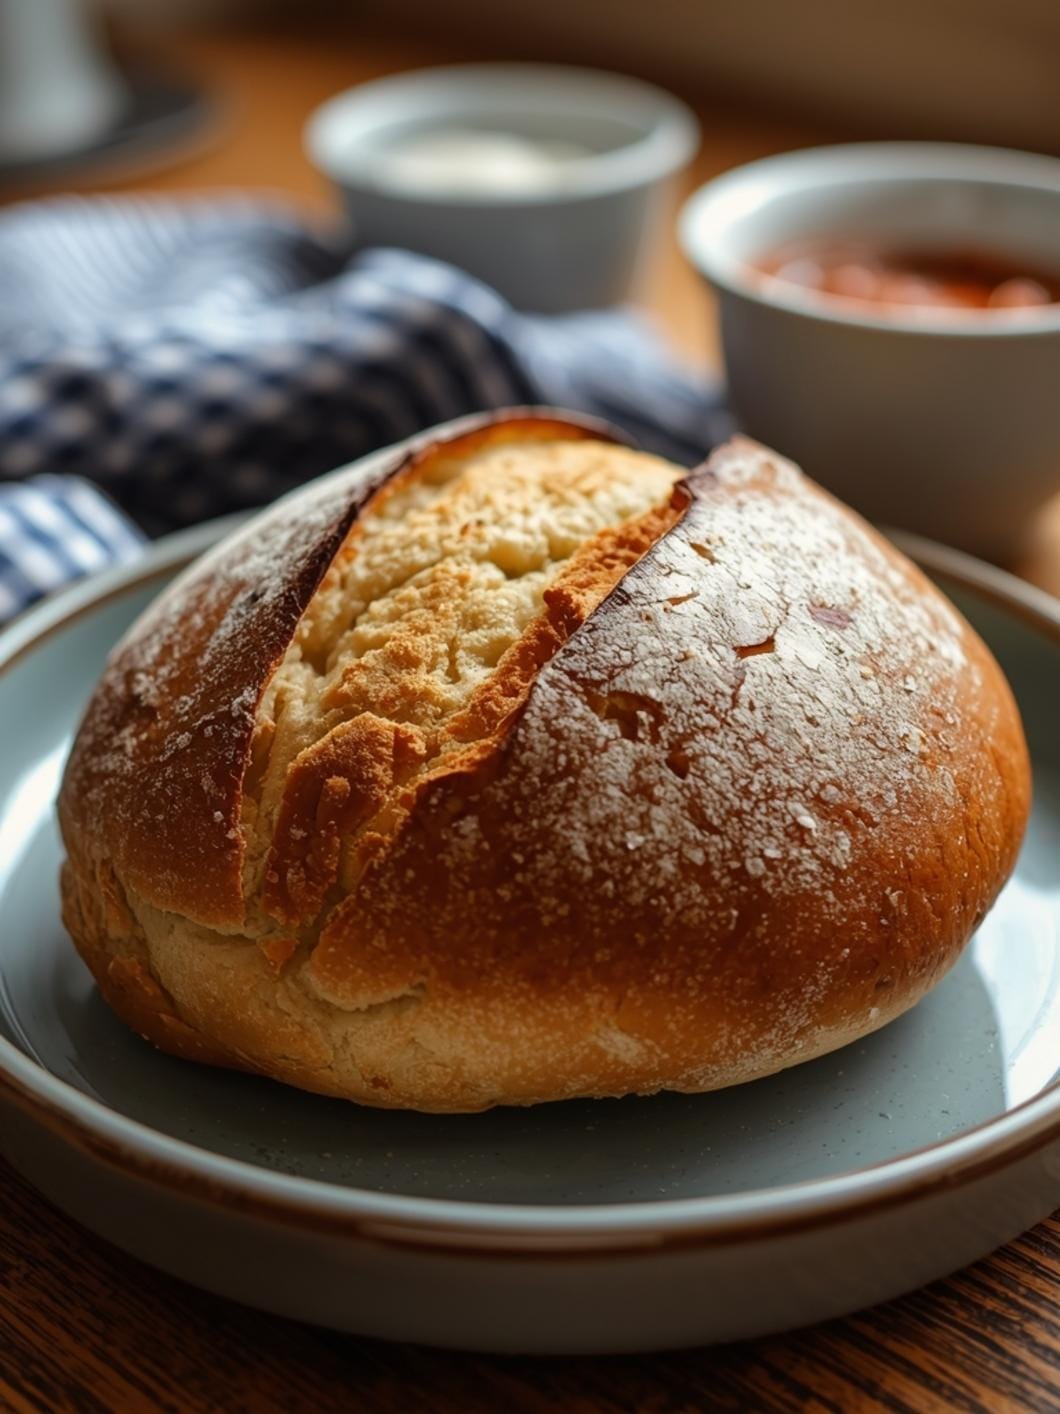
1. Prepare Your Loaf: Gently remove your proofed sourdough loaf from its banneton or proofing basket onto a piece of parchment paper or directly onto your baking vessel (like a Dutch oven). If desired, lightly dust the top surface of the loaf with rice flour or all-purpose flour using a small sieve. This not only adds a rustic look but also helps the scored patterns stand out beautifully.
2. Hold Your Lame Correctly: For most cuts, hold your lame or sharp knife at a shallow angle, about 15-30 degrees to the surface of the dough. This angle helps create a “lip” or “ear” on the crust as it bakes, which is a desirable characteristic in sourdough. For deeper, more open cuts, you might hold it a bit straighter, closer to 90 degrees.
3. The Basic Single Slash: This is the simplest and most common score. Make one confident, deep slash across the top of your round or oval loaf, from one side to the other. Aim for a depth of about 1/2 to 3/4 inch. This single cut allows for maximum oven spring and a beautiful ear.
4. The Cross Pattern: For a classic look, make two intersecting slashes across the top of a round loaf, forming an “X.” Ensure both cuts are of similar depth, around 1/2 inch. This pattern provides even expansion and a lovely symmetrical appearance.
5. The Box or Square Pattern: Create a square or rectangular pattern by making two parallel slashes lengthwise, and then two parallel slashes crosswise, forming a grid. The cuts should be about 1/4 to 1/2 inch deep. This is great for loaves where you want a more controlled, even rise across the surface.
6. The Wheat Stalk or Leaf Pattern: For a decorative touch, make a single, slightly curved slash down the center of your loaf. Then, make several smaller, short, angled cuts branching off from the main line, alternating sides, to mimic a wheat stalk or leaf. These smaller cuts should be shallower, about 1/4 inch deep.
7. The Spiral Pattern: Starting from the center of a round loaf, make a continuous, shallow spiral cut outwards towards the edge. This pattern is more decorative and typically shallower, around 1/8 to 1/4 inch deep, as it’s less about creating an ear and more about visual appeal.
8. Bake Immediately: Once scored, place your loaf into your preheated oven or Dutch oven as quickly as possible. The scoring helps the dough expand in a controlled manner during the initial burst of heat, known as oven spring.
- Prep Time: 2-5 minutes
- Cook Time: 30-50 minutes
- Category: bread
- Method: baking
- Cuisine: european
Nutrition
- Serving Size: 1 slice
Keywords: sourdough, scoring, bread, baking, artisan, homemade, loaves, patterns, crust, oven spring
What You’ll Love About This Quick And Easy Recipe
This guide is perfect for any home baker looking to add a touch of artistry to their sourdough loaves without needing advanced skills. It’s designed for those who have already mastered the basics of sourdough baking and are ready to take their presentation to the next level. You’ll love how these simple scoring techniques transform a rustic loaf into something truly special, making it ideal for sharing at brunches, dinner parties, or simply enjoying with your family. It works because it focuses on practical, achievable patterns that enhance the bread’s oven spring and visual appeal. This isn’t about complex, intricate designs, but rather foundational cuts that yield beautiful results every time.
Everything You Need To Make This Recipe Without Stress
To create beautiful scoring patterns on your sourdough, you’ll need just a few essential tools. The quality of your scoring tool can make a significant difference in the precision and cleanliness of your cuts. While a sharp knife can work in a pinch, a specialized lame offers superior control and sharpness.
INGREDIENTS:

- 1 proofed sourdough loaf, ready for baking
- Rice flour or all-purpose flour for dusting (optional)
- Bread Lame: This is a specialized tool with a very sharp, thin blade (often a double-edged razor blade). It allows for clean, precise cuts without dragging the dough. Straight lames are good for simple cuts, while curved lames are excellent for creating ears.
- Sharp Knife: A very sharp paring knife or utility knife can be used if a lame isn’t available. Ensure it’s as sharp as possible to avoid tearing the dough.
- Small Sieve or Dredger: Useful for dusting flour onto the loaf before scoring, which helps the patterns stand out.
Regarding the sourdough loaf itself, any well-proofed, cold-retarded sourdough dough will work best. A cold dough is firmer and easier to score cleanly. You can use your favorite sourdough recipe for this; the scoring patterns are applicable to most round or oval loaves. For dusting, rice flour is often preferred as it crisps up nicely and provides a stark contrast, making the scores more visible, but regular all-purpose flour works perfectly fine too.
Time Needed From Start To Finish
The actual time spent scoring your sourdough loaf is very minimal, but it’s a crucial step in the overall baking process.
- Prep Time: 2-5 minutes (This includes dusting the loaf and preparing your scoring tool.)
- Cook Time: Varies based on your sourdough recipe (typically 30-50 minutes).
- Total Time: 2-5 minutes of active scoring time, integrated into your overall baking schedule.
This short investment of time yields significant aesthetic and functional benefits for your finished bread.
How To Make It Step By Step With Visual Cues

Scoring your sourdough loaf is a delicate but rewarding process. Always ensure your dough is well-chilled from a cold proof, as this makes it much easier to score cleanly without sticking or tearing.
- Prepare Your Loaf: Gently remove your proofed sourdough loaf from its banneton or proofing basket onto a piece of parchment paper or directly onto your baking vessel (like a Dutch oven). If desired, lightly dust the top surface of the loaf with rice flour or all-purpose flour using a small sieve. This not only adds a rustic look but also helps the scored patterns stand out beautifully.
- Hold Your Lame Correctly: For most cuts, hold your lame or sharp knife at a shallow angle, about 15-30 degrees to the surface of the dough. This angle helps create a “lip” or “ear” on the crust as it bakes, which is a desirable characteristic in sourdough. For deeper, more open cuts, you might hold it a bit straighter, closer to 90 degrees.
- The Basic Single Slash: This is the simplest and most common score. Make one confident, deep slash across the top of your round or oval loaf, from one side to the other. Aim for a depth of about 1/2 to 3/4 inch. This single cut allows for maximum oven spring and a beautiful ear.
- The Cross Pattern: For a classic look, make two intersecting slashes across the top of a round loaf, forming an “X.” Ensure both cuts are of similar depth, around 1/2 inch. This pattern provides even expansion and a lovely symmetrical appearance.
- The Box or Square Pattern: Create a square or rectangular pattern by making two parallel slashes lengthwise, and then two parallel slashes crosswise, forming a grid. The cuts should be about 1/4 to 1/2 inch deep. This is great for loaves where you want a more controlled, even rise across the surface.
- The Wheat Stalk or Leaf Pattern: For a decorative touch, make a single, slightly curved slash down the center of your loaf. Then, make several smaller, short, angled cuts branching off from the main line, alternating sides, to mimic a wheat stalk or leaf. These smaller cuts should be shallower, about 1/4 inch deep.
- The Spiral Pattern: Starting from the center of a round loaf, make a continuous, shallow spiral cut outwards towards the edge. This pattern is more decorative and typically shallower, around 1/8 to 1/4 inch deep, as it’s less about creating an ear and more about visual appeal.
- Bake Immediately: Once scored, place your loaf into your preheated oven or Dutch oven as quickly as possible. The scoring helps the dough expand in a controlled manner during the initial burst of heat, known as oven spring.
Easy Variations And Serving Ideas That Fit Real Life
Scoring is a fantastic way to personalize your sourdough, and there are endless possibilities beyond the basics. For a simple variation, try combining patterns. For example, a single deep slash down the middle with several shallow, decorative cuts on either side can create a stunning effect. You can also experiment with different dusting flours; cocoa powder can create a dark contrast on a light loaf, or a mix of rice flour and a tiny pinch of turmeric can give a subtle golden hue.
Serving your beautifully scored sourdough is a joy. It’s perfect as a centerpiece for any meal. Slice it thickly and serve alongside a hearty soup or stew for a comforting dinner. For a casual brunch, offer it with an array of spreads like artisanal butter, homemade jam, or a rich olive tapenade. To make it kid-friendly, simply slice the bread and serve with their favorite cheese or a smear of avocado. The visual appeal of a well-scored loaf makes it an excellent addition to a charcuterie board, where its rustic beauty complements cured meats and cheeses. Don’t forget to offer a good quality olive oil for dipping – a classic and always appreciated accompaniment.
Common Slip-Ups And How To Avoid Them
Even experienced bakers can encounter issues with scoring, but many common problems are easily fixed.
- Dough Sticking to the Lame: This is often a sign that your lame isn’t sharp enough, or your dough isn’t cold enough. Ensure you’re using a fresh, sharp razor blade in your lame. If your dough is at room temperature, it will be much softer and stickier, making clean cuts difficult. Always score a cold-proofed loaf straight from the refrigerator.
- Cuts Not Opening Up (No “Ear”): If your scores don’t open nicely in the oven, it could be due to a few factors. Your cuts might not be deep enough, or the angle of your lame might be too straight. Remember to hold the lame at a shallow angle (15-30 degrees) to create that desirable flap of crust. Also, insufficient oven spring (due to under-proofing or an inactive starter) can prevent cuts from expanding.
- Tearing or Dragging the Dough: This usually indicates a dull blade or too much hesitation. Aim for confident, swift cuts. A dull blade will pull and tear the delicate surface of the dough. Replace your lame blade regularly.
- Over-Scoring: While decorative patterns are fun, too many deep cuts can cause the loaf to spread too much and flatten out, rather than rising upwards. For functional cuts that promote oven spring, stick to one or two main deep slashes. Decorative cuts should be shallower.
- Forgetting to Dust: While optional, dusting with flour helps your scores become much more visible and defined after baking. Without it, the cuts might blend into the crust, losing some of their visual impact.
How To Store It And Make It Ahead Without Ruining Texture
Scoring is a step that happens immediately before

FAQs
- Can I make these ahead? Yes—prep ahead, refrigerate, then serve when ready.
- How long do leftovers last? Store covered in the fridge for 3–4 days for best texture.
- Can I adjust sweetness? Yes—add more or less sweetener to taste.
- Can I change the fruit? Yes—swap strawberries for blueberries, raspberries, or sliced banana.