Creating the perfect sandwich often starts with the bread, and if you’re like me, you appreciate a loaf that’s both soft and flavorful.

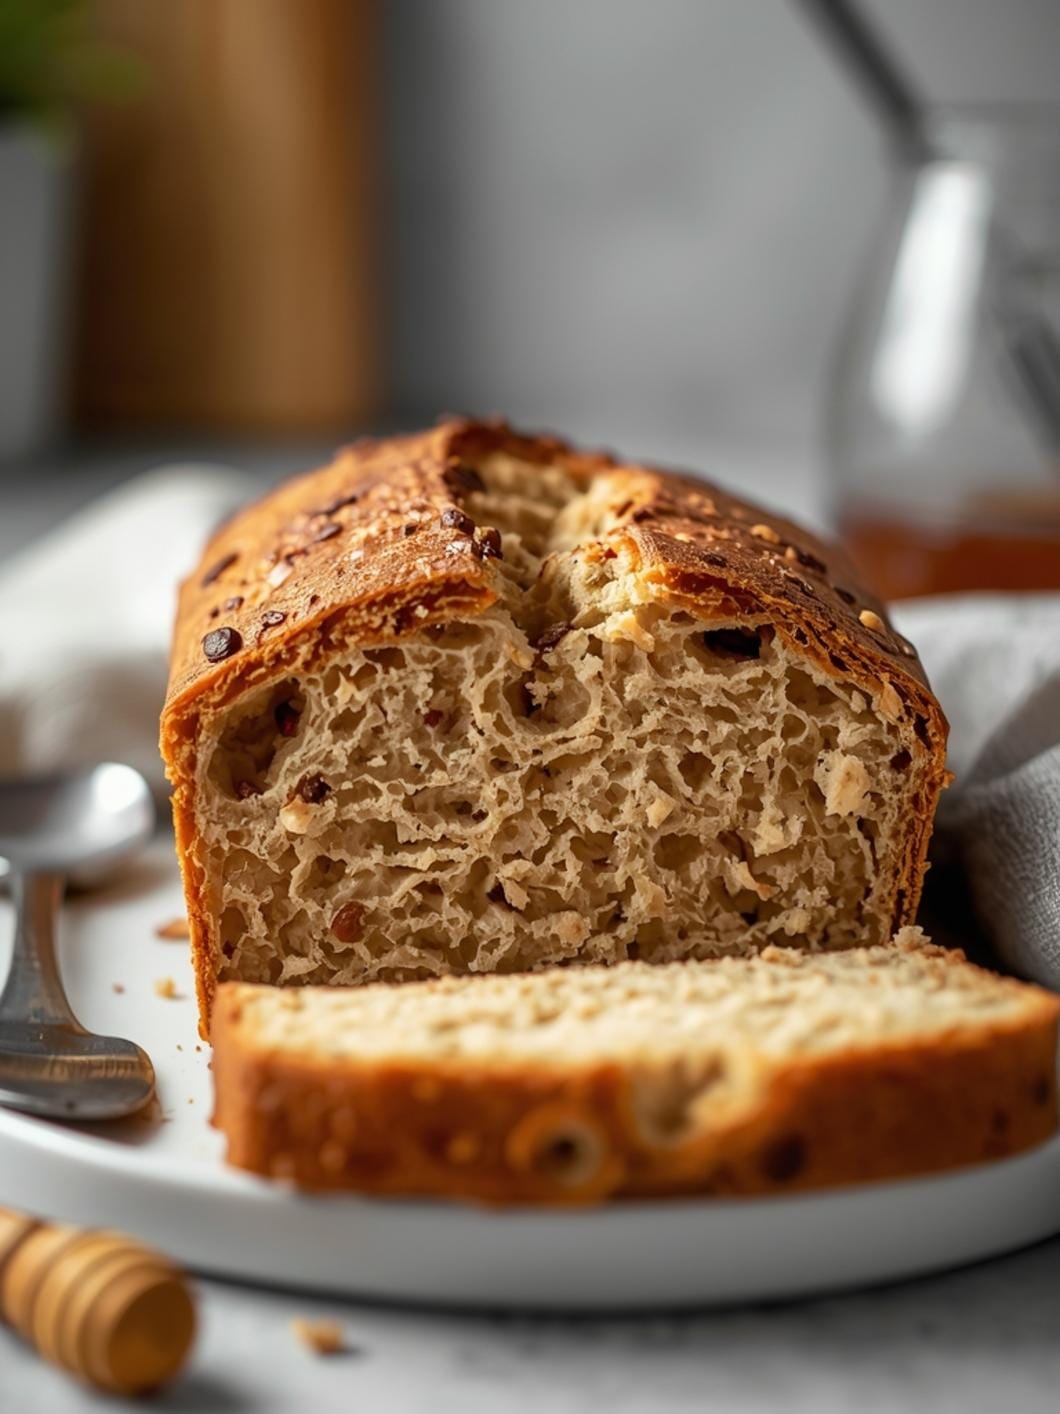
This recipe for extremely soft sourdough sandwich bread delivers just that – a tender crumb with that signature sourdough tang, making every sandwich an experience to savor.
Forget dense, dry slices; this bread is designed for everyday enjoyment, holding up beautifully to all your favorite fillings while offering a delightful chew. It’s surprisingly straightforward to bake, even for those new to sourdough, and promises to become a staple in your kitchen.
Table of Contents
- What You’ll Love About This Quick And Easy Recipe
- Everything You Need To Make This Recipe Without Stress
- Time Needed From Start To Finish
- How To Make It Step By Step With Visual Cues
- Easy Variations And Serving Ideas That Fit Real Life
- Common Slip-Ups And How To Avoid Them
- How To Store It And Make It Ahead Without Ruining Texture

Extremely Soft Sourdough Sandwich Bread
- Total Time: 7-11 hours
- Yield: 1 loaf 1x
Description
This recipe delivers an incredibly soft and flavorful sourdough sandwich bread, perfect for everyday enjoyment. It’s designed to be straightforward, even for sourdough beginners, resulting in a tender crumb with a signature sourdough tang that holds up beautifully to various fillings. Forget dense, dry slices; this bread is a game-changer for homemade bread lovers.
Ingredients
Instructions
1. 1. Combine Starter and Water: In a large mixing bowl, gently whisk together the active sourdough starter and the warm water until the starter is mostly dissolved. The mixture should look milky and slightly frothy.
2. 2. Mix Dry Ingredients: Add the all-purpose flour, salt, and granulated sugar to the bowl. Use a Danish dough whisk or a sturdy spoon to mix until a shaggy dough forms and no dry flour remains. It will be sticky. Cover the bowl with a clean kitchen towel or plastic wrap and let it rest for 30 minutes (this is called autolyse, and it helps the flour hydrate).
3. 3. Incorporate Butter and Knead: After the rest, add the softened unsalted butter to the dough. Using your hands, knead the butter into the dough until fully incorporated. This can be a bit messy at first, but keep working it. Once the butter is in, continue to knead the dough for 5-7 minutes on a lightly floured surface or in a stand mixer with a dough hook until it becomes smooth, elastic, and passes the windowpane test (you can stretch a small piece thin enough to see light through it without tearing).
4. 4. First Fermentation (Bulk Rise): Lightly grease a clean bowl with olive oil. Place the kneaded dough into the oiled bowl, turning it once to coat. Cover the bowl and let it rise in a warm spot (70-75 F / 21-24 C is ideal) for 4-6 hours, or until it has nearly doubled in size. During this time, perform 2-3 sets of “stretch and folds” every 45-60 minutes during the first 2-3 hours of the bulk rise. To do this, gently pull a portion of the dough up and fold it over itself, rotating the bowl and repeating until all sides have been folded.
5. 5. Shape the Loaf: Gently turn the dough out onto a lightly floured surface. Gently pat it into a rectangle. Fold the top third down to the center, then fold the bottom third up over the top. Turn the dough over and gently roll it into a tight log, sealing the seam at the bottom. The goal is to create tension on the surface. Place the shaped dough seam-side down into a lightly greased 9×5-inch loaf pan.
6. 6. Second Fermentation (Proofing): Cover the loaf pan loosely with plastic wrap or a clean kitchen towel. Let it proof in a warm spot for 1.5-2.5 hours, or until the dough has risen to about 1 inch above the rim of the pan. It should feel light and airy.
7. 7. Bake the Bread: Preheat your oven to 375 F (190 C) about 20 minutes before the end of the proofing time. Once preheated, place the loaf pan in the center of the oven. Bake for 35-40 minutes, or until the crust is deeply golden brown and the internal temperature reaches 200-210 F (93-99 C) when measured with an instant-read thermometer.
8. 8. Cool Completely: Remove the bread from the oven and immediately turn it out onto a wire rack. Allow it to cool completely for at least 1-2 hours before slicing. Slicing warm sourdough can result in a gummy texture.
- Prep Time: 15-20 minutes
- Cook Time: 35-40 minutes
- Category: bread
- Method: baking
- Cuisine: american
Nutrition
- Serving Size: 1 slice
Keywords: sourdough, sandwich, bread, soft, homemade, baking, starter, easy, comfort food, loaves
What You’ll Love About This Quick And Easy Recipe
This recipe is a game-changer for anyone who loves homemade bread but might be intimidated by traditional sourdough processes. It’s designed for busy families and home cooks who want to enjoy the incredible taste and texture of sourdough without a multi-day commitment. The result is a consistently soft, pliable loaf that’s ideal for everything from classic deli sandwiches to grilled cheese or even just toast with butter. It’s perfect for lunchboxes, quick weeknight dinners, or a satisfying weekend brunch, offering a wholesome alternative to store-bought options.
Everything You Need To Make This Recipe Without Stress
Gathering your ingredients before you begin ensures a smooth and enjoyable baking process. This recipe uses common pantry staples, with the star being your active sourdough starter, which provides both flavor and leavening.
INGREDIENTS:

- 150 grams active sourdough starter (fed and bubbly)
- 300 grams warm water (around 90-95°F / 32-35°C)
- 500 grams unbleached all-purpose flour
- 10 grams fine sea salt
- 30 grams granulated sugar
- 30 grams unsalted butter, softened
- 1 tablespoon olive oil (for greasing the bowl)
For the flour, unbleached all-purpose works wonderfully for a soft crumb, but you could also experiment with a blend of all-purpose and bread flour for a slightly chewier texture. If you don’t have fine sea salt, regular table salt can be used, but you might want to reduce the amount slightly as it’s often saltier by volume. The granulated sugar adds a touch of sweetness and helps with browning, while the softened unsalted butter contributes to the bread’s incredible tenderness.
Time Needed From Start To Finish
This recipe is designed to fit into a busy schedule, though sourdough always requires some patience for fermentation.
- Active Prep Time: 15-20 minutes
- Bulk Fermentation: 4-6 hours (depending on ambient temperature and starter activity)
- Shaping and Proofing: 1.5-2.5 hours
- Bake Time: 35-40 minutes
- Cooling Time: 1-2 hours (essential for best texture)
- Total Time: Approximately 7-11 hours (much of which is hands-off waiting)
How To Make It Step By Step With Visual Cues

Baking this soft sourdough sandwich bread is a rewarding process. Follow these steps for a perfect loaf every time.
- Combine Starter and Water: In a large mixing bowl, gently whisk together the active sourdough starter and the warm water until the starter is mostly dissolved. The mixture should look milky and slightly frothy.
- Mix Dry Ingredients: Add the all-purpose flour, salt, and granulated sugar to the bowl. Use a Danish dough whisk or a sturdy spoon to mix until a shaggy dough forms and no dry flour remains. It will be sticky. Cover the bowl with a clean kitchen towel or plastic wrap and let it rest for 30 minutes (this is called autolyse, and it helps the flour hydrate).
- Incorporate Butter and Knead: After the rest, add the softened unsalted butter to the dough. Using your hands, knead the butter into the dough until fully incorporated. This can be a bit messy at first, but keep working it. Once the butter is in, continue to knead the dough for 5-7 minutes on a lightly floured surface or in a stand mixer with a dough hook until it becomes smooth, elastic, and passes the windowpane test (you can stretch a small piece thin enough to see light through it without tearing).
- First Fermentation (Bulk Rise): Lightly grease a clean bowl with olive oil. Place the kneaded dough into the oiled bowl, turning it once to coat. Cover the bowl and let it rise in a warm spot (70-75°F / 21-24°C is ideal) for 4-6 hours, or until it has nearly doubled in size. During this time, perform 2-3 sets of “stretch and folds” every 45-60 minutes during the first 2-3 hours of the bulk rise. To do this, gently pull a portion of the dough up and fold it over itself, rotating the bowl and repeating until all sides have been folded.
- Shape the Loaf: Gently turn the dough out onto a lightly floured surface. Gently pat it into a rectangle. Fold the top third down to the center, then fold the bottom third up over the top. Turn the dough over and gently roll it into a tight log, sealing the seam at the bottom. The goal is to create tension on the surface. Place the shaped dough seam-side down into a lightly greased 9×5-inch loaf pan.
- Second Fermentation (Proofing): Cover the loaf pan loosely with plastic wrap or a clean kitchen towel. Let it proof in a warm spot for 1.5-2.5 hours, or until the dough has risen to about 1 inch above the rim of the pan. It should feel light and airy.
- Bake the Bread: Preheat your oven to 375°F (190°C) about 20 minutes before the end of the proofing time. Once preheated, place the loaf pan in the center of the oven. Bake for 35-40 minutes, or until the crust is deeply golden brown and the internal temperature reaches 200-210°F (93-99°C) when measured with an instant-read thermometer.
- Cool Completely: Remove the bread from the oven and immediately turn it out onto a wire rack. Allow it to cool completely for at least 1-2 hours before slicing. Slicing warm sourdough can result in a gummy texture.
Easy Variations And Serving Ideas That Fit Real Life
This soft sourdough sandwich bread is incredibly versatile. For a touch of sweetness, consider adding a handful of dried cranberries or golden raisins to the dough during the kneading stage. If you prefer a savory twist, incorporate 1/4 cup of grated Parmesan cheese and a teaspoon of dried Italian herbs. For an extra soft crust, you can brush the top of the loaf with melted butter immediately after it comes out of the oven.
This bread is, of course, perfect for sandwiches of all kinds – from classic turkey and provolone to a hearty BLT. It also makes fantastic toast, whether slathered with avocado and a sprinkle of everything bagel seasoning, or simply buttered with jam. Cut into thick slices, it’s wonderful for French toast. For a quick appetizer, slice it, brush with olive oil, sprinkle with garlic powder, and toast until golden, serving alongside marinara sauce. Kids especially love it for grilled cheese or peanut butter and jelly sandwiches because of its soft texture.
Common Slip-Ups And How To Avoid Them
Even experienced bakers can encounter small issues, but knowing what to look for can prevent them.
- Dense or Gummy Texture: This is often caused by under-proofing or slicing the bread too soon after baking. Ensure your dough has doubled in size during the bulk fermentation and risen adequately in the loaf pan. Always let the bread cool completely on a wire rack before slicing to allow the internal structure to set.
- Crust is Too Hard: If your crust is overly thick or hard, it might be due to overbaking or insufficient steam in the oven. While this recipe doesn’t call for steam, ensure you’re not baking it for too long. For a softer crust, you can lightly brush the top with milk or melted butter before baking.
- Loaf Doesn’t Rise: The most common culprit here is an inactive sourdough starter. Make sure your starter is fed, bubbly, and active before you begin. It should float when a small piece is dropped into water. Cold kitchen temperatures can also slow down fermentation significantly; try to find a warm spot for your dough to rise.
- Dough is Too Sticky to Handle: Sourdough dough can be sticky, especially with higher hydration. Avoid adding too much extra flour during kneading or shaping, as this can make the final bread dry. Lightly flour your hands and work surface, and use a bench scraper to help manage the dough. A little stickiness is normal.
How To Store It And Make It Ahead Without Ruining Texture
Proper storage is key to keeping your soft sourdough sandwich bread fresh and delicious. Once completely cooled, store the loaf in an airtight container or a bread bag at room temperature for up to 3-4 days. Avoid refrigerating it, as this can actually make bread stale faster.
If you

FAQs
- Can I make these ahead? Yes—prep ahead, refrigerate, then serve when ready.
- How long do leftovers last? Store covered in the fridge for 3–4 days for best texture.
- Can I adjust sweetness? Yes—add more or less sweetener to taste.
- Can I change the fruit? Yes—swap strawberries for blueberries, raspberries, or sliced banana.