There’s nothing quite like the aroma of freshly baked bread filling your kitchen, especially when it’s a healthy loaf that tastes incredibly comforting.

This No Knead Honey Oat Bread, baked in a Dutch oven, delivers on all fronts. It’s surprisingly simple to make, requiring minimal effort for maximum reward, making it perfect for busy weeknights or lazy weekends.
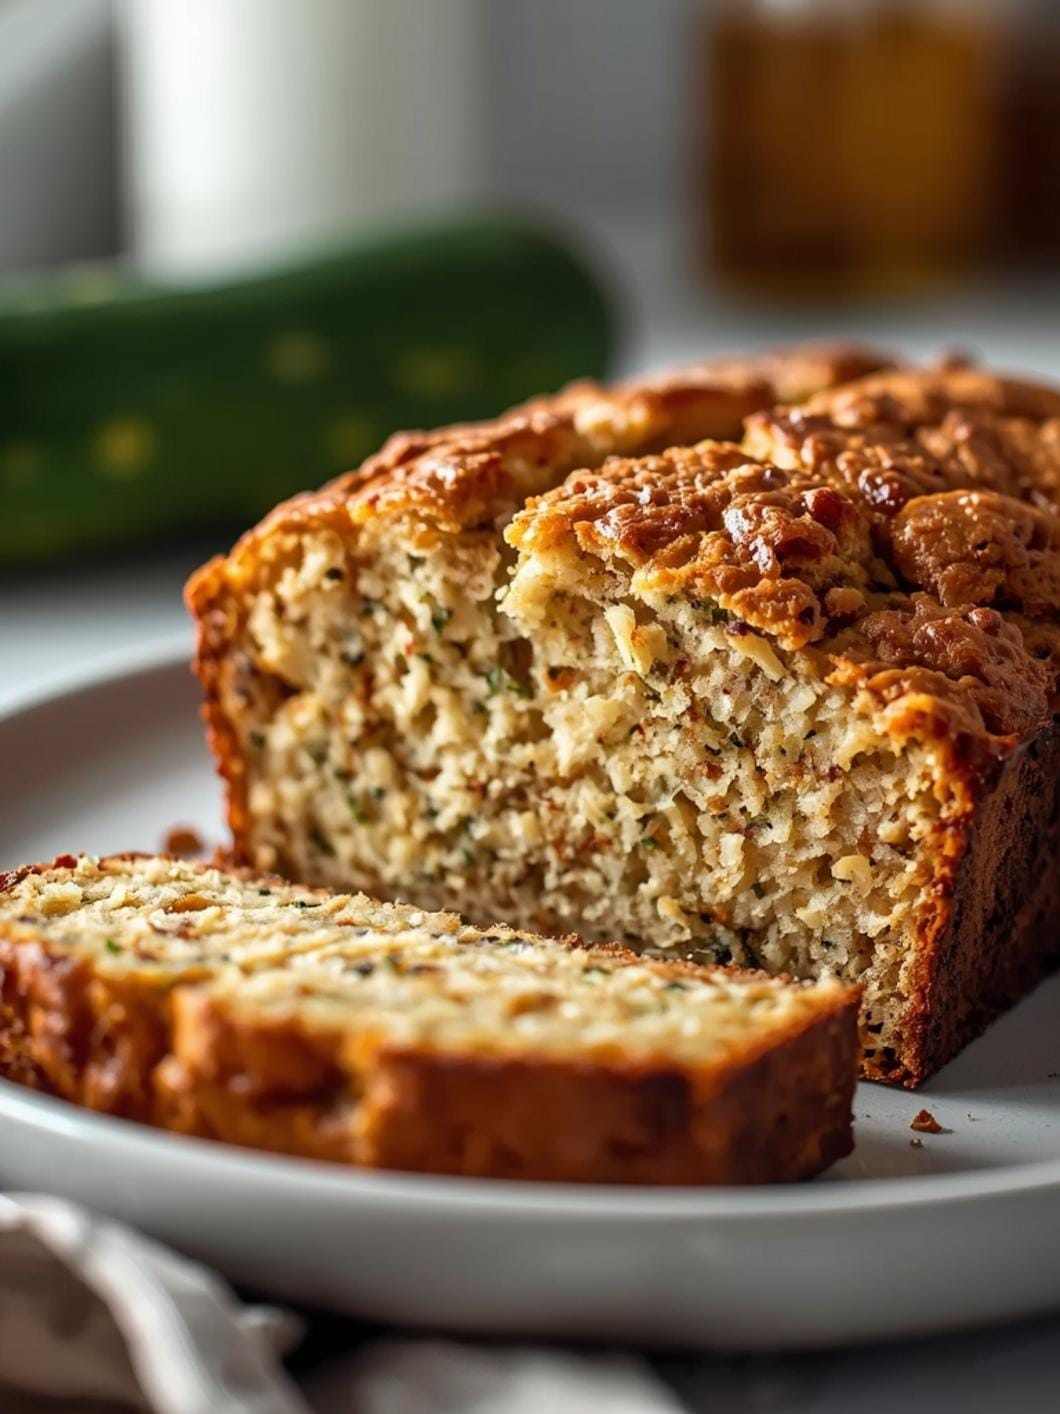
This recipe focuses on wholesome ingredients, creating a tender crumb with a delightful chew from the oats and a subtle sweetness from the honey. The Dutch oven creates a perfect steamy environment, mimicking a professional bakery oven and resulting in a beautifully crisp crust and a soft interior every single time. Get ready to bake a loaf that will quickly become a family favorite.
Table of Contents
- What You’ll Love About This Quick And Easy Recipe
- Everything You Need To Make This Recipe Without Stress
- Time Needed From Start To Finish
- How To Make It Step By Step With Visual Cues
- Easy Variations And Serving Ideas That Fit Real Life
- Common Slip-Ups And How To Avoid Them
- How To Store It And Make It Ahead Without Ruining Texture

No Knead Honey Oat Bread (Dutch Oven)
- Total Time: 9-13 hours
- Yield: 1 loaf 1x
Description
This No Knead Honey Oat Bread, baked in a Dutch oven, delivers on all fronts. It’s surprisingly simple to make, requiring minimal effort for maximum reward, making it perfect for busy weeknights or lazy weekends. This recipe focuses on wholesome ingredients, creating a tender crumb with a delightful chew from the oats and a subtle sweetness from the honey. The Dutch oven creates a perfect steamy environment, mimicking a professional bakery oven and resulting in a beautifully crisp crust and a soft interior every single time. Get ready to bake a loaf that will quickly become a family favorite.
Ingredients
Instructions
1. 1. Combine Dry Ingredients: In a large mixing bowl, whisk together the all-purpose flour, rolled oats, active dry yeast, and salt. Make sure these are well combined to ensure even distribution of the yeast and salt throughout the dough.
2. 2. Mix Wet Ingredients: In a separate small bowl or measuring cup, combine the warm water, honey, and olive oil. Stir until the honey is fully dissolved. The water should be warm to the touch, but not hot, to activate the yeast without killing it.
3. 3. Form the Dough: Pour the wet ingredients into the dry ingredients. Using a wooden spoon or a sturdy spatula, mix until a shaggy, sticky dough forms. Don’t worry about it looking perfect; no-knead dough is meant to be rustic. Ensure there are no dry pockets of flour left.
4. 4. First Rise (Overnight): Cover the bowl tightly with plastic wrap or a clean kitchen towel. Let the dough rise at room temperature for 8 to 12 hours, or preferably overnight. The dough should double in size and have bubbles on the surface. This long, slow rise develops incredible flavor.
5. 5. Preheat Oven and Dutch Oven: About 30 minutes before you’re ready to bake, place your Dutch oven (with its lid) in your oven and preheat to 450 F (230 C). This step is crucial for achieving that perfect crispy crust.
6. 6. Shape and Transfer Dough: Lightly flour a clean surface. Gently scrape the dough out of the bowl onto the floured surface. Fold the edges of the dough towards the center a few times to form a round ball. Avoid overworking the dough. Carefully remove the hot Dutch oven from the oven, remove the lid, and gently place the dough inside. You can sprinkle a few extra oats on top for a nice finish.
7. 7. Bake the Bread: Cover the Dutch oven with its lid and bake for 30 minutes. Then, remove the lid and continue baking for another 15-20 minutes, or until the crust is deeply golden brown and the internal temperature reaches 200-210 F (93-99 C).
8. 8. Cool Completely: Carefully remove the bread from the Dutch oven and transfer it to a wire rack to cool completely before slicing. This step is important for the texture to set properly. Slicing too early can result in a gummy interior.
- Prep Time: 10 minutes
- Cook Time: 45-50 minutes
- Category: bread
- Method: baking
- Cuisine: american
Nutrition
- Serving Size: 1 slice
Keywords: no knead, honey oat bread, dutch oven, homemade bread, easy bread, oat bread, healthy bread, whole grain, artisan bread, baking
What You’ll Love About This Quick And Easy Recipe
This No Knead Honey Oat Bread recipe is a game-changer for anyone who loves homemade bread but shies away from the time and effort often involved. The “no-knead” aspect means you don’t need any special skills or equipment beyond a good mixing bowl and a Dutch oven. It’s perfect for beginner bakers looking to impress themselves and their family, or experienced bakers who appreciate a straightforward, reliable recipe. The use of oats adds a lovely texture and a boost of fiber, making it a healthier alternative to many traditional bread recipes, while the honey provides a natural sweetness that appeals to both kids and adults. Serve it warm with a pat of butter for breakfast, alongside a hearty soup for lunch, or as an accompaniment to dinner. It’s truly versatile and fits into almost any mealtime.
Everything You Need To Make This Recipe Without Stress
Gathering your ingredients before you start baking makes the process smooth and enjoyable. You’ll find that most of these are pantry staples, ensuring this recipe is always within reach.
INGREDIENTS:

- 3 cups all-purpose flour
- 1 cup old-fashioned rolled oats, plus more for sprinkling
- 1 teaspoon active dry yeast
- 1 teaspoon salt
- 1 1/2 cups warm water (105-115°F)
- 1/4 cup honey
- 1 tablespoon olive oil, plus more for greasing
For the flour, while all-purpose works wonderfully, you can experiment with a blend of whole wheat and all-purpose for an even heartier loaf. Just be aware that whole wheat flour absorbs more liquid, so you might need to add an extra tablespoon or two of water. When choosing honey, any variety will work, but a local, raw honey can add a unique depth of flavor. Ensure your yeast is active by checking its expiration date; old yeast can lead to a flat loaf.
Time Needed From Start To Finish
This recipe is designed for minimal active work, though it does require some patience for the dough to rise.
- Prep Time: 10 minutes
- Rise Time: 8-12 hours (or overnight)
- Bake Time: 45-50 minutes
- Total Time: Approximately 9-13 hours (mostly hands-off)
How To Make It Step By Step With Visual Cues

Making this no-knead bread is a breeze. Follow these simple steps, and you’ll have a gorgeous loaf in no time.
- Combine Dry Ingredients: In a large mixing bowl, whisk together the all-purpose flour, rolled oats, active dry yeast, and salt. Make sure these are well combined to ensure even distribution of the yeast and salt throughout the dough.
- Mix Wet Ingredients: In a separate small bowl or measuring cup, combine the warm water, honey, and olive oil. Stir until the honey is fully dissolved. The water should be warm to the touch, but not hot, to activate the yeast without killing it.
- Form the Dough: Pour the wet ingredients into the dry ingredients. Using a wooden spoon or a sturdy spatula, mix until a shaggy, sticky dough forms. Don’t worry about it looking perfect; no-knead dough is meant to be rustic. Ensure there are no dry pockets of flour left.
- First Rise (Overnight): Cover the bowl tightly with plastic wrap or a clean kitchen towel. Let the dough rise at room temperature for 8 to 12 hours, or preferably overnight. The dough should double in size and have bubbles on the surface. This long, slow rise develops incredible flavor.
- Preheat Oven and Dutch Oven: About 30 minutes before you’re ready to bake, place your Dutch oven (with its lid) in your oven and preheat to 450°F (230°C). This step is crucial for achieving that perfect crispy crust.
- Shape and Transfer Dough: Lightly flour a clean surface. Gently scrape the dough out of the bowl onto the floured surface. Fold the edges of the dough towards the center a few times to form a round ball. Avoid overworking the dough. Carefully remove the hot Dutch oven from the oven, remove the lid, and gently place the dough inside. You can sprinkle a few extra oats on top for a nice finish.
- Bake the Bread: Cover the Dutch oven with its lid and bake for 30 minutes. Then, remove the lid and continue baking for another 15-20 minutes, or until the crust is deeply golden brown and the internal temperature reaches 200-210°F (93-99°C).
- Cool Completely: Carefully remove the bread from the Dutch oven and transfer it to a wire rack to cool completely before slicing. This step is important for the texture to set properly. Slicing too early can result in a gummy interior.
Easy Variations And Serving Ideas That Fit Real Life
This Honey Oat Bread is fantastic as is, but it’s also a great canvas for simple variations and delightful serving suggestions.
- Nutty Addition: For extra crunch and flavor, fold in 1/2 cup of chopped walnuts or pecans with the dry ingredients.
- Seed Power: Add 2 tablespoons of flax seeds, chia seeds, or sunflower seeds to the dough for an extra nutritional boost and textural interest.
- Sweet & Savory: A pinch of cinnamon or nutmeg can enhance the honey flavor. For a savory twist, try adding a tablespoon of dried rosemary or thyme.
- Kid-Friendly Toppings: Kids love to customize! Offer a spread of cream cheese, fruit jam, or even a drizzle of extra honey when serving.
- Bruschetta Style: Slice the bread, toast it lightly, and top with fresh diced tomatoes, basil, and a balsamic glaze for an appetizer.
- Soup Dipper: This bread is phenomenal for dipping into hearty stews, chilis, or creamy tomato soup.
- Breakfast Treat: Serve thick slices toasted with butter and a sprinkle of cinnamon sugar, or make a delicious open-faced sandwich with avocado and a fried egg.
- Mini Loaves: If you have smaller Dutch ovens or oven-safe pots, you can divide the dough and make smaller loaves, adjusting baking time as needed.
Common Slip-Ups And How To Avoid Them
Even with a simple recipe like this, a few common mistakes can impact your results. Knowing what to watch out for can help you achieve perfect bread every time.
- Inactive Yeast: If your dough doesn’t rise, the most likely culprit is inactive yeast. Always check the expiration date, and ensure your water is warm (105-115°F) but not hot enough to kill the yeast. If your yeast doesn’t foam when mixed with warm water and a pinch of sugar (a quick test), it’s probably dead.
- Overworking the Dough: With no-knead bread, less is more. Once the ingredients are combined, resist the urge to knead or manipulate the dough too much. Gentle handling preserves the air bubbles created during the long fermentation.
- Slicing Too Soon: It’s tempting to cut into a warm, fragrant loaf right out of the oven, but resist! The bread continues to cook and set as it cools. Slicing too early can result in a dense, gummy texture. Let it cool on a wire rack for at least an hour, or until it’s just warm to the touch.
- Not Preheating the Dutch Oven: This step is critical for achieving a crisp crust. A hot Dutch oven creates immediate steam around the dough, which is essential for a good “oven spring” and a beautifully browned crust. Don’t skip it!
- Too Much Flour on the Surface: When transferring and shaping the dough, use just enough flour to prevent sticking. Too much extra flour can make the bread dry or tough.
How To Store It And Make It Ahead Without Ruining Texture
Proper storage is key to keeping your homemade bread fresh and delicious.
- Storing Fresh Bread: Once completely cooled, store the bread at room temperature in an airtight container or a bread bag. It will stay fresh for 3-4 days. Avoid refrigerating bread, as it tends to dry out faster in the fridge.
- Freezing for Later: For longer storage, slice the cooled bread and freeze the slices in a freezer-safe bag or container for up to 3 months. You can toast individual slices directly from the freezer. You

FAQs
- Can I make these ahead? Yes—prep ahead, refrigerate, then serve when ready.
- How long do leftovers last? Store covered in the fridge for 3–4 days for best texture.
- Can I adjust sweetness? Yes—add more or less sweetener to taste.
- Can I change the fruit? Yes—swap strawberries for blueberries, raspberries, or sliced banana.