Get ready to bake some truly amazing gluten-free sourdough bread right in your own kitchen! This recipe is designed to be straightforward and rewarding, delivering a delicious loaf that’s perfect for all your favorite meals. Whether you’re new to gluten-free baking or a seasoned pro, you’ll find this method simple and satisfying.

This homemade GF sourdough bread offers a wonderful texture and a delightful tang, making it an excellent choice for everything from hearty sandwiches to a simple piece of toast with your morning coffee. Say goodbye to store-bought gluten-free bread that often lacks flavor or crumbles too easily – this recipe will quickly become a staple in your home.
Table of Contents
- What You’ll Love About This Quick And Easy Recipe
- Everything You Need To Make This Recipe Without Stress
- Time Needed From Start To Finish
- How To Make It Step By Step With Visual Cues
- Easy Variations And Serving Ideas That Fit Real Life
- Common Slip-Ups And How To Avoid Them
- How To Store It And Make It Ahead Without Ruining Texture

Gluten-Free Sourdough Bread
- Total Time: 12-18 hours
- Yield: 1 loaf 1x
Description
This recipe is designed to be straightforward and rewarding, delivering a delicious gluten-free sourdough loaf that’s perfect for all your favorite meals. Whether you’re new to gluten-free baking or a seasoned pro, you’ll find this method simple and satisfying. This homemade GF sourdough bread offers a wonderful texture and a delightful tang, making it an excellent choice for everything from hearty sandwiches to a simple piece of toast with your morning coffee.
Ingredients
Instructions
1. Prepare the Starter Mixture: In a large mixing bowl, combine the active gluten-free sourdough starter, warm water, psyllium husk powder, olive oil, honey (or maple syrup), and apple cider vinegar. Whisk everything together until the psyllium husk powder is fully incorporated and the mixture looks slightly thickened and uniform. The psyllium husk will absorb liquid and create a gel-like consistency, which is important for the structure of gluten-free bread.
2. Combine Dry Ingredients: In a separate medium bowl, whisk together the gluten-free all-purpose flour blend, salt, and baking soda. Make sure to distribute the salt and baking soda evenly throughout the flour.
3. Mix the Dough: Add the dry ingredients to the wet starter mixture. Use a sturdy spoon or a stand mixer with a paddle attachment to mix until a shaggy, cohesive dough forms. It will be stickier than traditional wheat dough but should hold together. Mix for about 3-5 minutes on medium speed if using a stand mixer, or vigorously by hand, until no dry streaks of flour remain.
4. First Fermentation (Bulk Rise): Lightly oil a clean large bowl with olive oil. Transfer the dough to the oiled bowl, turning it once to coat the entire surface. Cover the bowl tightly with plastic wrap or a damp kitchen towel. Let the dough ferment at room temperature (around 70-75F) for 8-12 hours, or until it has visibly increased in size by about 50-75% and shows some bubbles on the surface. Overnight fermentation works wonderfully for this step.
5. Shape and Second Proof: Gently turn the dough out onto a lightly floured surface (using gluten-free flour). Shape it into a round or oval loaf. You can use a banneton basket dusted with gluten-free flour for proofing, or place it on a piece of parchment paper on a baking sheet. Cover loosely with plastic wrap or a damp towel and let it proof for another 2-4 hours at room temperature. The dough should look slightly puffy and feel airy, but not overly gassy.
6. Preheat Oven and Bake: About 30 minutes before baking, preheat your oven to 450 F (232 C) with a Dutch oven or a heavy baking pot inside. Carefully remove the hot Dutch oven from the oven. Gently transfer the dough (on the parchment paper, if using) into the hot Dutch oven. Score the top of the dough with a sharp knife or razor blade to allow for expansion during baking.
7. Initial Bake (Covered): Cover the Dutch oven with its lid and bake for 30 minutes. This creates a steamy environment crucial for a good crust.
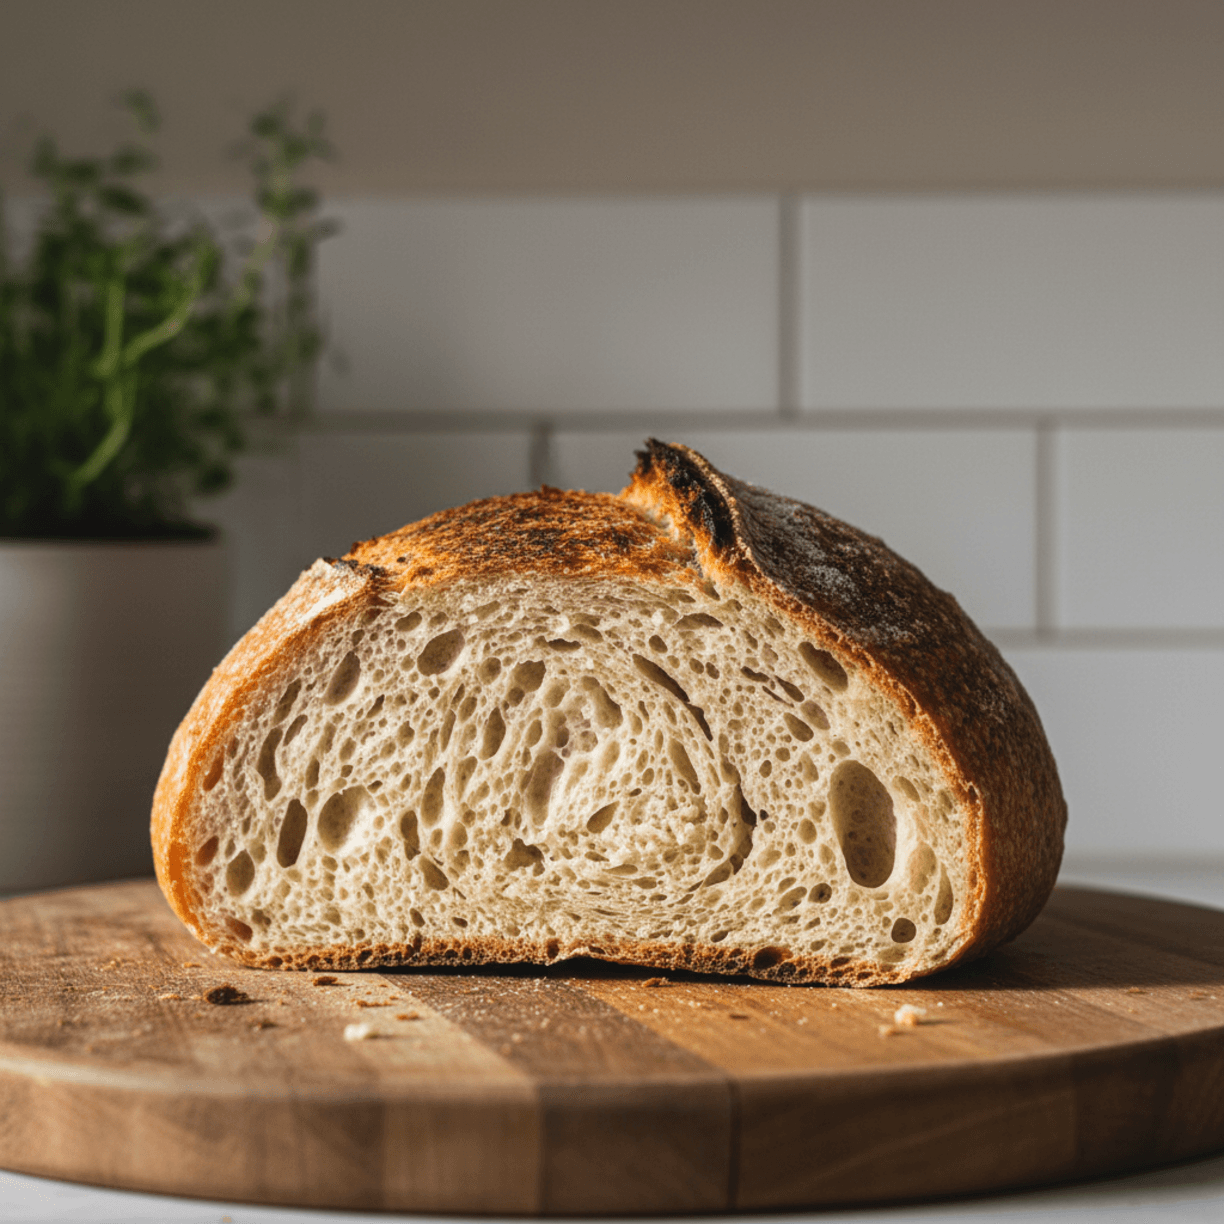
8. Final Bake (Uncovered) and Cool: Remove the lid and continue baking for another 20-30 minutes, or until the crust is deeply golden brown and the internal temperature reaches 200-210 F (93-99 C). Carefully remove the bread from the Dutch oven and transfer it to a wire rack. Let it cool completely for at least 2 hours before slicing. This cooling period is critical for the internal structure to set; slicing too early can result in a gummy texture.
- Prep Time: 20 minutes
- Cook Time: 50-60 minutes
- Category: main dish
- Method: baking
- Cuisine: american
Nutrition
- Serving Size: 1 slice
Keywords: gluten-free, sourdough, bread, baking, homemade, easy, healthy, sandwich, toast, dairy-free
What You’ll Love About This Quick And Easy Recipe
This recipe is a game-changer for anyone looking for a reliable, delicious gluten-free sourdough bread without the fuss. It’s perfect for busy families because it streamlines the process, focusing on key steps that yield fantastic results without requiring hours of hands-on time. You’ll love the satisfying chewiness and the slightly crisp crust, which stands up beautifully to all sorts of toppings and fillings. This bread is ideal for everyday enjoyment, whether it’s a quick breakfast, a packed lunch, or a side for dinner. It’s also a fantastic option for those with gluten sensitivities who miss the taste and texture of traditional sourdough.
Everything You Need To Make This Recipe Without Stress
Gathering your ingredients before you start baking makes the entire process smoother and more enjoyable. This list focuses on readily available gluten-free staples that will come together to create a truly delicious loaf.
INGREDIENTS:

- 1 cup active gluten-free sourdough starter (fed and bubbly)
- 1 ½ cups warm water (about 100-110°F)
- 1 tablespoon psyllium husk powder
- 1 tablespoon olive oil, plus extra for oiling the bowl
- 2 teaspoons honey or maple syrup
- 1 teaspoon apple cider vinegar
- 2 ½ cups gluten-free all-purpose flour blend (containing xanthan gum)
- 1 teaspoon salt
- ½ teaspoon baking soda
For the gluten-free flour blend, ensure it explicitly states it contains xanthan gum. If your blend does not include it, you’ll need to add ¼ teaspoon of xanthan gum per cup of flour, so about ⅝ teaspoon for this recipe. Good quality olive oil makes a difference in flavor, but any neutral oil will work. For the starter, make sure it’s active and bubbly, as this is crucial for the bread’s rise and texture. If you don’t have honey, maple syrup is a great alternative and won’t significantly alter the taste.
Time Needed From Start To Finish
This recipe is designed to be manageable within a reasonable timeframe, though sourdough always requires patience for fermentation.
- Active Preparation Time: 20 minutes
- Bulk Fermentation Time: 8-12 hours (overnight is ideal)
- Proofing Time: 2-4 hours
- Baking Time: 50-60 minutes
- Cooling Time: 2 hours (essential for best texture)
- Total Time (including inactive time): Approximately 12-18 hours
How To Make It Step By Step With Visual Cues

Follow these steps carefully to achieve a beautiful and delicious gluten-free sourdough loaf. Visual cues will help you know what to look for at each stage.
- Prepare the Starter Mixture: In a large mixing bowl, combine the active gluten-free sourdough starter, warm water, psyllium husk powder, olive oil, honey (or maple syrup), and apple cider vinegar. Whisk everything together until the psyllium husk powder is fully incorporated and the mixture looks slightly thickened and uniform. The psyllium husk will absorb liquid and create a gel-like consistency, which is important for the structure of gluten-free bread.
- Combine Dry Ingredients: In a separate medium bowl, whisk together the gluten-free all-purpose flour blend, salt, and baking soda. Make sure to distribute the salt and baking soda evenly throughout the flour.
- Mix the Dough: Add the dry ingredients to the wet starter mixture. Use a sturdy spoon or a stand mixer with a paddle attachment to mix until a shaggy, cohesive dough forms. It will be stickier than traditional wheat dough but should hold together. Mix for about 3-5 minutes on medium speed if using a stand mixer, or vigorously by hand, until no dry streaks of flour remain.
- First Fermentation (Bulk Rise): Lightly oil a clean large bowl with olive oil. Transfer the dough to the oiled bowl, turning it once to coat the entire surface. Cover the bowl tightly with plastic wrap or a damp kitchen towel. Let the dough ferment at room temperature (around 70-75°F) for 8-12 hours, or until it has visibly increased in size by about 50-75% and shows some bubbles on the surface. Overnight fermentation works wonderfully for this step.
- Shape and Second Proof: Gently turn the dough out onto a lightly floured surface (using gluten-free flour). Shape it into a round or oval loaf. You can use a banneton basket dusted with gluten-free flour for proofing, or place it on a piece of parchment paper on a baking sheet. Cover loosely with plastic wrap or a damp towel and let it proof for another 2-4 hours at room temperature. The dough should look slightly puffy and feel airy, but not overly gassy.
- Preheat Oven and Bake: About 30 minutes before baking, preheat your oven to 450°F (232°C) with a Dutch oven or a heavy baking pot inside. Carefully remove the hot Dutch oven from the oven. Gently transfer the dough (on the parchment paper, if using) into the hot Dutch oven. Score the top of the dough with a sharp knife or razor blade to allow for expansion during baking.
- Initial Bake (Covered): Cover the Dutch oven with its lid and bake for 30 minutes. This creates a steamy environment crucial for a good crust.
- Final Bake (Uncovered) and Cool: Remove the lid and continue baking for another 20-30 minutes, or until the crust is deeply golden brown and the internal temperature reaches 200-210°F (93-99°C). Carefully remove the bread from the Dutch oven and transfer it to a wire rack. Let it cool completely for at least 2 hours before slicing. This cooling period is critical for the internal structure to set; slicing too early can result in a gummy texture.
Easy Variations And Serving Ideas That Fit Real Life
This versatile gluten-free sourdough bread can be enjoyed in so many ways, and it’s easy to adapt for different tastes and occasions. For a savory twist, try adding 1/2 cup of chopped olives, sun-dried tomatoes, or roasted garlic to the dough during the mixing stage. If you prefer a herby loaf, incorporate 2 tablespoons of dried rosemary, thyme, or a blend of Italian herbs. For a slightly sweet and nutty flavor, a handful of toasted walnuts or pecans can be folded in.
This bread is fantastic for everyday meals. Use thick slices for incredible grilled cheese sandwiches or hearty avocado toast. It also makes a wonderful accompaniment to soups and stews, perfect for dipping. For a quick snack, simply toast a slice and spread with butter, jam, or your favorite nut butter. Kids often love this bread toasted with a sprinkle of cinnamon sugar or as mini pizza bases with a little sauce and cheese. For a party or buffet, slice it thinly and serve with a platter of cheeses, cured meats, and various spreads. Don’t forget it makes excellent croutons or breadcrumbs if you have any leftover!
Common Slip-Ups And How To Avoid Them
Even experienced bakers can encounter small challenges, especially with gluten-free baking. One common mistake is not using an active enough sourdough starter. If your starter isn’t bubbly and robust, your bread won’t rise properly. To avoid this, feed your starter 4-12 hours before you plan to mix your dough and ensure it doubles in size and has plenty of visible bubbles. Another frequent issue is over-handling the dough. Gluten-free dough doesn’t develop gluten like wheat dough, so excessive kneading isn’t necessary and can actually make it denser. Mix just until combined and then handle gently.
Under-proofing or over-proofing can also lead to less-than-ideal results. If the dough doesn’t rise enough during the bulk fermentation or second proof, the bread will be dense. If it proofs too long, it can collapse in the oven. Look for visual cues: the dough should increase in size and show some bubbles, but shouldn’t be overly gassy or deflated. Finally, resist the urge to slice the bread while it’s still warm. Cooling completely is essential for the internal structure to set, preventing a gummy texture. Patience here will be rewarded with a much better loaf.
How To Store It And Make It Ahead Without Ruining Texture
Proper storage is key to keeping your homemade gluten-free sourdough fresh and delicious. Once the bread has completely cooled, store it at room temperature in an airtight container or a bread bag. A linen bread bag can also work

FAQs
- Can I make these ahead? Yes—prep ahead, refrigerate, then serve when ready.
- How long do leftovers last? Store covered in the fridge for 3–4 days for best texture.
- Can I adjust sweetness? Yes—add more or less sweetener to taste.
- Can I change the fruit? Yes—swap strawberries for blueberries, raspberries, or sliced banana.