There’s nothing quite like the aroma of freshly baked bread filling your kitchen, and with this homemade multigrain sourdough bread recipe, you can experience that joy without any fuss.

This recipe is designed to be approachable for home bakers of all skill levels, guiding you through each step to create a truly delicious loaf. You’ll be amazed at how simple it is to transform basic ingredients into a wholesome, flavorful bread that’s perfect for any meal.
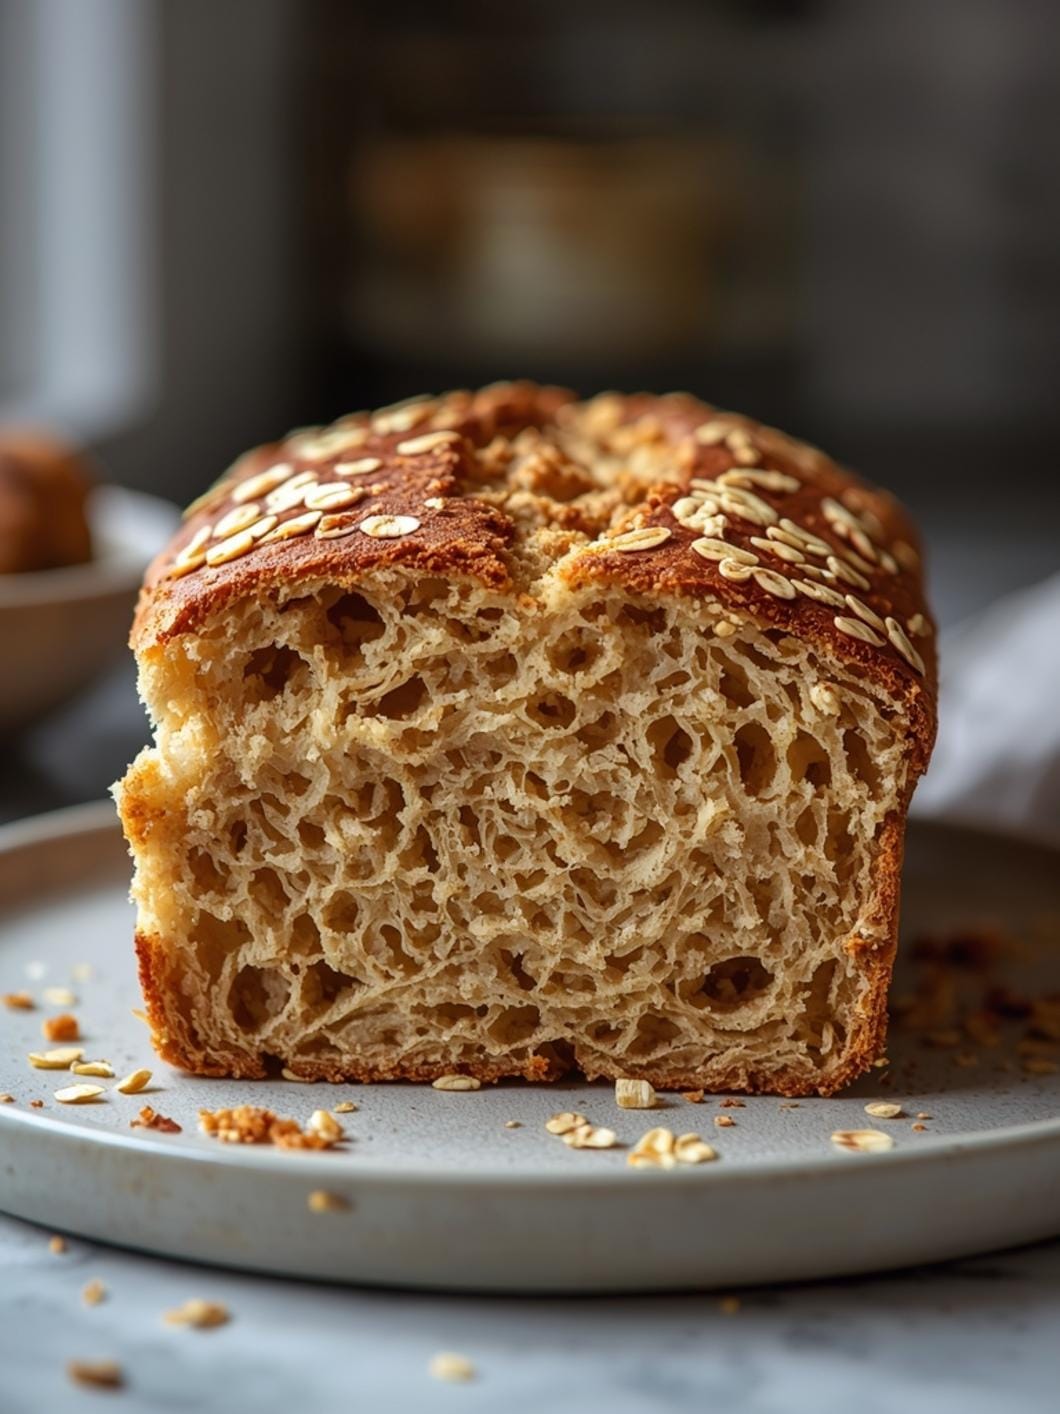
Get ready to impress your family and friends with a soft, chewy, and wonderfully textured multigrain sourdough loaf. We’re breaking down the process into easy-to-follow instructions, ensuring your baking experience is enjoyable and results in a beautiful, crusty bread with a tender crumb. Let’s dive into making some incredible homemade bread together!

Homemade Multigrain Sourdough Bread
- Total Time: 14-24 hours
- Yield: 1 large loaf 1x
Description
This recipe guides you through making a delicious and wholesome multigrain sourdough bread, perfect for home bakers of all skill levels. It transforms basic ingredients into a flavorful loaf with a soft, chewy, and wonderfully textured crumb, ideal for any meal.
Ingredients
Instructions
1. 1. Prepare Your Starter and Mix the Dough: In a large mixing bowl, combine the active sourdough starter with the warm water. Stir gently until the starter is mostly dissolved. Add the salt, bread flour, whole wheat flour, rolled oats, flax seeds, sunflower seeds, and optional honey or maple syrup. Mix with a sturdy spoon or your hands until all the flour is hydrated and no dry spots remain. The dough will be shaggy. Cover the bowl with a damp cloth or plastic wrap and let it rest for 30 minutes (this is called autolyse, which helps with gluten development).
2. 2. Perform the First Set of Stretch and Folds: After the rest, uncover the dough. With damp hands, grab a portion of the dough from one side, stretch it upwards, and fold it over to the opposite side of the bowl. Rotate the bowl a quarter turn and repeat this process three more times, effectively folding all four sides. This helps build strength in the dough. Cover and let it rest for another 30 minutes.
3. 3. Continue with More Stretch and Folds: Repeat the stretch and fold process (Step 2) three more times, with 30-minute rest periods in between each set. You should complete a total of four sets of stretch and folds over a 2-hour period. You’ll notice the dough becoming smoother, more elastic, and holding its shape better with each set.
4. 4. Bulk Fermentation (First Rise): After the final set of stretch and folds, cover the bowl and let the dough rise at room temperature for 2-4 hours. The exact time will depend on the warmth of your kitchen and the activity of your starter. The dough should look visibly puffy and have increased in volume by about 30-50%. You should see some bubbles on the surface.
5. 5. Shape the Dough and Cold Proof: Gently turn the dough out onto a lightly floured surface. Shape it into a round or oval loaf. You can do this by gently pulling the edges of the dough towards the center and then flipping it over, using the surface tension to create a taut skin. Place the shaped dough seam-side up into a floured banneton basket or a bowl lined with a floured kitchen towel. Cover with plastic wrap and refrigerate for 8-12 hours, or up to 24 hours. This cold proof develops flavor and makes the dough easier to handle.
6. 6. Preheat Oven and Dutch Oven: About 45 minutes before you’re ready to bake, place your Dutch oven (with its lid) into your oven and preheat it to 450 F (230 C). This ensures the Dutch oven is scorching hot, which is crucial for a good crust.
7. 7. Score and Bake Your Bread: Carefully remove the hot Dutch oven from the oven. Gently invert the cold dough from the banneton into the hot Dutch oven. Using a sharp knife or a bread lame, score the top of the dough with a design of your choice (a simple cross or a single slash works well). This allows the bread to expand during baking. Place the lid back on the Dutch oven and bake for 30 minutes.
8. 8. Finish Baking and Cool: After 30 minutes, remove the lid from the Dutch oven. Reduce the oven temperature to 425 F (220 C) and continue baking for another 10-15 minutes, or until the crust is a deep golden brown and sounds hollow when tapped on the bottom. Carefully remove the bread from the Dutch oven and transfer it to a wire rack to cool completely for at least 1-2 hours before slicing. Slicing too early can result in a gummy texture.
- Prep Time: 30 minutes
- Cook Time: 45 minutes
- Category: bread
- Method: baking
- Cuisine: american
Nutrition
- Serving Size: 1 slice
Keywords: sourdough, multigrain, bread, homemade, baking, whole wheat, flax seeds, sunflower seeds, comfort food, healthy
What You’ll Love About This Quick And Easy Recipe
This multigrain sourdough bread recipe is a true gem for anyone looking to bring the warmth and comfort of homemade bread to their table without needing to be a master baker. It’s perfect for busy parents who want to provide nutritious options, or for individuals who simply enjoy the satisfaction of creating something from scratch. This recipe shines because it demystifies sourdough baking, making it accessible and enjoyable. You’ll find that the process, while requiring a bit of patience for the fermentation, is straightforward and yields incredibly rewarding results. It’s ideal for weekend baking projects, special occasion brunches, or simply as a wholesome addition to your weekly meal prep. Serve it alongside a hearty soup, as the base for an epic sandwich, or simply toasted with a smear of butter and jam. The robust flavor and satisfying texture make it a versatile staple that everyone will adore.
Everything You Need To Make This Recipe Without Stress
Gathering your ingredients before you begin is the first step to a smooth baking process. This recipe uses common pantry staples and a few specialized items that are readily available at most grocery stores or online. Having everything measured and ready will help you stay organized and ensure you don’t miss a beat.
INGREDIENTS:

- 150 grams active sourdough starter (fed and bubbly)
- 350 grams warm water (around 90-95°F)
- 10 grams fine sea salt
- 300 grams bread flour
- 100 grams whole wheat flour
- 50 grams rolled oats
- 25 grams flax seeds
- 25 grams sunflower seeds
- 1 tablespoon honey or maple syrup (optional, for a touch of sweetness)
- Extra flour for dusting
For the flours, using a good quality bread flour will provide the necessary gluten structure for a chewy crumb, while whole wheat flour adds a nutty depth and nutritional value. If you don’t have bread flour, all-purpose flour can be used, but the texture might be slightly less chewy. Feel free to experiment with other grains or seeds you enjoy; chia seeds, sesame seeds, or even a mixed grain blend can be excellent additions. Just ensure the total weight of the added grains remains consistent to maintain the dough’s hydration balance. If you prefer a less sweet bread, you can omit the honey or maple syrup entirely.
Time Needed From Start To Finish
Understanding the timeline for this multigrain sourdough bread will help you plan your baking day effectively. While the hands-on time is relatively minimal, sourdough baking does involve several resting periods for the dough to develop its flavor and structure.
- Active Prep Time: 20-30 minutes (mixing, folding, shaping)
- Bulk Fermentation (First Rise): 4-6 hours (depending on room temperature and starter activity)
- Cold Proof (Second Rise): 8-12 hours (or up to 24 hours) in the refrigerator
- Baking Time: 40-45 minutes
- Cooling Time: At least 1-2 hours (essential for proper texture)
Total Estimated Time: Approximately 14-24 hours, including resting and cooling, with only about an hour of active work spread throughout. This makes it a great recipe to start one evening and bake the next morning.
How To Make It Step By Step With Visual Cues

Creating this delicious multigrain sourdough bread is a rewarding process. Follow these steps carefully for the best results.
- Prepare Your Starter and Mix the Dough: In a large mixing bowl, combine the active sourdough starter with the warm water. Stir gently until the starter is mostly dissolved. Add the salt, bread flour, whole wheat flour, rolled oats, flax seeds, sunflower seeds, and optional honey or maple syrup. Mix with a sturdy spoon or your hands until all the flour is hydrated and no dry spots remain. The dough will be shaggy. Cover the bowl with a damp cloth or plastic wrap and let it rest for 30 minutes (this is called autolyse, which helps with gluten development).
- Perform the First Set of Stretch and Folds: After the rest, uncover the dough. With damp hands, grab a portion of the dough from one side, stretch it upwards, and fold it over to the opposite side of the bowl. Rotate the bowl a quarter turn and repeat this process three more times, effectively folding all four sides. This helps build strength in the dough. Cover and let it rest for another 30 minutes.
- Continue with More Stretch and Folds: Repeat the stretch and fold process (Step 2) three more times, with 30-minute rest periods in between each set. You should complete a total of four sets of stretch and folds over a 2-hour period. You’ll notice the dough becoming smoother, more elastic, and holding its shape better with each set.
- Bulk Fermentation (First Rise): After the final set of stretch and folds, cover the bowl and let the dough rise at room temperature for 2-4 hours. The exact time will depend on the warmth of your kitchen and the activity of your starter. The dough should look visibly puffy and have increased in volume by about 30-50%. You should see some bubbles on the surface.
- Shape the Dough and Cold Proof: Gently turn the dough out onto a lightly floured surface. Shape it into a round or oval loaf. You can do this by gently pulling the edges of the dough towards the center and then flipping it over, using the surface tension to create a taut skin. Place the shaped dough seam-side up into a floured banneton basket or a bowl lined with a floured kitchen towel. Cover with plastic wrap and refrigerate for 8-12 hours, or up to 24 hours. This cold proof develops flavor and makes the dough easier to handle.
- Preheat Oven and Dutch Oven: About 45 minutes before you’re ready to bake, place your Dutch oven (with its lid) into your oven and preheat it to 450°F (230°C). This ensures the Dutch oven is scorching hot, which is crucial for a good crust.
- Score and Bake Your Bread: Carefully remove the hot Dutch oven from the oven. Gently invert the cold dough from the banneton into the hot Dutch oven. Using a sharp knife or a bread lame, score the top of the dough with a design of your choice (a simple cross or a single slash works well). This allows the bread to expand during baking. Place the lid back on the Dutch oven and bake for 30 minutes.
- Finish Baking and Cool: After 30 minutes, remove the lid from the Dutch oven. Reduce the oven temperature to 425°F (220°C) and continue baking for another 10-15 minutes, or until the crust is a deep golden brown and sounds hollow when tapped on the bottom. Carefully remove the bread from the Dutch oven and transfer it to a wire rack to cool completely for at least 1-2 hours before slicing. Slicing too early can result in a gummy texture.
Easy Variations And Serving Ideas That Fit Real Life
This multigrain sourdough bread is wonderfully versatile and can be adapted to suit various tastes and occasions. For a sweeter loaf, you could add a handful of dried cranberries or raisins along with the seeds. If you prefer a savory twist, try incorporating a tablespoon of dried herbs like rosemary or thyme, or even some grated Parmesan cheese, during the initial mixing stage.
This bread is fantastic served warm with a simple spread of butter, a drizzle of olive oil, or a spoonful of your favorite jam. It makes an incredible base for open-faced sandwiches with avocado and a sprinkle of everything bagel seasoning. For a family-friendly meal, use thick slices to make gourmet grilled cheese sandwiches, or serve it alongside a hearty bowl of chili or stew. For a party or buffet, slice it thinly and serve with a cheese board, charcuterie, or a selection of dips like hummus or spinach artichoke dip. Kids often love it simply toasted with cream cheese or peanut butter.
Common Slip-Ups And How To Avoid Them
Even experienced bakers can encounter small challenges, but knowing what to look out for can save your loaf.
- Under-proofed or Over-proofed Dough: If your dough doesn’t rise much in the oven (a “flat” loaf), it might be under-proofed. If it spreads out too much and loses its shape, it could be over-proofed. Pay attention to the visual cues

FAQs
- Can I make these ahead? Yes—prep ahead, refrigerate, then serve when ready.
- How long do leftovers last? Store covered in the fridge for 3–4 days for best texture.
- Can I adjust sweetness? Yes—add more or less sweetener to taste.
- Can I change the fruit? Yes—swap strawberries for blueberries, raspberries, or sliced banana.