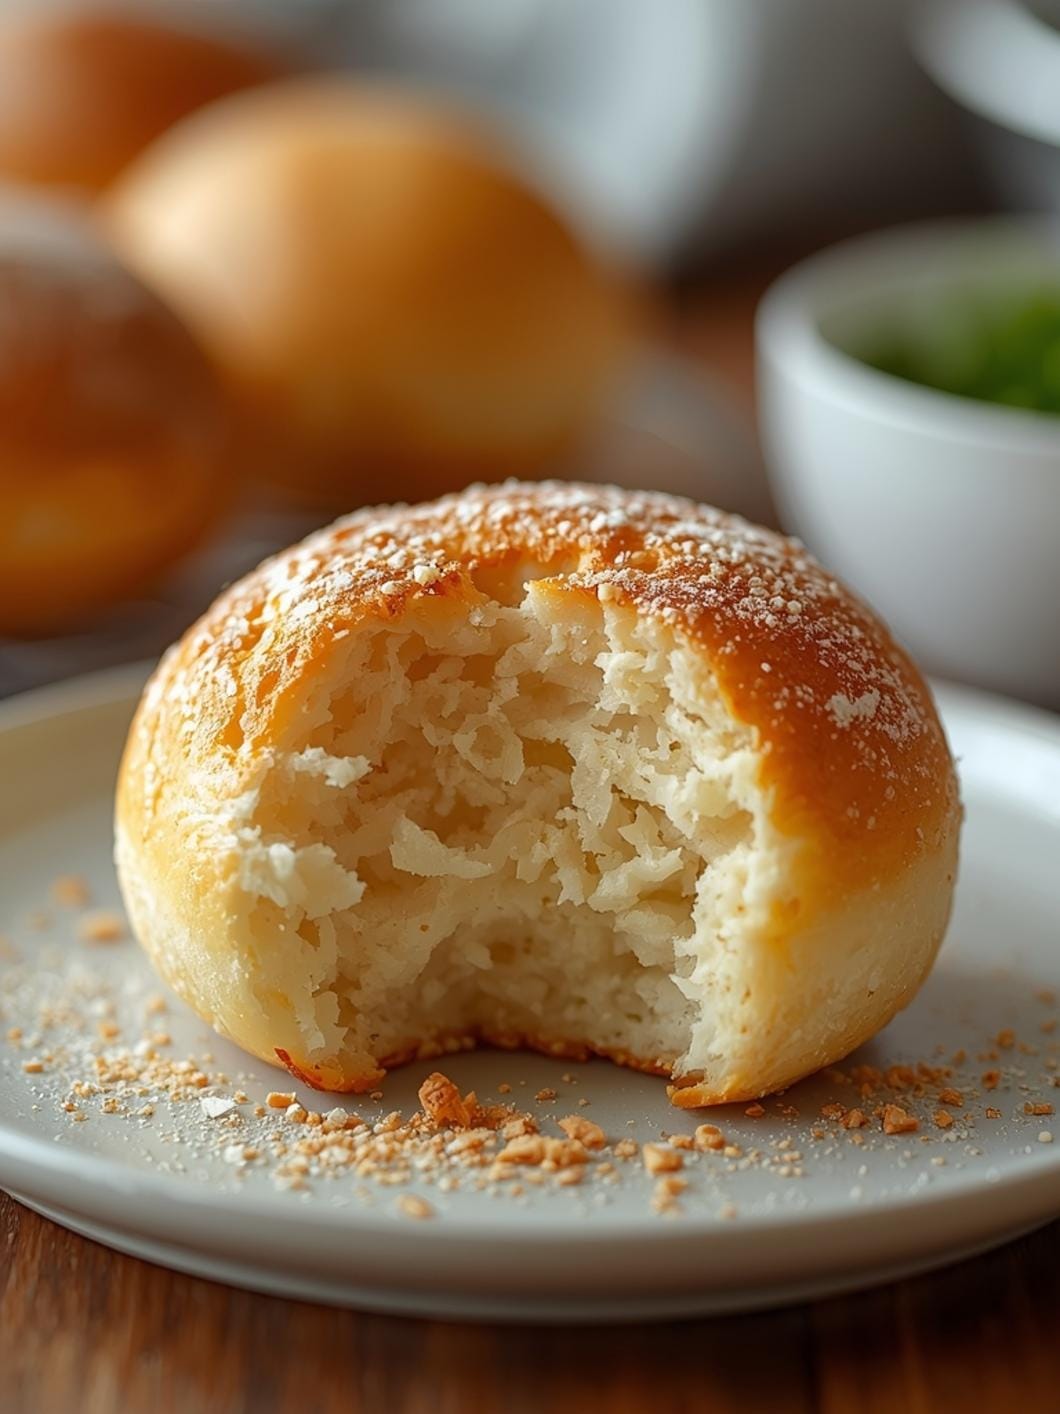
Crafting the perfect vessel for your favorite hearty soups just got easier with this fantastic sourdough bread bowl recipe.

Imagine a warm, crusty, yet tender bread bowl, ready to be filled with chili, creamy tomato soup, or a rich chowder. It’s not just a meal; it’s an experience, turning a simple dinner into something truly special and comforting.
This recipe focuses on bringing that delightful bakery experience right into your home kitchen, making it accessible for even beginner bakers. We’ll guide you through creating bread bowls that are not only delicious but also sturdy enough to hold your soup without collapsing, yet soft enough to tear and dip. Get ready to impress your family and friends with these homemade wonders!
Table of Contents
- What You’ll Love About This Quick And Easy Recipe
- Everything You Need To Make This Recipe Without Stress
- Time Needed From Start To Finish
- How To Make It Step By Step With Visual Cues
- Easy Variations And Serving Ideas That Fit Real Life
- Common Slip-Ups And How To Avoid Them
- How To Store It And Make It Ahead Without Ruining Texture

Sourdough Bread Bowls
- Total Time: 5-6 hours
- Yield: 4-6 bread bowls 1x
Description
Crafting the perfect vessel for your favorite hearty soups just got easier with this fantastic sourdough bread bowl recipe. Imagine a warm, crusty, yet tender bread bowl, ready to be filled with chili, creamy tomato soup, or a rich chowder. It’s not just a meal; it’s an experience, turning a simple dinner into something truly special and comforting. This recipe focuses on bringing that delightful bakery experience right into your home kitchen, making it accessible for even beginner bakers. We’ll guide you through creating bread bowls that are not only delicious but also sturdy enough to hold your soup without collapsing, yet soft enough to tear and dip. Get ready to impress your family and friends with these homemade wonders!
Ingredients
Instructions
1. Activate Your Starter and Mix the Dough: In a large mixing bowl, combine the active sourdough starter, warm water, sugar, and salt. Stir gently until the sugar and salt dissolve and the starter is well distributed. Gradually add the all-purpose flour, one cup at a time, mixing with a wooden spoon or your hands until a shaggy dough forms.
2. Knead Until Smooth: Turn the dough out onto a lightly floured surface. Knead for about 8-10 minutes, incorporating the olive oil gradually, until the dough is smooth, elastic, and no longer sticky. It should spring back slowly when poked.
3. First Rise (Bulk Fermentation): Lightly grease a clean large bowl with olive oil. Place the kneaded dough into the bowl, turning it once to coat the top. Cover the bowl tightly with plastic wrap or a damp kitchen towel. Let it rise in a warm, draft-free place for 3-4 hours, or until it has doubled in size.
4. Shape the Bread Bowls: Gently punch down the risen dough to release the air. Divide the dough into 4-6 equal portions, depending on your desired bread bowl size. On a lightly floured surface, shape each portion into a tight, round ball by pulling the edges underneath and pinching them together at the bottom.
5. Second Rise (Proofing): Lightly dust a baking sheet with cornmeal. Place the shaped dough balls on the prepared baking sheet, leaving ample space between them. Cover loosely with plastic wrap or a damp towel. Let them rise again in a warm place for 1-2 hours, or until they look puffy and have nearly doubled in size.
6. Preheat Oven and Score: While the dough is on its second rise, preheat your oven to 400 F (200 C). If you have a baking stone or Dutch oven, place it in the oven to preheat as well. Just before baking, use a sharp knife or a bread lame to score an “X” or a few parallel lines on the top of each dough ball. This helps the bread expand evenly.
7. Bake to Golden Perfection: Carefully transfer the proofed bread bowls to the preheated oven. If using a baking stone, you can place them directly on it. For a crispier crust, you can place a pan of hot water on the bottom rack of your oven to create steam. Bake for 30-35 minutes, or until the crust is golden brown and the internal temperature reaches 200-210 F (93-99 C) with an instant-read thermometer.
8. Cool and Hollow Out: Once baked, transfer the bread bowls to a wire rack to cool completely before hollowing them out. This usually takes about 30-60 minutes. Once cool, use a serrated knife to cut a circle around the top of each bread bowl, then carefully scoop out the soft interior bread, leaving a sturdy shell. Save the scooped-out bread for dipping!
- Prep Time: 20 minutes
- Cook Time: 30-35 minutes
- Category: main dish
- Method: baking
- Cuisine: american
Nutrition
- Serving Size: 1 bread bowl
Keywords: sourdough, bread, bowls, soup, homemade, baking, comfort food, easy, savory, crusty
What You’ll Love About This Quick And Easy Recipe
This recipe is a game-changer for anyone who loves soup and wants to elevate their mealtime. You’ll adore how surprisingly simple it is to achieve bakery-quality sourdough bread bowls without needing years of baking experience. It’s perfect for busy weeknights when you want something special but don’t have hours to spend in the kitchen, or for weekend gatherings where you want to serve a memorable meal. These bread bowls are fantastic for families because they turn a regular soup dinner into an interactive and fun experience, making even picky eaters excited to dig in. They’re also incredibly versatile, pairing beautifully with almost any thick, hearty soup or stew you can imagine.
Everything You Need To Make This Recipe Without Stress
Gathering your ingredients is the first step to a successful baking adventure. This recipe uses readily available items, ensuring you won’t need to hunt for obscure specialty products. We’re focusing on simplicity and flavor, so you can achieve delicious results without any fuss.
INGREDIENTS:

- 1 cup active sourdough starter, fed and bubbly
- 1 ½ cups warm water (around 95-105°F)
- 1 tablespoon granulated sugar
- 2 teaspoons salt
- 5 cups all-purpose flour, plus more for dusting
- 2 tablespoons olive oil, plus more for greasing
- Cornmeal, for dusting
For those who might not have an active sourdough starter on hand, you can often find dehydrated sourdough starter kits online or at specialty food stores, which you can activate a few days before you plan to bake. If you prefer a slightly different texture or are looking for a whole-grain option, you can substitute up to 1 cup of the all-purpose flour with whole wheat flour, though this might result in a denser bread bowl. Ensure your water is warm but not hot, as too much heat can kill the yeast in your sourdough starter, preventing your dough from rising properly.
Time Needed From Start To Finish
While sourdough often implies a long, drawn-out process, this recipe is streamlined to bring you delicious bread bowls without an excessive time commitment. The hands-on time is minimal, allowing the sourdough starter to do most of the work.
- Prep Time: 20 minutes (includes mixing ingredients and initial shaping)
- Proofing Time: 3-4 hours (first rise) + 1-2 hours (second rise)
- Bake Time: 30-35 minutes
- Total Time: Approximately 5-6 hours (mostly inactive proofing time)
How To Make It Step By Step With Visual Cues

Creating these sourdough bread bowls is a rewarding process, and following these steps will ensure you get a beautiful, edible vessel for your favorite soup.
- Activate Your Starter and Mix the Dough: In a large mixing bowl, combine the active sourdough starter, warm water, sugar, and salt. Stir gently until the sugar and salt dissolve and the starter is well distributed. Gradually add the all-purpose flour, one cup at a time, mixing with a wooden spoon or your hands until a shaggy dough forms.
- Knead Until Smooth: Turn the dough out onto a lightly floured surface. Knead for about 8-10 minutes, incorporating the olive oil gradually, until the dough is smooth, elastic, and no longer sticky. It should spring back slowly when poked.
- First Rise (Bulk Fermentation): Lightly grease a clean large bowl with olive oil. Place the kneaded dough into the bowl, turning it once to coat the top. Cover the bowl tightly with plastic wrap or a damp kitchen towel. Let it rise in a warm, draft-free place for 3-4 hours, or until it has doubled in size.
- Shape the Bread Bowls: Gently punch down the risen dough to release the air. Divide the dough into 4-6 equal portions, depending on your desired bread bowl size. On a lightly floured surface, shape each portion into a tight, round ball by pulling the edges underneath and pinching them together at the bottom.
- Second Rise (Proofing): Lightly dust a baking sheet with cornmeal. Place the shaped dough balls on the prepared baking sheet, leaving ample space between them. Cover loosely with plastic wrap or a damp towel. Let them rise again in a warm place for 1-2 hours, or until they look puffy and have nearly doubled in size.
- Preheat Oven and Score: While the dough is on its second rise, preheat your oven to 400°F (200°C). If you have a baking stone or Dutch oven, place it in the oven to preheat as well. Just before baking, use a sharp knife or a bread lame to score an “X” or a few parallel lines on the top of each dough ball. This helps the bread expand evenly.
- Bake to Golden Perfection: Carefully transfer the proofed bread bowls to the preheated oven. If using a baking stone, you can place them directly on it. For a crispier crust, you can place a pan of hot water on the bottom rack of your oven to create steam. Bake for 30-35 minutes, or until the crust is golden brown and the internal temperature reaches 200-210°F (93-99°C) with an instant-read thermometer.
- Cool and Hollow Out: Once baked, transfer the bread bowls to a wire rack to cool completely before hollowing them out. This usually takes about 30-60 minutes. Once cool, use a serrated knife to cut a circle around the top of each bread bowl, then carefully scoop out the soft interior bread, leaving a sturdy shell. Save the scooped-out bread for dipping!
Easy Variations And Serving Ideas That Fit Real Life
These sourdough bread bowls are incredibly versatile and can be adapted to fit many different meals and preferences. For a fun twist, consider adding some flavor to the dough itself. Before the first rise, you could knead in 1/2 cup of shredded cheddar cheese and 2 tablespoons of finely chopped fresh chives for a savory, cheesy bread bowl that pairs wonderfully with chili or broccoli cheddar soup. Another delicious option is to incorporate 1-2 teaspoons of dried Italian herbs or garlic powder into the flour mixture for an aromatic bread bowl that complements a classic tomato soup.
When it comes to serving, the possibilities are endless. These bowls are perfect for individual servings of hearty stews, creamy chowders, or even a robust beef chili. For a party or buffet, you can make smaller bread bowls and fill them with dips like spinach and artichoke dip or a warm cheese dip, turning them into edible serving dishes. Don’t forget to serve the scooped-out bread pieces alongside the bowls – they’re perfect for dipping into the soup or dip. For a kid-friendly approach, fill smaller bread bowls with macaroni and cheese or their favorite creamy soup, making mealtime an exciting adventure.
Common Slip-Ups And How To Avoid Them
Even experienced bakers can encounter small challenges, but knowing what to look out for can save you a lot of trouble. One common issue is under-proofing the dough. If your bread bowls don’t rise enough, they’ll be dense and heavy. To avoid this, ensure your sourdough starter is active and bubbly, and always allow the dough to rise in a warm, draft-free environment until it has visibly doubled in size for the first rise and become puffy for the second. Don’t rush the process; patience is key with sourdough.
Another frequent mistake is over-kneading or under-kneading the dough. Under-kneaded dough will be tough and crumbly, while over-kneaded dough can become stiff and difficult to work with. Aim for a dough that is smooth, elastic, and springs back slowly when gently poked. If your dough feels too sticky, resist the urge to add too much extra flour, which can dry out the bread; instead, lightly flour your hands and work surface. Finally, not letting the bread bowls cool completely before hollowing them out can lead to a gummy interior and a less sturdy structure. Always allow them to cool on a wire rack for at least 30-60 minutes to ensure they set properly.
How To Store It And Make It Ahead Without Ruining Texture
These homemade sourdough bread bowls are best enjoyed fresh, but you can certainly prepare them ahead of time or store leftovers. If you want to make them ahead, you can bake the bread bowls completely, let them cool, and then store them at room temperature in an airtight container or a large zip-top bag for up to

FAQs
- Can I make these ahead? Yes—prep ahead, refrigerate, then serve when ready.
- How long do leftovers last? Store covered in the fridge for 3–4 days for best texture.
- Can I adjust sweetness? Yes—add more or less sweetener to taste.
- Can I change the fruit? Yes—swap strawberries for blueberries, raspberries, or sliced banana.