Baking homemade bread can feel intimidating, but this low-sugar cinnamon raisin sourdough bread recipe makes it approachable and incredibly rewarding.

Imagine the aroma filling your kitchen – warm, comforting, and just a touch sweet from the raisins, without any added sugars. It’s a wholesome treat that’s perfect for any time of day.
This recipe focuses on simplicity and flavor, allowing the natural goodness of sourdough and fruit to shine. Whether you’re new to sourdough baking or a seasoned pro looking for a healthier option, this bread is a delicious addition to your repertoire.
Table of Contents
- What You’ll Love About This Quick And Easy Recipe
- Everything You Need To Make This Recipe Without Stress
- Time Needed From Start To Finish
- How To Make It Step By Step With Visual Cues
- Easy Variations And Serving Ideas That Fit Real Life
- Common Slip-Ups And How To Avoid Them
- How To Store It And Make It Ahead Without Ruining Texture

Low-Sugar Cinnamon Raisin Sourdough Bread
- Total Time: 7-12 hours
- Yield: 1 loaf 1x
Description
This low-sugar cinnamon raisin sourdough bread recipe is approachable and incredibly rewarding, filling your kitchen with warm, comforting aromas. It’s a wholesome treat, perfect for any time of day, focusing on simplicity and flavor from natural sourdough and fruit. Whether you’re new to sourdough or a seasoned pro, this bread is a delicious and healthier option for your repertoire.
Ingredients
Instructions
1. 1. Combine Starter and Water: In a large mixing bowl, gently whisk together your active sourdough starter and the warm water until the starter is mostly dissolved and bubbly. This creates the foundation for your dough.
2. 2. Add Flour, Salt, and Cinnamon: Add the bread flour, sea salt, and ground cinnamon to the wet mixture. Use a wooden spoon or your hands to mix until a shaggy dough forms and no dry flour remains. It will be sticky at this stage. Cover the bowl with a damp cloth or plastic wrap and let it rest for 30 minutes (this is called autolyse, which helps the flour hydrate).
3. 3. Incorporate Raisins and Oil: After the rest, add the 2 tablespoons of olive oil and the raisins to the dough. Gently fold and knead the dough in the bowl for about 5 minutes, ensuring the raisins are evenly distributed. The dough will still be sticky but should start to come together.
4. 4. Perform Stretch and Folds: Lightly grease a clean bowl with olive oil. Transfer the dough to this bowl. Over the next 2-3 hours, perform a series of “stretch and folds.” Every 30-45 minutes, gently pull a section of the dough from the edge, stretch it upwards, and fold it over the center. Rotate the bowl and repeat 3-4 times. This builds strength in the dough. After the last fold, cover the bowl and let the dough bulk ferment (first rise) for 4-6 hours at room temperature, or until it has visibly increased in size and looks bubbly.
5. 5. Shape the Loaf: Gently turn the dough out onto a lightly floured surface. Shape it into a round or oval loaf. If you have a banneton (proofing basket), dust it with flour and transfer the shaped dough seam-side up. If not, place it on a piece of parchment paper on a baking sheet. Cover loosely with plastic wrap or a damp cloth.
6. 6. Proof the Dough: Allow the dough to proof (second rise) at room temperature for 2-4 hours, or until it looks puffy and passes the “poke test” (when gently poked, it springs back slowly). For a deeper flavor and easier handling, you can also cold proof it in the refrigerator overnight (8-12 hours).
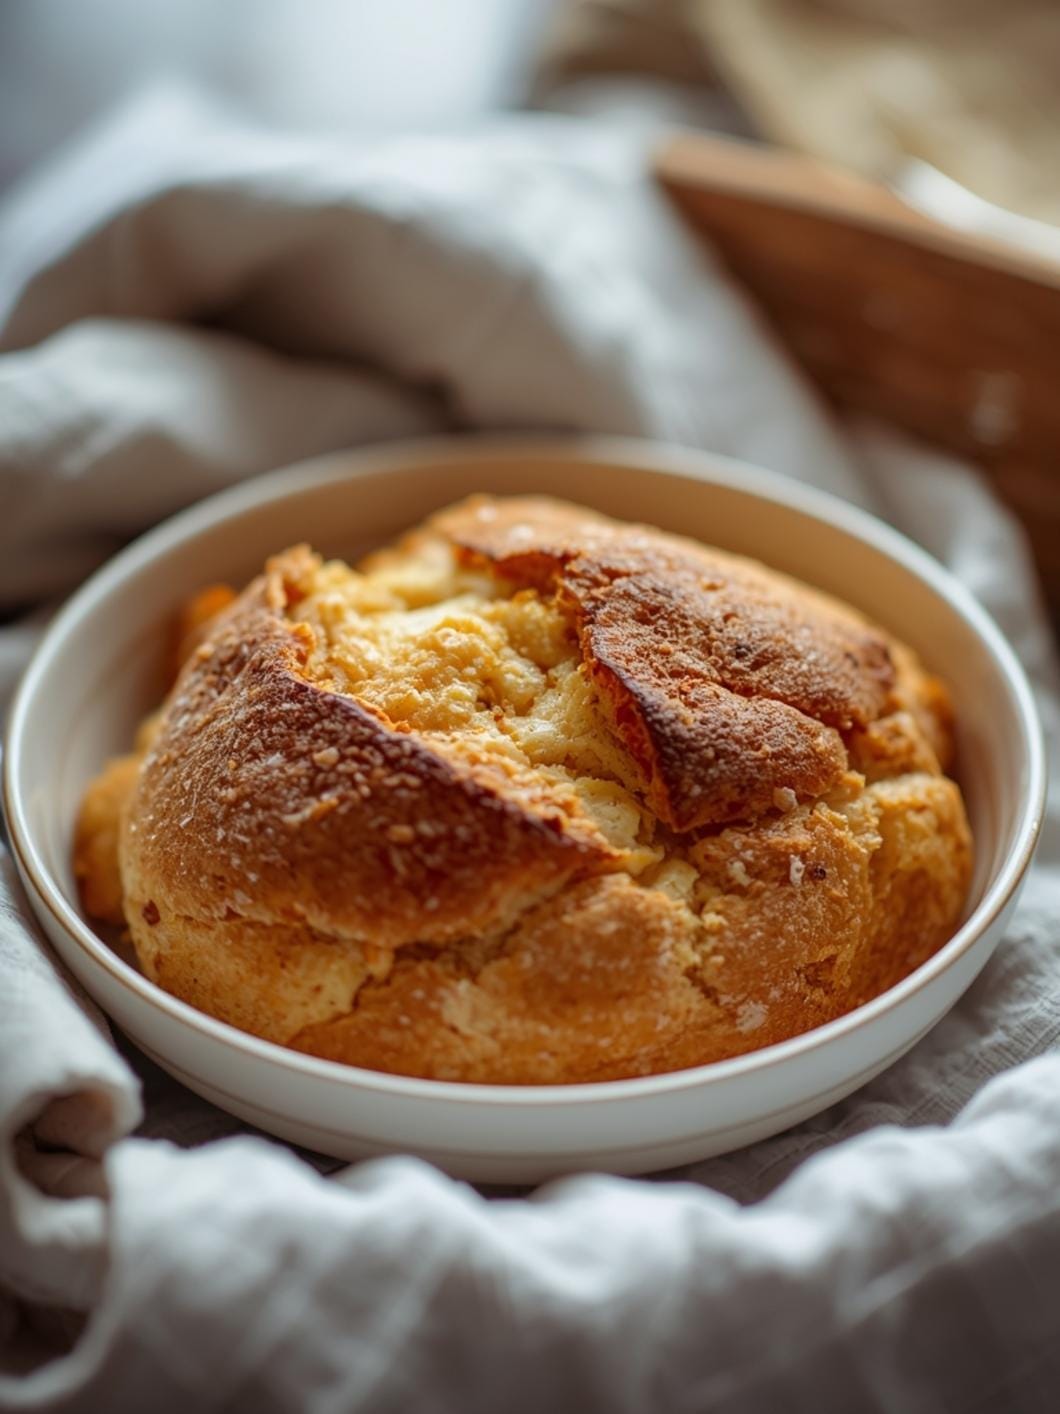
7. 7. Preheat Oven and Bake: Preheat your oven to 450F (230C) with a Dutch oven or baking stone inside for at least 30 minutes. Carefully remove the hot Dutch oven. Gently transfer the dough into the Dutch oven (if using parchment, you can lift it in). Score the top of the loaf with a sharp knife or razor blade.
8. 8. Bake and Cool: Bake with the lid on for 20 minutes, then remove the lid and continue baking for another 20-25 minutes, or until the crust is deep golden brown and the internal temperature reaches 200-210F (93-99C). Transfer the bread to a wire rack and let it cool completely for at least 1-2 hours before slicing. This is crucial for the crumb to set properly.
- Prep Time: 20 minutes
- Cook Time: 40-45 minutes
- Category: bread
- Method: baking
- Cuisine: american
Nutrition
- Serving Size: 1 slice
Keywords: sourdough, cinnamon, raisins, bread, homemade, baking, low sugar, breakfast, snack, comfort food
What You’ll Love About This Quick And Easy Recipe
This recipe is a true gem for anyone looking to enjoy the benefits and flavor of sourdough without the guilt of excessive sugar. It’s designed for busy families, home bakers of all skill levels, and anyone who appreciates a hearty, flavorful bread that’s also wholesome. You’ll love how the tangy sourdough perfectly complements the sweet bursts of raisins and the warm spice of cinnamon. It’s an ideal choice for a nourishing breakfast, a satisfying snack, or even as a unique side dish with dinner. Serve it toasted with a smear of butter, alongside your morning coffee, or as a base for a delicious open-faced sandwich. It’s a versatile loaf that brings comfort and joy to any meal.
Everything You Need To Make This Recipe Without Stress
Gathering your ingredients before you start baking makes the process much smoother. This recipe uses straightforward items you likely already have or can easily find at any grocery store. We’re focusing on quality ingredients that contribute to the bread’s delicious flavor and texture.
INGREDIENTS:

- 1 cup active sourdough starter (fed and bubbly)
- 1 ½ cups warm water (about 90-100°F)
- 4 cups bread flour, plus more for dusting
- 2 teaspoons fine sea salt
- 2 teaspoons ground cinnamon
- 1 cup raisins
- 2 tablespoons olive oil, plus more for greasing the bowl
For the flour, bread flour is recommended for its higher protein content, which gives the bread a better structure and chew. However, if you only have all-purpose flour on hand, it can be used, though the texture might be slightly less chewy. For the raisins, any variety will work – dark or golden – just be sure they are plump and fresh. If your raisins seem a bit dry, you can soak them in warm water for about 10 minutes, then drain them thoroughly before adding them to the dough. This helps them stay soft and juicy during baking.
Time Needed From Start To Finish
While sourdough baking involves some waiting for the dough to rise, the active hands-on time for this recipe is surprisingly manageable.
- Prep Time: 20 minutes (mixing and initial folding)
- Bulk Fermentation (First Rise): 4-6 hours (depending on room temperature and starter activity)
- Proofing (Second Rise): 2-4 hours (or overnight in the refrigerator)
- Bake Time: 40-45 minutes
- Cooling Time: 1-2 hours (essential for best texture)
- Total Time: Approximately 7-12 hours (mostly passive waiting)
How To Make It Step By Step With Visual Cues

Follow these steps carefully to achieve a beautiful and delicious low-sugar cinnamon raisin sourdough bread. Pay attention to the feel of the dough and its appearance as you go.
- Combine Starter and Water: In a large mixing bowl, gently whisk together your active sourdough starter and the warm water until the starter is mostly dissolved and bubbly. This creates the foundation for your dough.
- Add Flour, Salt, and Cinnamon: Add the bread flour, sea salt, and ground cinnamon to the wet mixture. Use a wooden spoon or your hands to mix until a shaggy dough forms and no dry flour remains. It will be sticky at this stage. Cover the bowl with a damp cloth or plastic wrap and let it rest for 30 minutes (this is called autolyse, which helps the flour hydrate).
- Incorporate Raisins and Oil: After the rest, add the 2 tablespoons of olive oil and the raisins to the dough. Gently fold and knead the dough in the bowl for about 5 minutes, ensuring the raisins are evenly distributed. The dough will still be sticky but should start to come together.
- Perform Stretch and Folds: Lightly grease a clean bowl with olive oil. Transfer the dough to this bowl. Over the next 2-3 hours, perform a series of “stretch and folds.” Every 30-45 minutes, gently pull a section of the dough from the edge, stretch it upwards, and fold it over the center. Rotate the bowl and repeat 3-4 times. This builds strength in the dough. After the last fold, cover the bowl and let the dough bulk ferment (first rise) for 4-6 hours at room temperature, or until it has visibly increased in size and looks bubbly.
- Shape the Loaf: Gently turn the dough out onto a lightly floured surface. Shape it into a round or oval loaf. If you have a banneton (proofing basket), dust it with flour and transfer the shaped dough seam-side up. If not, place it on a piece of parchment paper on a baking sheet. Cover loosely with plastic wrap or a damp cloth.
- Proof the Dough: Allow the dough to proof (second rise) at room temperature for 2-4 hours, or until it looks puffy and passes the “poke test” (when gently poked, it springs back slowly). For a deeper flavor and easier handling, you can also cold proof it in the refrigerator overnight (8-12 hours).
- Preheat Oven and Bake: Preheat your oven to 450°F (230°C) with a Dutch oven or baking stone inside for at least 30 minutes. Carefully remove the hot Dutch oven. Gently transfer the dough into the Dutch oven (if using parchment, you can lift it in). Score the top of the loaf with a sharp knife or razor blade.
- Bake and Cool: Bake with the lid on for 20 minutes, then remove the lid and continue baking for another 20-25 minutes, or until the crust is deep golden brown and the internal temperature reaches 200-210°F (93-99°C). Transfer the bread to a wire rack and let it cool completely for at least 1-2 hours before slicing. This is crucial for the crumb to set properly.
Easy Variations And Serving Ideas That Fit Real Life
This low-sugar cinnamon raisin sourdough is fantastic on its own, but a few simple tweaks and serving suggestions can elevate it even further. For a fun twist, try adding a handful of chopped walnuts or pecans along with the raisins for extra crunch and nutty flavor. If you enjoy a bit more spice, a pinch of nutmeg or allspice can complement the cinnamon beautifully.
When it comes to serving, this bread is incredibly versatile. It makes an amazing breakfast toast, especially when lightly buttered. You can also use it for French toast, creating a truly decadent morning meal. For a quick snack, slice it thin and enjoy it plain, or with a light spread of cream cheese. It pairs wonderfully with a cup of coffee or tea. For a savory-sweet combination, try it alongside a mild cheese. Kids often love it simply toasted with a little jam or honey, or even as a mini sandwich with a thin slice of turkey.
Common Slip-Ups And How To Avoid Them
Even experienced bakers can encounter small issues, but knowing what to watch for can save your loaf. One common mistake is using an inactive sourdough starter. Your starter needs to be fed and bubbly, showing clear signs of activity (doubled in size, lots of bubbles) before you mix your dough. An inactive starter will result in a flat, dense loaf.
Another pitfall is not allowing enough time for bulk fermentation or proofing. Sourdough takes time, and rushing these stages will lead to underdeveloped flavor and poor rise. Watch the dough, not just the clock – it should look visibly increased in size and feel airy. Conversely, over-proofing can also be an issue, leading to a dough that collapses in the oven. If your dough looks very bubbly and feels fragile, it might be over-proofed.
Finally, resist the urge to slice into the bread too soon after baking. While the aroma is intoxicating, cutting into hot bread can result in a gummy texture. The internal structure needs time to set as it cools, so patience is key for a perfect crumb.
How To Store It And Make It Ahead Without Ruining Texture
Proper storage is essential to keep your homemade sourdough fresh and delicious. Once completely cooled, store the bread at room temperature. A bread box is ideal, or you can wrap it tightly in plastic wrap, foil, or a clean kitchen towel. It will stay fresh for 2-3 days. For longer storage, slice the cooled bread and freeze the slices in an airtight freezer bag. This way, you can pull out individual slices and toast them directly from frozen, enjoying fresh-tasting bread whenever you like. It will keep well in the freezer for up to 3 months.
If you want to make this bread ahead, the best approach is to cold proof the shaped dough in the

FAQs
- Can I make these ahead? Yes—prep ahead, refrigerate, then serve when ready.
- How long do leftovers last? Store covered in the fridge for 3–4 days for best texture.
- Can I adjust sweetness? Yes—add more or less sweetener to taste.
- Can I change the fruit? Yes—swap strawberries for blueberries, raspberries, or sliced banana.