Get ready to impress your family and friends with these adorable mini sourdough bread bowls! They’re the perfect vessel for individual servings of your favorite creamy dips or a cozy bowl of soup. You’ll love how simple and satisfying it is to create these charming edible containers.

This recipe focuses on ease and convenience, allowing you to whip up these delightful bread bowls without any fuss. Whether you’re planning a casual get-together or a fun family meal, these mini bowls are sure to be a hit, adding a touch of rustic charm to any table.
Table of Contents
- What You’ll Love About This Quick And Easy Recipe
- Everything You Need To Make This Recipe Without Stress
- Time Needed From Start To Finish
- How To Make It Step By Step With Visual Cues
- Easy Variations And Serving Ideas That Fit Real Life
- Common Slip-Ups And How To Avoid Them
- How To Store It And Make It Ahead Without Ruining Texture

Mini Sourdough Bread Bowls
- Total Time: 25-30 minutes
- Yield: 4-6 mini bread bowls 1x
Description
These adorable mini sourdough bread bowls are perfect for individual servings of your favorite creamy dips or a cozy bowl of soup. This recipe is easy to make and adds a charming, rustic touch to any meal or gathering. They are versatile, fun, and minimize dishwashing.
Ingredients
Instructions
1. Preheat Your Oven and Prepare Your Baking Sheet: Start by preheating your oven to 375 F (190 C). Line a large baking sheet with parchment paper to prevent sticking and make cleanup easier. This ensures your bread bowls will bake evenly and release easily.
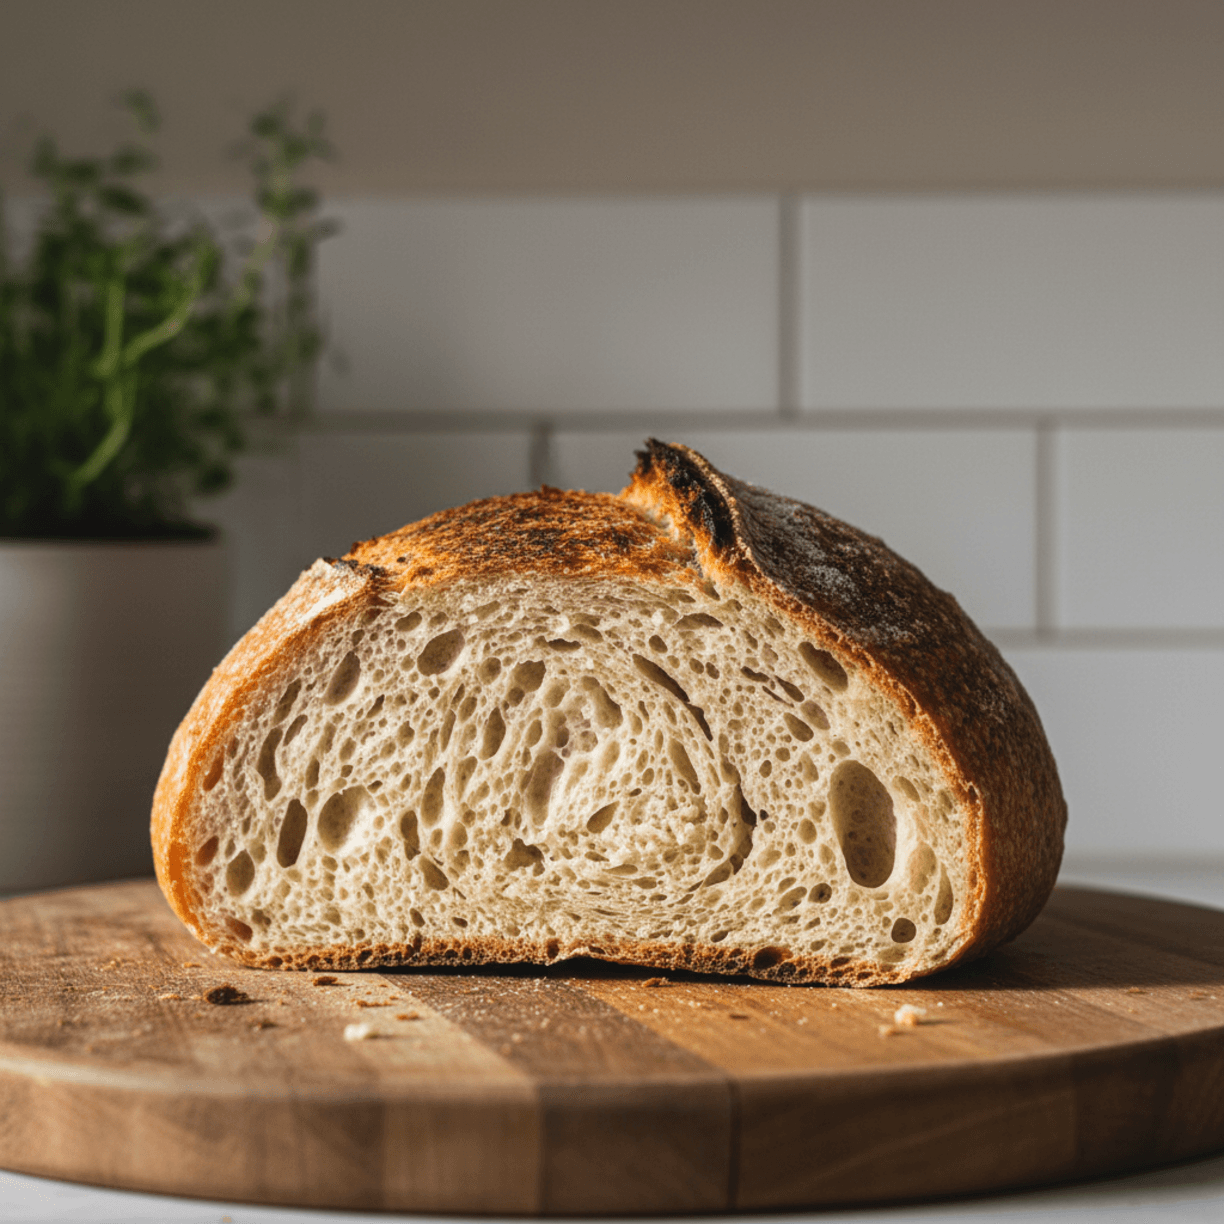
2. Slice the Sourdough Loaf: Place your round sourdough loaf on a cutting board. Using a sharp serrated knife, carefully slice the loaf into 4-6 equal-sized thick slices, depending on how large you want your mini bowls to be. Aim for slices that are about 1.5 to 2 inches thick. Each slice will become one bread bowl.
3. Hollow Out Each Bread Slice: Take one slice of sourdough. Using your serrated knife or a small paring knife, carefully cut a circle or square shape about 1/2 inch from the crust, going about two-thirds of the way down into the bread. Do not cut all the way through the bottom. Then, use a spoon to scoop out the soft interior bread from the center, leaving a sturdy wall and bottom. Save the scooped-out bread pieces (the “guts”) – they make excellent croutons or dippers!
4. Brush with Oil or Butter: Arrange the hollowed-out bread bowls on your prepared baking sheet. Lightly brush the inside and outside of each bread bowl with olive oil or melted butter. This adds flavor, helps create a golden crust, and prevents the bread from drying out too much. If desired, sprinkle a pinch of sea salt or garlic powder over the brushed surfaces for extra seasoning.
5. Bake Until Golden and Toasty: Place the baking sheet in the preheated oven. Bake for 10-15 minutes, or until the bread bowls are lightly golden brown and slightly crisp around the edges. Keep an eye on them to prevent over-browning. The goal is to warm them through and give them a nice texture.
6. Prepare the Bread Pieces (Optional): While the bowls are baking, you can lightly toast the scooped-out bread pieces on a separate small baking sheet for 5-7 minutes, or until golden and crunchy. These make perfect dippers for your soup or dip.
7. Fill and Serve Immediately: Once the bread bowls are baked, carefully remove them from the oven. Fill them with your favorite warm dip or soup right before serving. The warmth of the bread will complement the filling beautifully.
- Prep Time: 15 minutes
- Cook Time: 10-15 minutes
- Category: appetizer
- Method: baking
- Cuisine: american
Nutrition
- Serving Size: 1 bread bowl
Keywords: sourdough, bread bowls, mini, appetizer, soup, dip, easy, party, entertaining, edible
What You’ll Love About This Quick And Easy Recipe
This recipe is a true winner for anyone looking for a creative yet incredibly simple way to serve food. It’s perfect for busy parents who want to add a special touch to dinner without spending hours in the kitchen, or for anyone hosting a party who needs an impressive appetizer or soup serving solution. What makes these mini sourdough bread bowls so appealing is their versatility and the sheer “wow” factor they bring. They transform an ordinary dip or soup into an interactive and fun eating experience. Imagine individual servings of warm tomato soup, creamy spinach dip, or even a hearty chili, all nestled within their own edible, slightly tangy bread bowl. It’s a fantastic way to minimize dishes and maximize enjoyment, making it ideal for casual gatherings, game nights, or even a cozy weeknight dinner. The process is so straightforward that even beginner cooks will feel confident tackling it, yielding professional-looking results every time.
Everything You Need To Make This Recipe Without Stress
Making these mini sourdough bread bowls doesn’t require a trip to a specialty store or any complex ingredients. The beauty of this recipe lies in its simplicity and the fact that you can likely find everything you need at your local grocery store. We’re focusing on convenience and flavor, ensuring that you can get these on the table without any stress or fuss.
INGREDIENTS:

- 1 loaf round sourdough bread (about 1.5-2 pounds)
- Olive oil or melted butter (for brushing)
- Sea salt or garlic powder (optional, for seasoning)
For the sourdough bread, look for a round loaf that has a good crust but is still soft enough to cut and hollow out. A slightly firmer, artisan-style sourdough works best as it will hold its shape well when hollowed. If you can’t find a round loaf, an oval one will also work, you’ll just get slightly different shapes for your bowls. The olive oil or melted butter is essential for giving the bowls a lovely golden finish and a little extra flavor, while the optional salt or garlic powder can add a savory touch that complements many dips and soups.
Time Needed From Start To Finish
One of the best aspects of this recipe is how quickly it comes together, making it an excellent choice for a last-minute addition to your menu or a speedy weeknight meal.
Prep time: 15 minutes Cook time: 10-15 minutes Total time: 25-30 minutes
This timing assumes you have your sourdough loaf ready to go. The bulk of the prep involves slicing and hollowing the bread, which is quite fast. The baking time is just enough to warm the bread through, crisp up the edges, and give it a beautiful golden hue, making it perfectly ready for your chosen filling.
How To Make It Step By Step With Visual Cues

Creating these mini sourdough bread bowls is a straightforward process, and with these clear steps, you’ll have them ready in no time. Focus on careful cutting and hollowing to ensure sturdy bowls.
- Preheat Your Oven and Prepare Your Baking Sheet: Start by preheating your oven to 375°F (190°C). Line a large baking sheet with parchment paper to prevent sticking and make cleanup easier. This ensures your bread bowls will bake evenly and release easily.
- Slice the Sourdough Loaf: Place your round sourdough loaf on a cutting board. Using a sharp serrated knife, carefully slice the loaf into 4-6 equal-sized thick slices, depending on how large you want your mini bowls to be. Aim for slices that are about 1.5 to 2 inches thick. Each slice will become one bread bowl.
- Hollow Out Each Bread Slice: Take one slice of sourdough. Using your serrated knife or a small paring knife, carefully cut a circle or square shape about 1/2 inch from the crust, going about two-thirds of the way down into the bread. Do not cut all the way through the bottom. Then, use a spoon to scoop out the soft interior bread from the center, leaving a sturdy wall and bottom. Save the scooped-out bread pieces (the “guts”) – they make excellent croutons or dippers!
- Brush with Oil or Butter: Arrange the hollowed-out bread bowls on your prepared baking sheet. Lightly brush the inside and outside of each bread bowl with olive oil or melted butter. This adds flavor, helps create a golden crust, and prevents the bread from drying out too much. If desired, sprinkle a pinch of sea salt or garlic powder over the brushed surfaces for extra seasoning.
- Bake Until Golden and Toasty: Place the baking sheet in the preheated oven. Bake for 10-15 minutes, or until the bread bowls are lightly golden brown and slightly crisp around the edges. Keep an eye on them to prevent over-browning. The goal is to warm them through and give them a nice texture.
- Prepare the Bread Pieces (Optional): While the bowls are baking, you can lightly toast the scooped-out bread pieces on a separate small baking sheet for 5-7 minutes, or until golden and crunchy. These make perfect dippers for your soup or dip.
- Fill and Serve Immediately: Once the bread bowls are baked, carefully remove them from the oven. Fill them with your favorite warm dip or soup right before serving. The warmth of the bread will complement the filling beautifully.
Easy Variations And Serving Ideas That Fit Real Life
These mini sourdough bread bowls are incredibly versatile, making them a fantastic addition to almost any meal or gathering. You can easily adapt them to suit different tastes, occasions, and dietary preferences.
For a kid-friendly twist, try filling the bowls with mac and cheese, mini meatballs in marinara sauce, or even a mild cheese fondue. Kids love having their own individual servings, and the edible bowl makes it extra fun. For adults, the possibilities are endless: think creamy spinach and artichoke dip, a rich clam chowder, French onion soup (with a slice of provolone melted on top!), or a hearty beef stew. They also make excellent vessels for chili, queso, or even a warm bruschetta topping.
Consider serving these at a party or buffet by offering a variety of fillings. You could have one set of bowls with a vegetarian soup, another with a cheesy dip, and a third with a hearty meat-based option. Don’t forget to serve the scooped-out bread pieces alongside for extra dipping! You can also season the bread bowls differently – a sprinkle of Italian herbs before baking would be lovely for a tomato-based soup, or a dash of paprika for a smoky dip. For a sweet variation (though less common with sourdough), you could even brush them with cinnamon sugar and fill them with fruit compote or a sweet cream cheese dip for a unique dessert presentation.
Common Slip-Ups And How To Avoid Them
Even with a simple recipe like mini sourdough bread bowls, a few common mistakes can impact the final result. Knowing what to watch out for will help you achieve perfect bowls every time.
One frequent issue is cutting the bread too thin or too thick. If your slices are too thin, the bowls might not be sturdy enough to hold their filling and could break apart. If they’re too thick, you’ll have less space for your delicious dip or soup, and the bread might be overly dense. Aim for slices that are about 1.5 to 2 inches thick for a good balance.
Another common pitfall is hollowing out the bread too aggressively or not enough. If you scoop out too much bread, you risk cutting through the bottom or sides, leading to leaks. If you don’t scoop out enough, your bowls will have limited capacity. Use a small knife to define the inner circle/square, then a spoon to gently remove the soft interior, leaving a sturdy wall of about 1/2 inch thickness. Remember not to cut all the way through the bottom!
Over-baking or under-baking the bread bowls can also be an issue. Over-baked bowls will be too hard and dry, making them difficult to eat. Under-baked bowls will be soft and potentially soggy once filled. Keep a close eye on them during the 10-15 minute baking time. You’re looking for a light golden color and a slightly crisp exterior, not a rock-hard crust. The brushing of oil or butter helps prevent them from drying out.
Finally, filling the bowls too far in advance can lead to soggy bread. While the bread bowls are sturdy, they are still bread. For best results, fill them with your chosen dip or soup right before serving. This ensures the bread remains pleasantly textured and doesn’t absorb too much moisture from the filling.
How To Store It And Make It Ahead Without Ruining Texture
These mini sourdough bread bowls are best enjoyed fresh, warm from

FAQs
- Can I make these ahead? Yes—prep ahead, refrigerate, then serve when ready.
- How long do leftovers last? Store covered in the fridge for 3–4 days for best texture.
- Can I adjust sweetness? Yes—add more or less sweetener to taste.
- Can I change the fruit? Yes—swap strawberries for blueberries, raspberries, or sliced banana.