Elevate your baking with a delightful twist on classic bread using this naturally sweetened date sourdough bread recipe.

It’s a specialty sourdough that brings unique inclusions to the forefront, perfect for those moments when you crave something a little different for breakfast or a satisfying snack.
This recipe is designed to be approachable and enjoyable, transforming your usual sourdough routine into an exciting culinary adventure. Discover how simple it is to infuse your bread with the natural sweetness and tender texture of dates, creating a truly memorable loaf.

Naturally Sweetened Date Sourdough Bread
- Total Time: 13-20 hours
- Yield: 1 loaf 1x
Description
Elevate your baking with a delightful twist on classic bread using this naturally sweetened date sourdough bread recipe. It’s a specialty sourdough that brings unique inclusions to the forefront, perfect for those moments when you crave something a little different for breakfast or a satisfying snack. This recipe is designed to be approachable and enjoyable, transforming your usual sourdough routine into an exciting culinary adventure. Discover how simple it is to infuse your bread with the natural sweetness and tender texture of dates, creating a truly memorable loaf.
Ingredients
Instructions
1. Combine and Autolyse: In a large mixing bowl, gently mix the active sourdough starter, warm water, and salt until mostly combined. Add the bread flour and mix with your hands or a sturdy spoon until no dry flour remains. The dough will be shaggy. Cover the bowl with a damp cloth or plastic wrap and let it rest for 30 minutes. This resting period, called autolyse, allows the flour to fully hydrate.
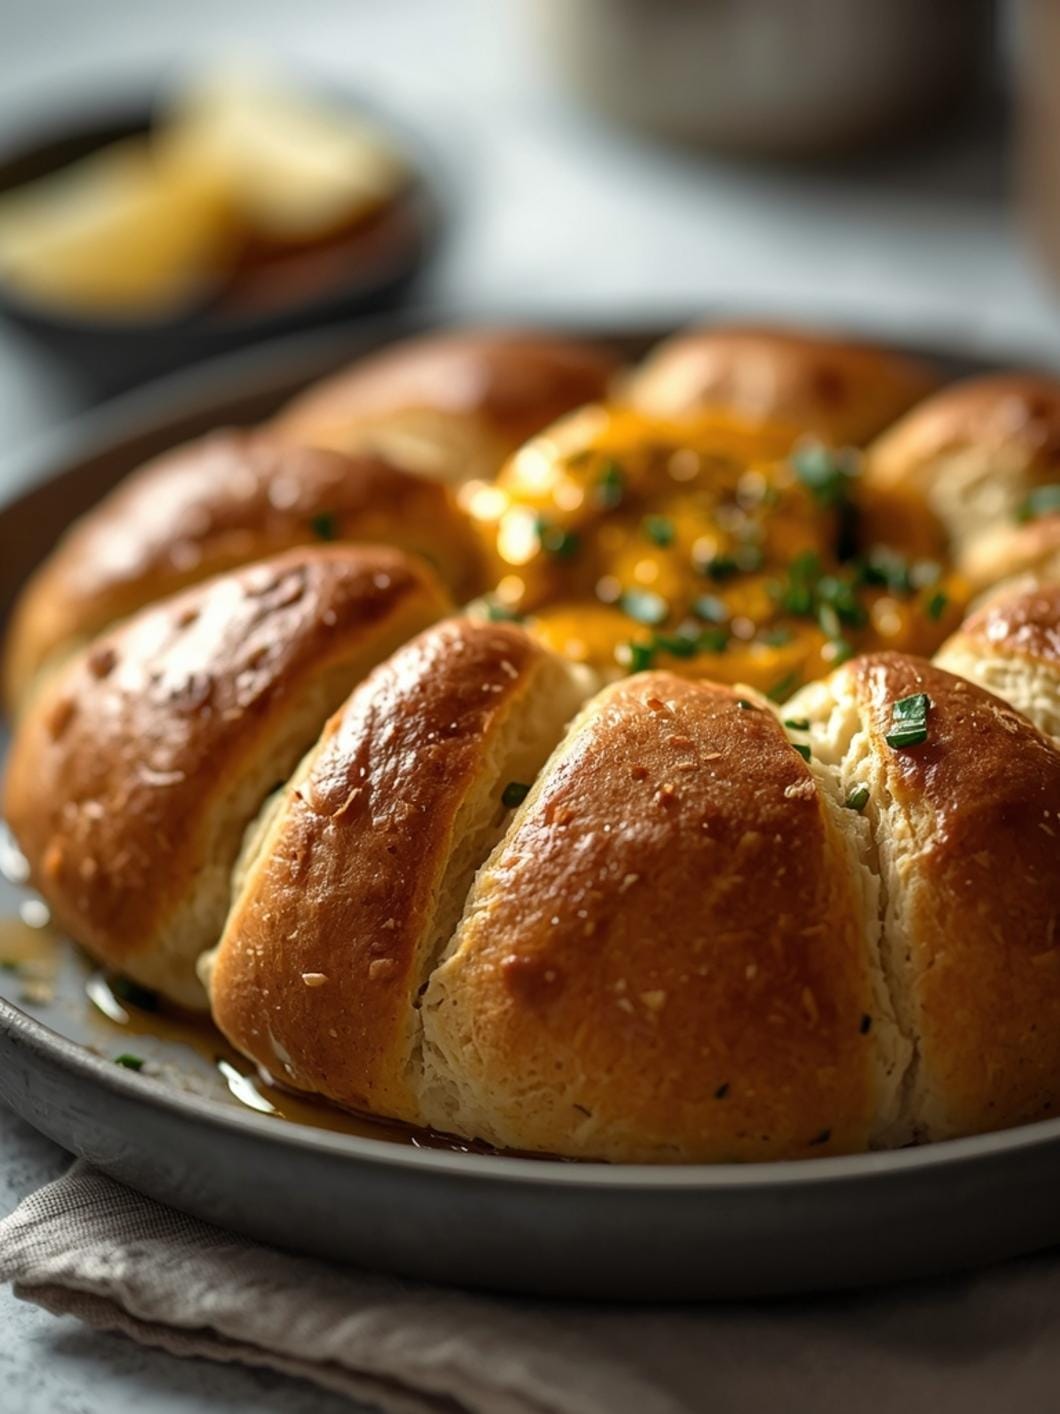
2. Incorporate Dates and First Fold: After the autolyse, sprinkle the chopped dates evenly over the dough. Perform your first set of stretch and folds. To do this, wet your hands slightly, grab a portion of the dough from one side, stretch it upwards, and fold it over to the opposite side of the bowl. Rotate the bowl a quarter turn and repeat this process 3-4 more times, ensuring the dates are gradually incorporated. Cover and let rest for 30 minutes.
3. Perform Subsequent Folds: Over the next 2-3 hours, perform 3-4 more sets of stretch and folds, spaced 30-45 minutes apart. Each time, gently stretch and fold the dough over itself 4-6 times. This builds strength in the dough and helps distribute the dates evenly. By the last fold, the dough should feel more elastic and cohesive.
4. Bulk Fermentation: After the final fold, cover the bowl and let the dough bulk ferment at room temperature (around 72-78 F / 22-25 C) for 3-5 hours, or until it has increased in volume by about 30-50% and looks bubbly. The exact time will depend on your starter’s activity and room temperature.
5. Pre-Shape and Bench Rest: Lightly flour your work surface. Gently turn the dough out onto the floured surface. Using a bench scraper, gently shape the dough into a loose round or rectangle. Avoid deflating it too much. Cover with a damp cloth and let it rest for 20-30 minutes. This is the bench rest, which allows the dough to relax before final shaping.
6. Final Shape and Cold Proof: Lightly flour your banneton (proofing basket) or a bowl lined with a floured kitchen towel. Gently shape the dough into your desired final shape (batard or boule). Place the shaped dough seam-side up into the prepared banneton. Cover with plastic wrap or a shower cap and refrigerate for 8-12 hours, or up to 24 hours. This cold proofing develops flavor and makes the dough easier to handle.
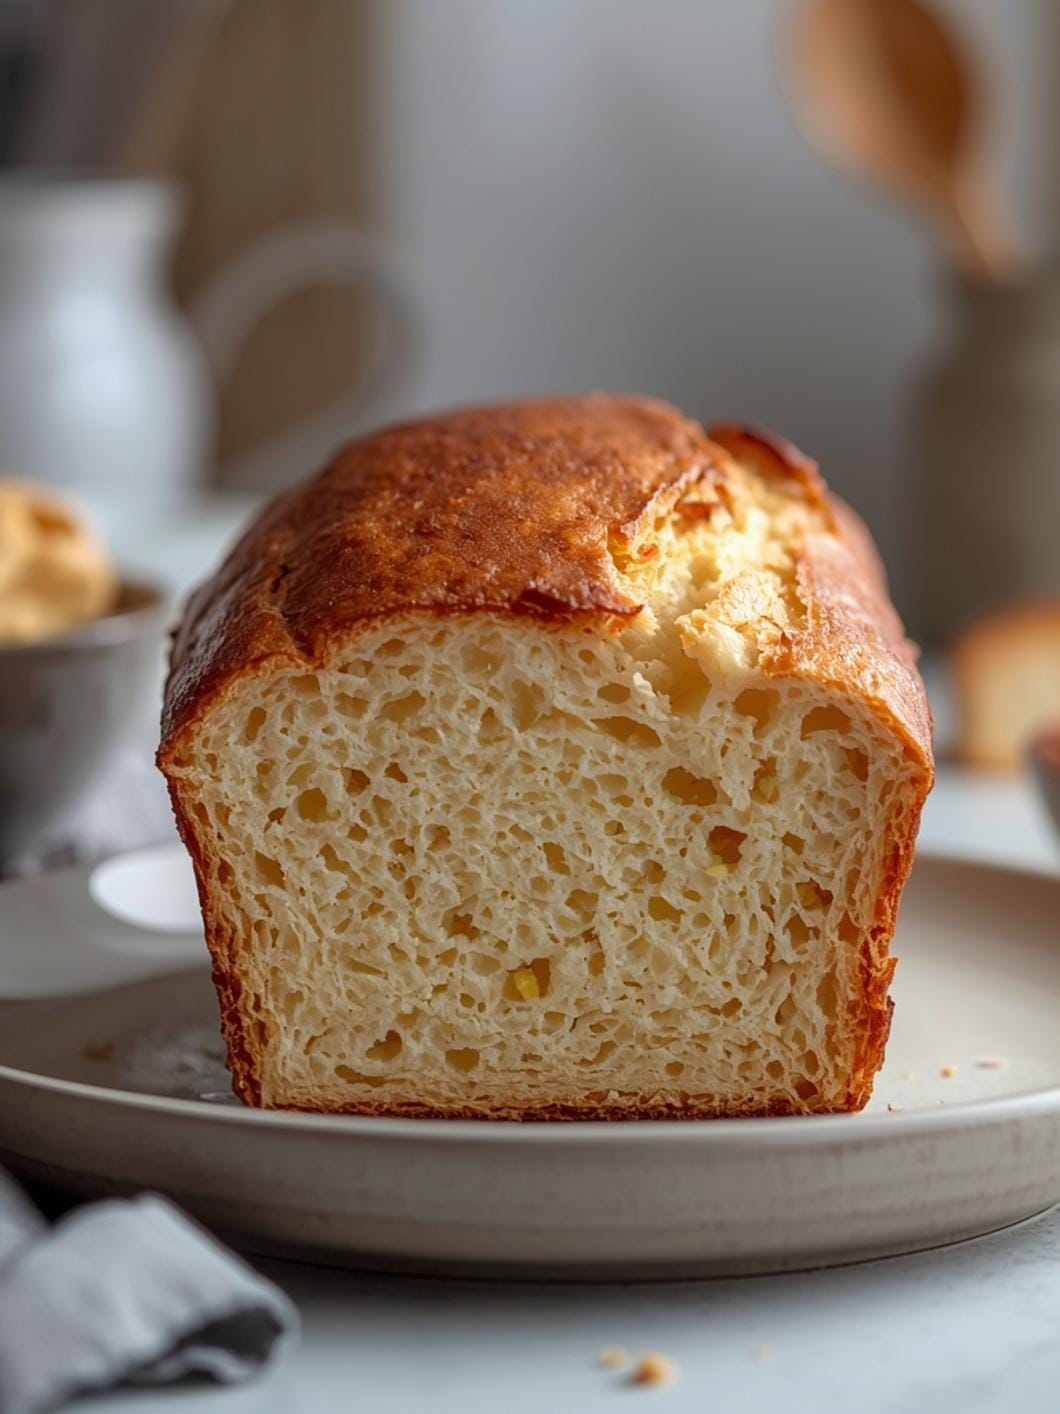
7. Bake the Bread: Preheat your oven to 450 F (232 C) with your Dutch oven inside for at least 30-45 minutes. Carefully remove the hot Dutch oven. Gently invert the cold dough into the hot Dutch oven. Score the top of the dough with a sharp razor blade or knife. Cover with the lid and bake for 30 minutes.
8. Finish Baking: Remove the lid from the Dutch oven and continue baking for another 15-20 minutes, or until the crust is deeply golden brown and the internal temperature reaches 200-210 F (93-99 C). Carefully remove the bread from the Dutch oven and transfer it to a wire rack to cool completely for at least 1-2 hours before slicing.
- Prep Time: 20 minutes
- Cook Time: 45-50 minutes
- Category: bread
- Method: baking
- Cuisine: american
Nutrition
- Serving Size: 1 slice
Keywords: sourdough, date bread, sweet bread, homemade bread, baking, naturally sweetened, breakfast, snack, artisan bread, fermented
What You’ll Love About This Quick And Easy Recipe
This recipe is a game-changer for anyone looking to add a touch of natural sweetness and unique texture to their sourdough baking without overcomplicating the process. It’s perfect for both seasoned sourdough enthusiasts eager to experiment with inclusions and those newer to the craft who want to try something beyond a plain loaf. The natural sweetness from the dates means you won’t need to add refined sugars, making it a healthier option for your family. Serve it warm with a pat of butter for breakfast, alongside your favorite cheese for a sophisticated snack, or even toasted for a delightful treat any time of day. Its versatility and comforting flavors make it an instant favorite.
Everything You Need To Make This Recipe Without Stress
Gathering your ingredients beforehand makes the baking process smooth and enjoyable. This recipe uses readily available items, ensuring you can whip up this delicious bread without a special trip to a gourmet store.
INGREDIENTS:

- 500 grams active sourdough starter
- 350 grams warm water (around 90-95°F / 32-35°C)
- 10 grams fine sea salt
- 500 grams bread flour
- 150 grams pitted dates, roughly chopped
- 2 tablespoons olive oil (for bowl and hands)
- Rice flour or all-purpose flour (for dusting)
For the dates, choose soft, plump medjool dates if possible, as they offer the best flavor and texture. If your dates seem a bit dry, you can soak them in warm water for about 10-15 minutes, then drain thoroughly before chopping. For the bread flour, a good quality unbleached bread flour will give you the best rise and crumb structure, but all-purpose flour can work in a pinch for a slightly softer loaf.
Time Needed From Start To Finish
While sourdough recipes often imply a long process, this date sourdough bread focuses on active steps that fit into a busy schedule, with most of the time being passive fermentation.
- Active Prep Time: 20 minutes (mixing, folding, shaping)
- Bulk Fermentation: 4-6 hours (depending on room temperature and starter activity)
- Cold Proofing: 8-12 hours (or up to 24 hours)
- Baking Time: 45-50 minutes
- Total Time (Active + Passive): Approximately 13-20 hours (mostly hands-off)
How To Make It Step By Step With Visual Cues

Creating this naturally sweetened date sourdough bread is a rewarding process. Follow these steps for a beautiful and delicious loaf.
- Combine and Autolyse: In a large mixing bowl, gently mix the active sourdough starter, warm water, and salt until mostly combined. Add the bread flour and mix with your hands or a sturdy spoon until no dry flour remains. The dough will be shaggy. Cover the bowl with a damp cloth or plastic wrap and let it rest for 30 minutes. This resting period, called autolyse, allows the flour to fully hydrate.
- Incorporate Dates and First Fold: After the autolyse, sprinkle the chopped dates evenly over the dough. Perform your first set of stretch and folds. To do this, wet your hands slightly, grab a portion of the dough from one side, stretch it upwards, and fold it over to the opposite side of the bowl. Rotate the bowl a quarter turn and repeat this process 3-4 more times, ensuring the dates are gradually incorporated. Cover and let rest for 30 minutes.
- Perform Subsequent Folds: Over the next 2-3 hours, perform 3-4 more sets of stretch and folds, spaced 30-45 minutes apart. Each time, gently stretch and fold the dough over itself 4-6 times. This builds strength in the dough and helps distribute the dates evenly. By the last fold, the dough should feel more elastic and cohesive.
- Bulk Fermentation: After the final fold, cover the bowl and let the dough bulk ferment at room temperature (around 72-78°F / 22-25°C) for 3-5 hours, or until it has increased in volume by about 30-50% and looks bubbly. The exact time will depend on your starter’s activity and room temperature.
- Pre-Shape and Bench Rest: Lightly flour your work surface. Gently turn the dough out onto the floured surface. Using a bench scraper, gently shape the dough into a loose round or rectangle. Avoid deflating it too much. Cover with a damp cloth and let it rest for 20-30 minutes. This is the bench rest, which allows the dough to relax before final shaping.
- Final Shape and Cold Proof: Lightly flour your banneton (proofing basket) or a bowl lined with a floured kitchen towel. Gently shape the dough into your desired final shape (bâtard or boule). Place the shaped dough seam-side up into the prepared banneton. Cover with plastic wrap or a shower cap and refrigerate for 8-12 hours, or up to 24 hours. This cold proofing develops flavor and makes the dough easier to handle.
- Bake the Bread: Preheat your oven to 450°F (232°C) with your Dutch oven inside for at least 30-45 minutes. Carefully remove the hot Dutch oven. Gently invert the cold dough into the hot Dutch oven. Score the top of the dough with a sharp razor blade or knife. Cover with the lid and bake for 30 minutes.
- Finish Baking: Remove the lid from the Dutch oven and continue baking for another 15-20 minutes, or until the crust is deeply golden brown and the internal temperature reaches 200-210°F (93-99°C). Carefully remove the bread from the Dutch oven and transfer it to a wire rack to cool completely for at least 1-2 hours before slicing.
Easy Variations And Serving Ideas That Fit Real Life
This naturally sweetened date sourdough bread is fantastic on its own, but there are many ways to enjoy it and adapt it to your preferences.
- Nutty Addition: For extra texture and flavor, add 1/2 cup of chopped walnuts or pecans along with the dates during the first fold. The nuts complement the sweetness of the dates beautifully.
- Spiced Sourdough: A pinch of cinnamon (1/2 teaspoon) or a dash of cardamom can elevate the flavor profile, making it even more aromatic and comforting, especially for breakfast. Add spices with the flour.
- Kid-Friendly Toppings: Kids often love this bread simply toasted with a little butter. For a fun twist, offer a small bowl of cream cheese or a drizzle of honey as a dipping option. You can also make small “sandwiches” with a thin slice of apple or banana.
- Savory Twist: While dates are sweet, this bread can also pair well with savory elements. Try it alongside a sharp cheddar cheese or a creamy goat cheese. A slice of prosciutto can also be a delightful contrast.
- Brunch Buffet Star: Slice the cooled bread and arrange it on a platter with various spreads like fig jam, almond butter, or even a savory olive tapenade for a sophisticated brunch offering.
- French Toast Upgrade: Day-old date sourdough makes incredible French toast. The natural sweetness means you might need less syrup!
Common Slip-Ups And How To Avoid Them
Even experienced bakers can encounter small challenges. Here are some common mistakes when making sourdough with inclusions and how to steer clear of them.
- Dates Clumping Together: If your dates are very sticky, they might clump instead of distributing evenly. To prevent this, lightly toss the chopped dates with a teaspoon of flour before adding them to the dough. This helps them stay separate.
- Over-Proofing the Dough: Over-proofed dough can be difficult to handle and may result in a dense, flat loaf. Keep an eye on your dough during bulk fermentation; it should increase by 30-50%, not double. The poke test can also help: gently poke the dough with a floured finger; if it springs back slowly, it’s ready. If it springs back immediately, it needs more time. If it leaves a deep indentation, it’s likely over-proofed.
- Under-Proofing the Dough: Conversely, under-proofed dough can lead to a very dense crumb and a lack of oven spring. Ensure your bulk fermentation and cold proofing times are adequate. A starter that isn’t active enough can also contribute to under-proofing, so make sure your starter is bubbly and passes the float test before you begin. *

FAQs
- Can I make these ahead? Yes—prep ahead, refrigerate, then serve when ready.
- How long do leftovers last? Store covered in the fridge for 3–4 days for best texture.
- Can I adjust sweetness? Yes—add more or less sweetener to taste.
- Can I change the fruit? Yes—swap strawberries for blueberries, raspberries, or sliced banana.