There’s nothing quite like the aroma of freshly baked bread filling your kitchen, and this rustic honey oat sourdough loaf delivers that comforting experience with surprising ease. This recipe is designed for home bakers of all skill levels, especially those looking for a delicious, hearty bread without the fuss of traditional kneading.

Get ready to impress your family and friends with a beautiful, flavorful loaf that has a wonderful texture and a hint of sweetness from the honey, perfectly complemented by the wholesome oats. It’s truly a simple, no-knead sourdough bread that fits perfectly into a busy schedule.

Rustic Honey Oat Sourdough Loaf
- Total Time: 11-17 hours
- Yield: 1 loaf 1x
Description
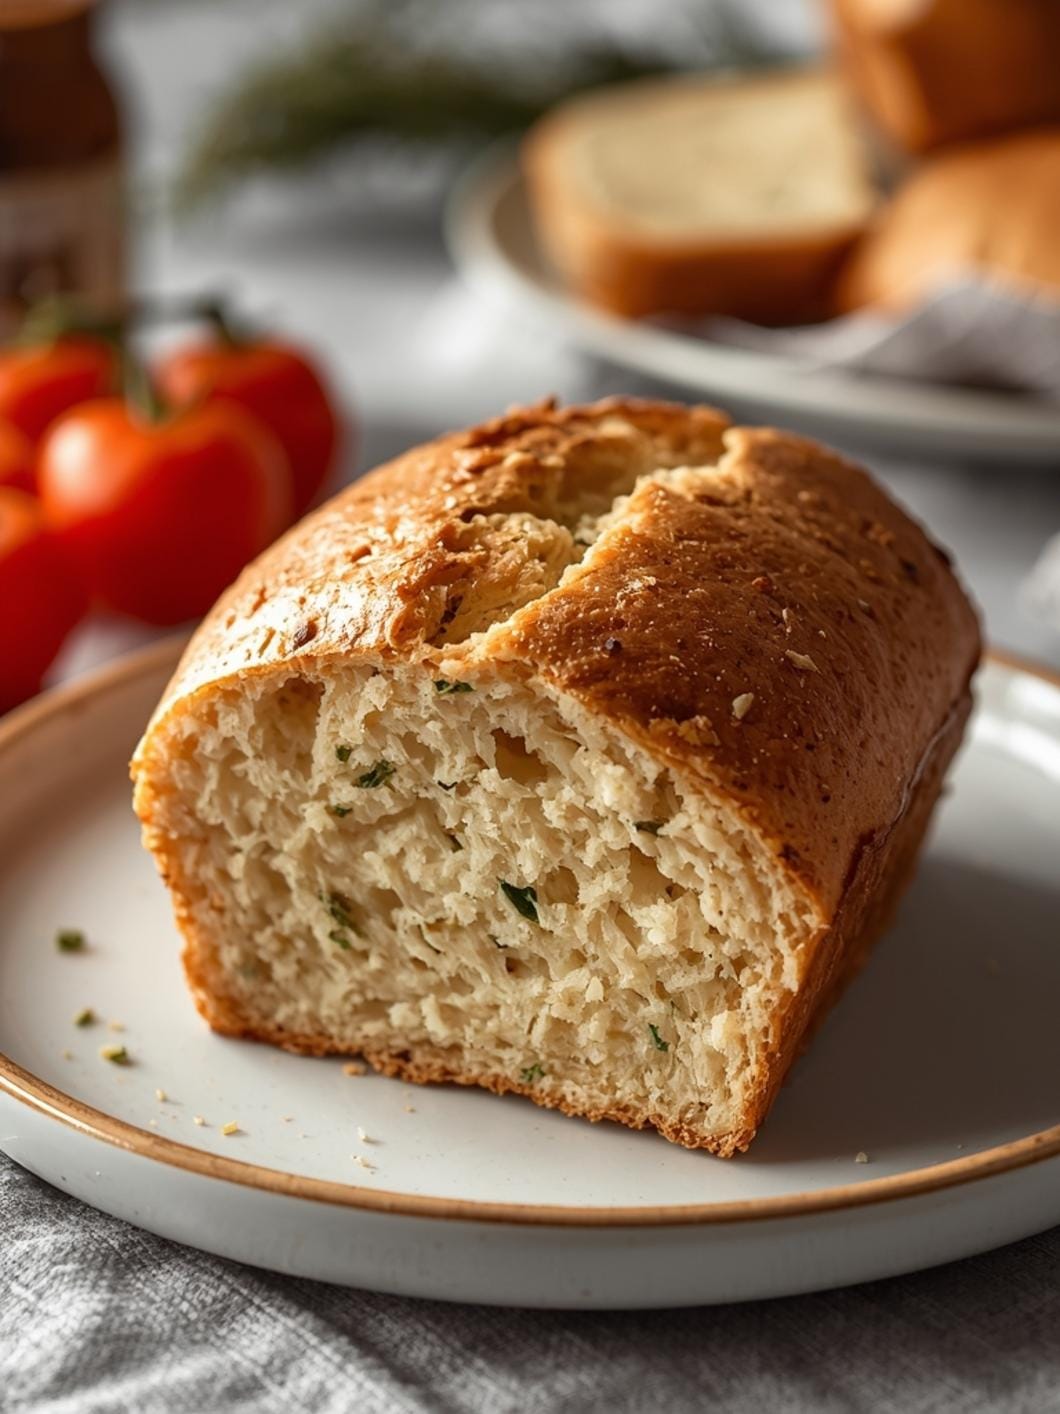
This recipe for a rustic honey oat sourdough loaf is designed for home bakers of all skill levels, offering a delicious, hearty bread without the fuss of traditional kneading. It’s a no-knead recipe, meaning minimal hands-on time, allowing the natural magic of sourdough to do most of the work. The combination of honey and oats adds a delightful sweetness and a satisfying chewiness, making it a versatile bread perfect for any meal.
Ingredients
Instructions
1. Combine Wet Ingredients: In a large mixing bowl, gently whisk together the active sourdough starter, warm water, and honey until well combined. The mixture should look milky and slightly frothy from the starter.
2. Add Dry Ingredients: Stir in the salt, all-purpose flour, and 1/2 cup of rolled oats. Mix with a wooden spoon or a sturdy spatula until no dry streaks of flour remain and a shaggy, sticky dough forms. Do not overmix; just ensure everything is incorporated.
3. First Proof (Bulk Fermentation): Cover the bowl tightly with plastic wrap or a damp kitchen towel. Let the dough rest at room temperature (ideally 70-75 F) for 8-12 hours, or until it has nearly doubled in size and has a bubbly, airy appearance. This is often done overnight.
4. Shape the Loaf: Gently turn the dough out onto a lightly floured surface. Fold the edges of the dough towards the center to create a round or oval shape, building tension on the surface. Avoid deflating the dough too much.
5. Second Proof (Final Rise): Lightly flour a proofing basket (banneton) or a bowl lined with a floured kitchen towel. Carefully transfer the shaped dough, seam-side up, into the basket or bowl. Sprinkle the top with a few extra rolled oats. Cover loosely with plastic wrap and let it proof at room temperature for 2-4 hours, or until visibly puffy. Alternatively, for a deeper flavor, you can cold-proof in the refrigerator for 12-24 hours.
6. Preheat Oven and Dutch Oven: About 30 minutes before baking, place a Dutch oven with its lid into your oven and preheat to 450 F (230 C). Heating the Dutch oven ensures a crisp crust.
7. Bake the Bread: Carefully remove the hot Dutch oven from the oven. Gently invert the dough from the proofing basket into the hot Dutch oven. If desired, score the top of the dough with a sharp knife or razor blade (a simple “X” or a single slash works well). Cover with the lid and bake for 30 minutes.
8. Finish Baking: Remove the lid from the Dutch oven and continue to bake for another 15-25 minutes, or until the crust is deeply golden brown and the internal temperature reaches 200-210 F (93-99 C).
9. Cool Completely: Carefully remove the bread from the Dutch oven and transfer it to a wire rack to cool completely before slicing. This is crucial for the internal structure and flavor development.
- Prep Time: 10 minutes
- Cook Time: 45-55 minutes
- Category: bread
- Method: baking
- Cuisine: american
Nutrition
- Serving Size: 1 slice
Keywords: sourdough, bread, oat, honey, no-knead, rustic, homemade, baking, easy, comfort food
What You’ll Love About This Quick And Easy Recipe
This honey oat sourdough loaf is a game-changer for anyone who loves homemade bread but doesn’t have hours to dedicate to complex baking processes. It’s a no-knead recipe, which means you spend minimal hands-on time in the kitchen, allowing the natural magic of sourdough to do most of the work. This recipe is perfect for busy weeknights, lazy weekends, or any time you crave a warm, crusty loaf. It’s incredibly forgiving, making it ideal for beginners who might be intimidated by sourdough baking. The combination of honey and oats adds a delightful sweetness and a satisfying chewiness that makes this bread stand out. Serve it alongside a hearty soup, as a base for open-faced sandwiches, or simply toasted with butter and jam for a comforting breakfast or snack. It’s a versatile bread that everyone at your table will enjoy.
Everything You Need To Make This Recipe Without Stress
Gathering your ingredients beforehand makes the baking process smooth and enjoyable. This recipe uses readily available items, ensuring you won’t have to hunt for obscure specialty products. The beauty of no-knead bread lies in its simplicity, and that extends to the ingredient list as well.
INGREDIENTS:

- 1 cup active sourdough starter, fed and bubbly
- 1 ½ cups warm water (about 95-105°F)
- 1 tablespoon honey
- 1 teaspoon salt
- 3 cups all-purpose flour
- ½ cup rolled oats, plus extra for topping
When selecting your ingredients, an active sourdough starter is key. This means it should have been fed 4-12 hours prior and be bubbly and active, ready to leaven your bread. For the honey, any good quality liquid honey will work beautifully; local honey often adds a nice touch. All-purpose flour is perfectly fine for this recipe, providing a good balance of texture and structure. If you prefer, you can use bread flour for a slightly chewier crumb. Rolled oats, also known as old-fashioned oats, are best for their texture and ability to hold up during baking. Instant oats tend to get too mushy, so stick with rolled oats.
Time Needed From Start To Finish
While this is a no-knead recipe, sourdough does require some patience for the fermentation process. However, the hands-on time is very minimal, making it an excellent option for busy home bakers.
- Prep Time: 10 minutes (for mixing the dough)
- Proofing Time: 8-12 hours (first proof) + 2-4 hours (second proof)
- Bake Time: 45-55 minutes
- Total Time: Approximately 11-17 hours (mostly hands-off proofing)
The bulk of the time is spent waiting for the dough to rise, which can be done overnight or while you’re out running errands. The actual work involved is quick and straightforward.
How To Make It Step By Step With Visual Cues

Creating this rustic honey oat sourdough loaf is a satisfying experience, and these steps will guide you through the process, ensuring a perfect loaf every time.
- Combine Wet Ingredients: In a large mixing bowl, gently whisk together the active sourdough starter, warm water, and honey until well combined. The mixture should look milky and slightly frothy from the starter.
- Add Dry Ingredients: Stir in the salt, all-purpose flour, and ½ cup of rolled oats. Mix with a wooden spoon or a sturdy spatula until no dry streaks of flour remain and a shaggy, sticky dough forms. Do not overmix; just ensure everything is incorporated.
- First Proof (Bulk Fermentation): Cover the bowl tightly with plastic wrap or a damp kitchen towel. Let the dough rest at room temperature (ideally 70-75°F) for 8-12 hours, or until it has nearly doubled in size and has a bubbly, airy appearance. This is often done overnight.
- Shape the Loaf: Gently turn the dough out onto a lightly floured surface. Fold the edges of the dough towards the center to create a round or oval shape, building tension on the surface. Avoid deflating the dough too much.
- Second Proof (Final Rise): Lightly flour a proofing basket (banneton) or a bowl lined with a floured kitchen towel. Carefully transfer the shaped dough, seam-side up, into the basket or bowl. Sprinkle the top with a few extra rolled oats. Cover loosely with plastic wrap and let it proof at room temperature for 2-4 hours, or until visibly puffy. Alternatively, for a deeper flavor, you can cold-proof in the refrigerator for 12-24 hours.
- Preheat Oven and Dutch Oven: About 30 minutes before baking, place a Dutch oven with its lid into your oven and preheat to 450°F (230°C). Heating the Dutch oven ensures a crisp crust.
- Bake the Bread: Carefully remove the hot Dutch oven from the oven. Gently invert the dough from the proofing basket into the hot Dutch oven. If desired, score the top of the dough with a sharp knife or razor blade (a simple “X” or a single slash works well). Cover with the lid and bake for 30 minutes.
- Finish Baking: Remove the lid from the Dutch oven and continue to bake for another 15-25 minutes, or until the crust is deeply golden brown and the internal temperature reaches 200-210°F (93-99°C).
- Cool Completely: Carefully remove the bread from the Dutch oven and transfer it to a wire rack to cool completely before slicing. This is crucial for the internal structure and flavor development.
Easy Variations And Serving Ideas That Fit Real Life
This rustic honey oat sourdough loaf is wonderful on its own, but it also lends itself beautifully to various simple adaptations and serving suggestions that fit any meal or occasion.
- Nutty Addition: For extra texture and flavor, fold in ½ cup of chopped walnuts or pecans along with the oats and flour. The nuts toast slightly during baking, adding a delicious crunch.
- Seed Power: Add a couple of tablespoons of flax seeds, chia seeds, or sunflower seeds to the dough for an added nutritional boost and a subtle nutty flavor.
- Cinnamon Swirl: For a sweeter, breakfast-friendly loaf, gently swirl 1-2 tablespoons of cinnamon sugar into the dough before the second proof.
- Savory Herbs: Incorporate 1-2 tablespoons of dried rosemary or thyme into the dough for a fragrant, savory bread that pairs well with stews and roasts.
- Serving Suggestions:
- Breakfast: Toast slices and spread with butter, cream cheese, or your favorite jam.
- Lunch: Use it for hearty sandwiches with deli meats, cheese, and fresh vegetables.
- Dinner: Serve alongside a warm bowl of soup, chili, or a fresh salad. It’s also fantastic with a simple olive oil dip.
- Snack: Enjoy a thick slice with a drizzle of extra honey or a smear of almond butter.
Common Slip-Ups And How To Avoid Them
Even with a simple recipe like this no-knead sourdough, a few common mistakes can occur. Knowing how to avoid them will ensure your baking success.
- Inactive Starter: If your sourdough starter isn’t bubbly and active, your bread won’t rise properly. Always feed your starter 4-12 hours before you plan to use it and ensure it’s at its peak activity. A simple float test (a small spoonful of starter floats in water) can confirm its readiness.
- Under-Proofing: Pulling the dough out too early during either the first or second proof will result in a dense, heavy loaf. Look for visual cues: the dough should be significantly larger, bubbly, and feel light and airy. Patience is key here.
- Over-Proofing: While less common for beginners, over-proofed dough can collapse in the oven or have a very weak structure. If your dough looks very spread out, super bubbly, and smells overly sour, it might be over-proofed. Stick to the suggested proofing times as a guideline, but always observe your dough.
- Not Preheating the Dutch Oven: Baking in a cold Dutch oven will prevent the crust from developing properly and can lead to a less impressive “oven spring.” Always preheat your Dutch oven thoroughly for at least 30 minutes at the specified temperature.
- Slicing Too Soon: It’s tempting to cut into a warm loaf, but cooling the

FAQs
- Can I make these ahead? Yes—prep ahead, refrigerate, then serve when ready.
- How long do leftovers last? Store covered in the fridge for 3–4 days for best texture.
- Can I adjust sweetness? Yes—add more or less sweetener to taste.
- Can I change the fruit? Yes—swap strawberries for blueberries, raspberries, or sliced banana.