There’s nothing quite like the aroma of freshly baked bread filling your kitchen, and with this easy sourdough boule recipe, you can achieve that comforting experience even as a beginner. Forget complicated techniques and endless waiting; we’re focusing on a straightforward approach to creating a beautiful, rustic loaf that will impress everyone.
 11")
This recipe is designed to demystify sourdough baking, making it accessible and enjoyable for anyone new to the process. You’ll learn how to transform simple ingredients into a delicious, chewy bread with a delightful crust, perfect for sharing with family and friends.
 12")
Easy Sourdough Boule for Beginners
- Total Time: 9-13 hours
- Yield: 1 large boule 1x
Description
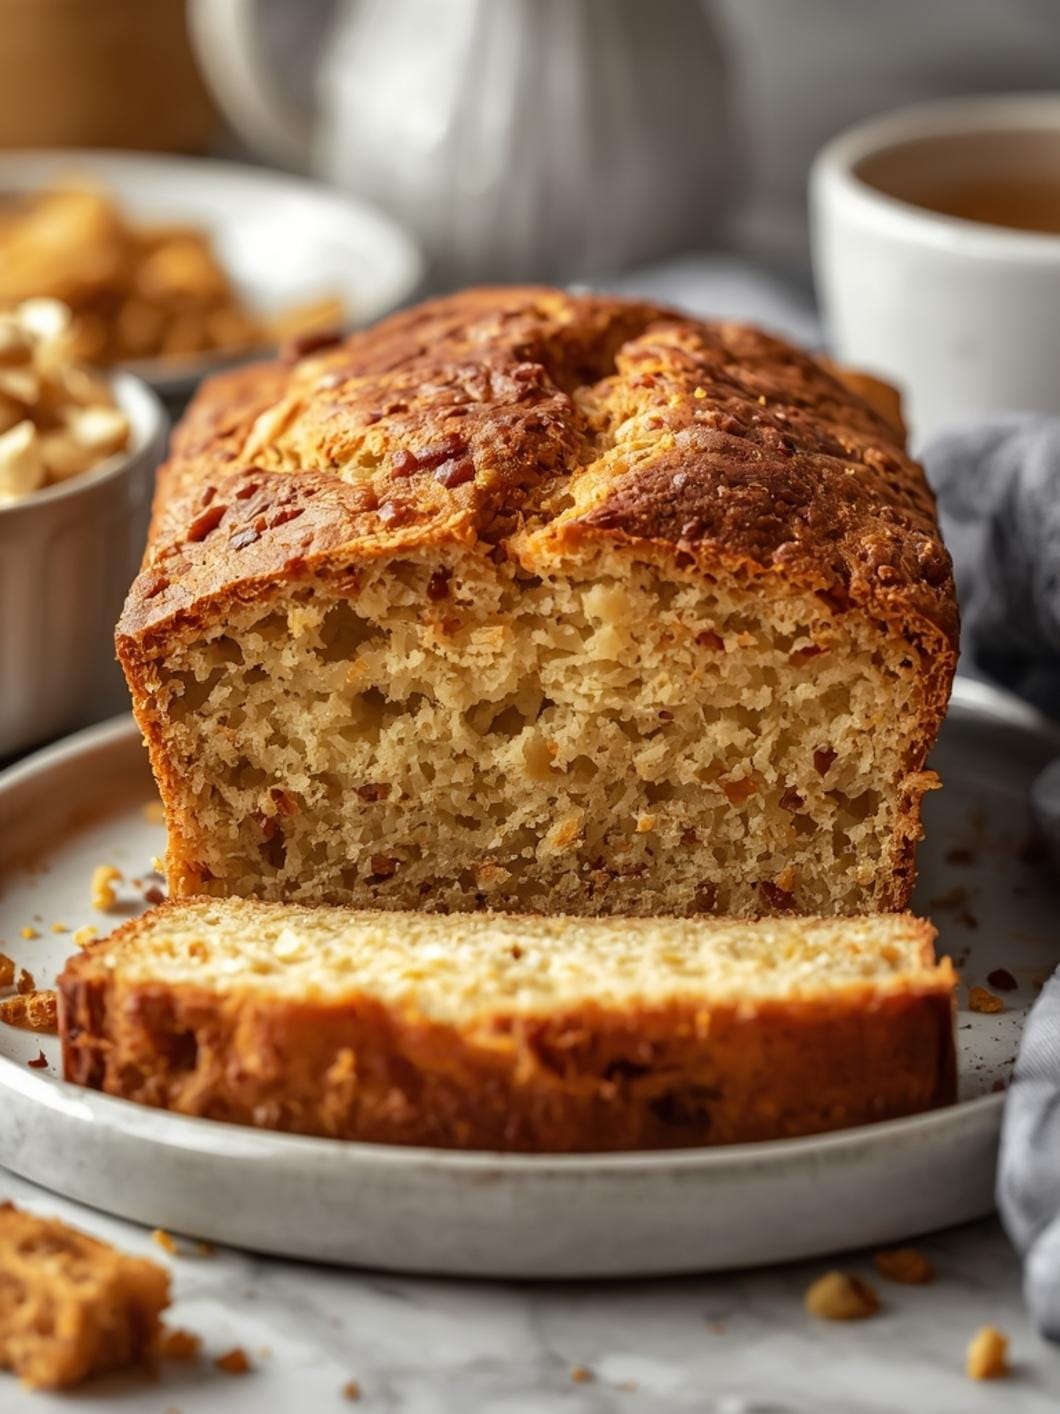
This easy sourdough boule recipe is perfect for beginners, offering a straightforward approach to creating a beautiful, rustic loaf with minimal hands-on time. It demystifies sourdough baking, making it accessible and enjoyable for anyone new to the process, resulting in a delicious, chewy bread with a delightful crust.
Ingredients
Instructions
1. Combine the Wet Ingredients: In a large mixing bowl, combine the active sourdough starter, warm water, sugar, and olive oil. Whisk gently until the starter is mostly dissolved and the mixture is well combined. The mixture should look milky and slightly frothy.
2. Add Dry Ingredients and Mix: Add the salt and 3 cups of the all-purpose flour to the wet ingredients. Use a sturdy spoon or a Danish dough whisk to mix until a shaggy dough forms and no dry streaks of flour remain. It will be sticky and a bit rough.
3. Knead the Dough: Turn the dough out onto a lightly floured surface. Gradually add the remaining 1 cup of flour, a little at a time, as you knead for about 5-7 minutes. The dough should become smoother, more elastic, and less sticky, though it will still be soft. You’re looking for a dough that springs back slightly when poked.
4. First Rise (Bulk Fermentation): Lightly grease the mixing bowl with a little olive oil. Place the dough back into the bowl, turning it once to coat. Cover the bowl tightly with plastic wrap or a damp kitchen towel. Let it rise in a warm spot (around 70-75F) for 8-12 hours, or until it has at least doubled in size and looks bubbly. An overnight rise on the counter is often perfect.
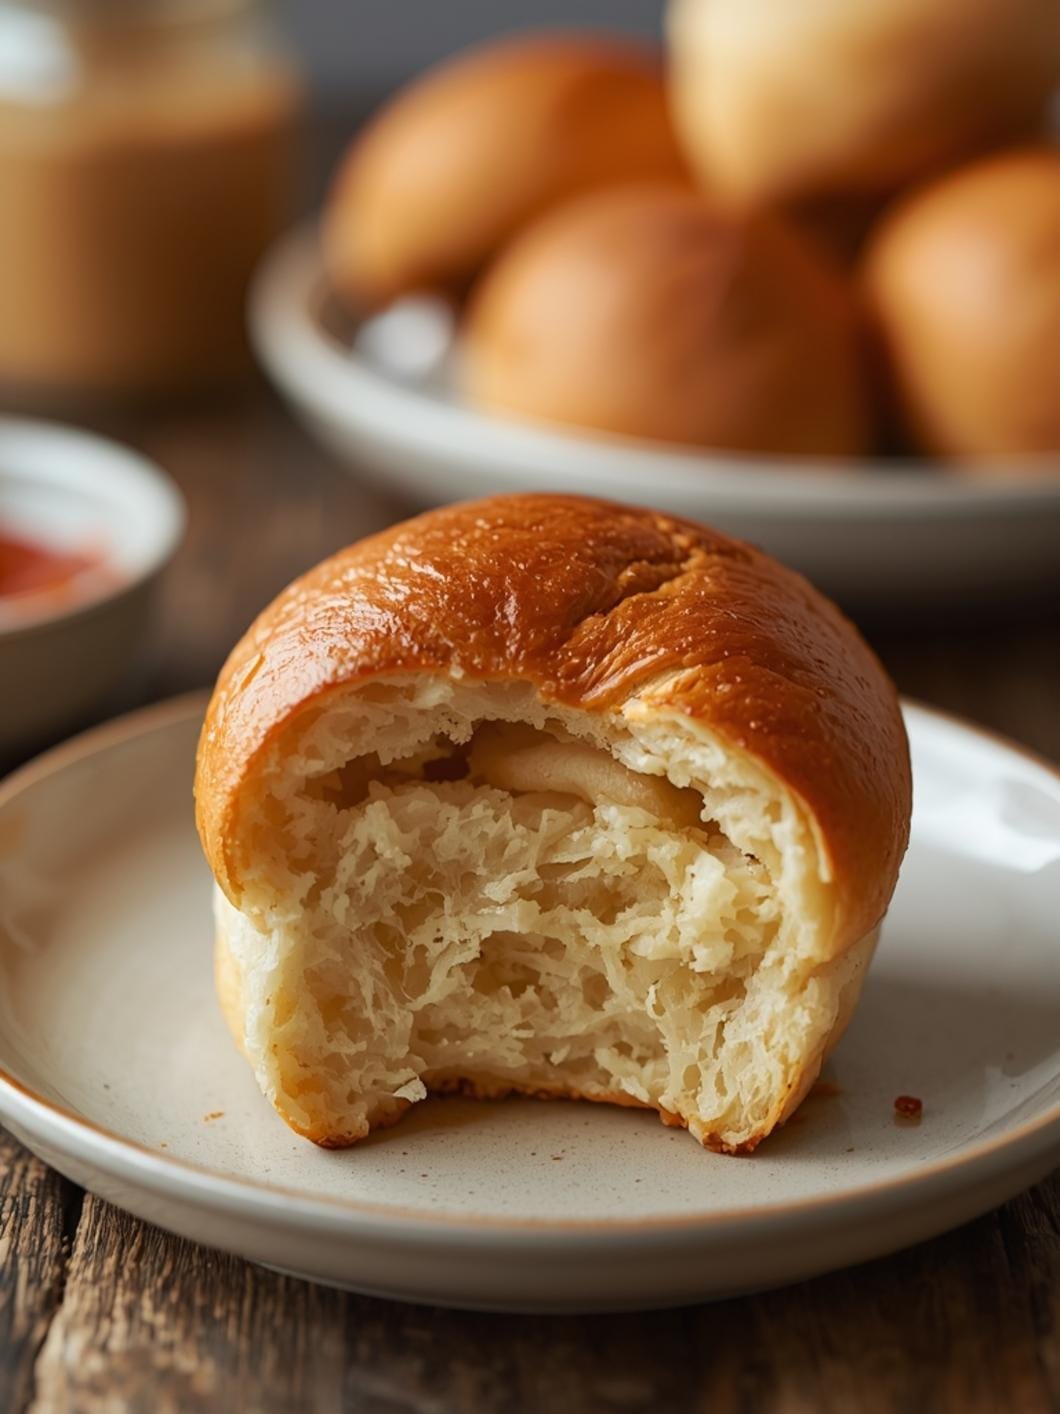
5. Shape the Boule: Gently turn the risen dough out onto a lightly floured surface. Carefully deflate it by pressing out the air. Shape the dough into a tight round boule by pulling the edges towards the center and pinching them together at the top, then flipping it over and gently rotating it to create surface tension.
6. Second Rise (Proofing): Lightly flour a proofing basket (banneton) or a bowl lined with a floured kitchen towel. Place the shaped boule seam-side up into the basket/bowl. Cover loosely with plastic wrap or a kitchen towel and let it proof for 1-2 hours at room temperature, or refrigerate for 4-12 hours for a slower, more flavorful proof. The dough should feel puffy and slightly jiggly.
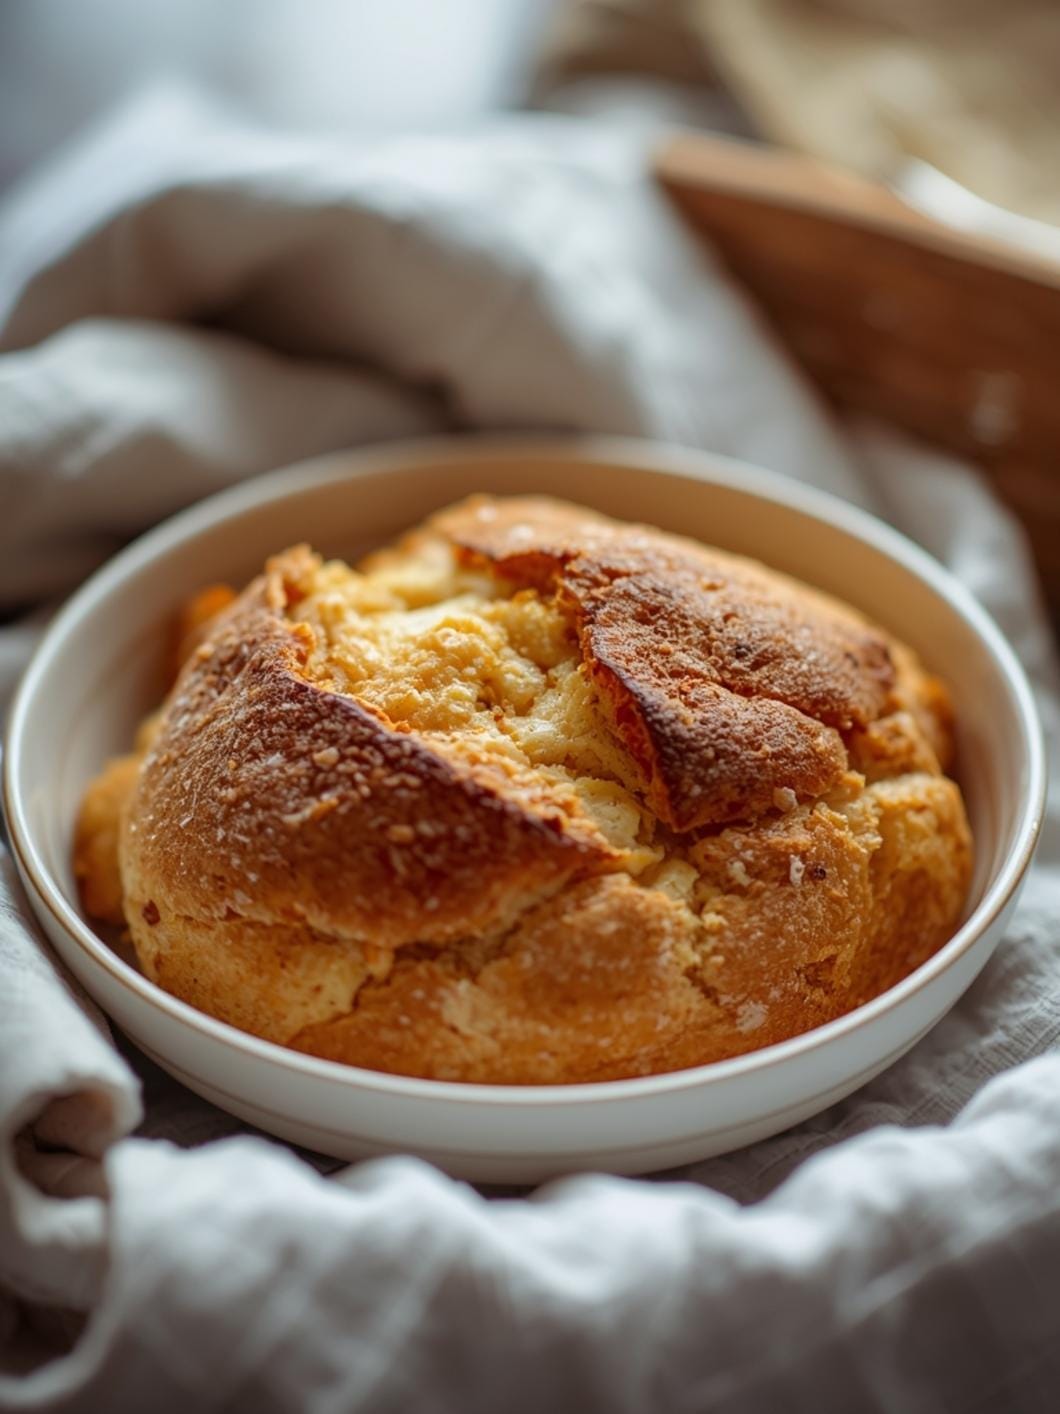
7. Preheat Oven and Dutch Oven: About 30 minutes before baking, place a Dutch oven with its lid into your oven and preheat to 450F (230C). Heating the Dutch oven ensures a great crust.
8. Bake the Bread: Carefully remove the hot Dutch oven from the oven. Gently invert the proofed dough into the hot Dutch oven. If desired, score the top of the dough with a sharp knife or razor blade (a simple “X” or a single slash works well). Cover with the lid and bake for 30 minutes. Remove the lid and continue baking for another 15-20 minutes, or until the crust is deeply golden brown and the internal temperature reaches 200-210F (93-99C).
9. Cool Completely: Carefully remove the bread from the Dutch oven and transfer it to a wire rack. Let it cool completely for at least 1-2 hours before slicing. This is crucial for the crumb to set properly and for the best flavor and texture.
- Prep Time: 20 minutes
- Cook Time: 45-50 minutes
- Category: bread
- Method: baking
- Cuisine: american
Nutrition
- Serving Size: 1 slice
Keywords: sourdough, bread, boule, baking, homemade, rustic, beginner, easy, yeast-free, fermented
What You’ll Love About This Quick And Easy Recipe
This sourdough boule recipe is a true game-changer for anyone who has ever felt intimidated by homemade bread. It works because it simplifies the traditional sourdough process, focusing on practical steps that yield fantastic results without requiring hours of hands-on time or advanced baking knowledge. This recipe is perfect for busy parents, new bakers, or anyone looking to add a touch of homemade goodness to their meals without the stress. It’s ideal for a weekend baking project, a comforting addition to a weeknight dinner, or even as a thoughtful gift. Imagine serving this warm, crusty bread with a simple soup, alongside a hearty stew, or simply with butter and jam for breakfast. It’s versatile, satisfying, and surprisingly easy to master.
Everything You Need To Make This Recipe Without Stress
Gathering your ingredients before you start baking is key to a smooth and enjoyable process. This recipe uses readily available items, so you won’t need to hunt down any obscure specialty products.
INGREDIENTS:
 13")
- 1 cup active sourdough starter
- 1 ½ cups warm water (around 95-105°F)
- 1 tablespoon granulated sugar
- 1 tablespoon olive oil
- 1 ½ teaspoons salt
- 4 cups all-purpose flour, plus more for dusting
For the all-purpose flour, you can use any standard brand. If you prefer a slightly chewier texture, you can substitute up to 1 cup of bread flour for an equal amount of all-purpose flour. The olive oil adds a nice richness and helps with the crust, but you can use another neutral oil like vegetable or canola oil if that’s what you have on hand. Ensure your sourdough starter is active and bubbly; this is crucial for a good rise. If your starter isn’t quite ready, feed it 4-12 hours before you plan to bake.
Time Needed From Start To Finish
This recipe is designed to be beginner-friendly, which also means managing your time effectively. While sourdough does require some waiting for fermentation, the active hands-on time is minimal.
- Prep Time: 20 minutes (mixing and initial shaping)
- Resting/Proofing Time: 8-12 hours (overnight is ideal)
- Bake Time: 45-50 minutes
- Total Time: Approximately 9-13 hours (mostly inactive waiting)
The bulk of the time is spent waiting for the dough to rise, which can conveniently happen overnight while you sleep. This makes it a perfect recipe to start in the evening and bake fresh in the morning.
How To Make It Step By Step With Visual Cues
 14")
Follow these simple steps to create your beautiful sourdough boule. Don’t worry if it’s not perfect the first time; practice makes perfect!
- Combine the Wet Ingredients: In a large mixing bowl, combine the active sourdough starter, warm water, sugar, and olive oil. Whisk gently until the starter is mostly dissolved and the mixture is well combined. The mixture should look milky and slightly frothy.
- Add Dry Ingredients and Mix: Add the salt and 3 cups of the all-purpose flour to the wet ingredients. Use a sturdy spoon or a Danish dough whisk to mix until a shaggy dough forms and no dry streaks of flour remain. It will be sticky and a bit rough.
- Knead the Dough: Turn the dough out onto a lightly floured surface. Gradually add the remaining 1 cup of flour, a little at a time, as you knead for about 5-7 minutes. The dough should become smoother, more elastic, and less sticky, though it will still be soft. You’re looking for a dough that springs back slightly when poked.
- First Rise (Bulk Fermentation): Lightly grease the mixing bowl with a little olive oil. Place the dough back into the bowl, turning it once to coat. Cover the bowl tightly with plastic wrap or a damp kitchen towel. Let it rise in a warm spot (around 70-75°F) for 8-12 hours, or until it has at least doubled in size and looks bubbly. An overnight rise on the counter is often perfect.
- Shape the Boule: Gently turn the risen dough out onto a lightly floured surface. Carefully deflate it by pressing out the air. Shape the dough into a tight round boule by pulling the edges towards the center and pinching them together at the top, then flipping it over and gently rotating it to create surface tension.
- Second Rise (Proofing): Lightly flour a proofing basket (banneton) or a bowl lined with a floured kitchen towel. Place the shaped boule seam-side up into the basket/bowl. Cover loosely with plastic wrap or a kitchen towel and let it proof for 1-2 hours at room temperature, or refrigerate for 4-12 hours for a slower, more flavorful proof. The dough should feel puffy and slightly jiggly.
- Preheat Oven and Dutch Oven: About 30 minutes before baking, place a Dutch oven with its lid into your oven and preheat to 450°F (230°C). Heating the Dutch oven ensures a great crust.
- Bake the Bread: Carefully remove the hot Dutch oven from the oven. Gently invert the proofed dough into the hot Dutch oven. If desired, score the top of the dough with a sharp knife or razor blade (a simple “X” or a single slash works well). Cover with the lid and bake for 30 minutes. Remove the lid and continue baking for another 15-20 minutes, or until the crust is deeply golden brown and the internal temperature reaches 200-210°F (93-99°C).
- Cool Completely: Carefully remove the bread from the Dutch oven and transfer it to a wire rack. Let it cool completely for at least 1-2 hours before slicing. This is crucial for the crumb to set properly and for the best flavor and texture.
Easy Variations And Serving Ideas That Fit Real Life
This basic sourdough boule is a fantastic starting point, and there are many ways to adapt it to your family’s preferences or different occasions.
- Kid-Friendly Additions: For a fun twist, you can gently fold in a handful of shredded cheddar cheese and a sprinkle of dried herbs (like oregano or basil) during the kneading step. Kids often love cheesy bread! You could also serve slices with a side of honey butter or a mild cream cheese spread.
- Flavor Swaps: To add more depth, consider incorporating a tablespoon of dried rosemary or thyme into the dough with the flour. For a savory loaf, add 1/4 cup of chopped olives or sun-dried tomatoes. If you enjoy a touch of sweetness, a tablespoon of honey or maple syrup can be added with the wet ingredients.
- Party and Buffet Serving: A freshly baked sourdough boule is a showstopper on any buffet. Serve it alongside a charcuterie board, with a bowl of olive oil and balsamic vinegar for dipping, or as an accompaniment to a hearty soup or chili. You can also slice it and toast it for bruschetta.
- Optional Toppings/Dips: Before baking, you can sprinkle the top of the dough with flaky sea salt, sesame seeds, or poppy seeds for extra texture and flavor. For dipping, consider a homemade garlic herb butter, a rich pesto, or a simple olive tapenade.
Common Slip-Ups And How To Avoid Them
Even with a beginner-friendly recipe, a few common mistakes can happen. Knowing what to watch out for will help you achieve success.
- Inactive Sourdough Starter: This is the most frequent culprit for a flat loaf. Ensure your starter is active, bubbly, and passes the float test (a small spoonful floats in water) before you begin. If it’s sluggish, feed it and wait until it’s vigorous.
- Not Enough Kneading: Underkneaded dough won’t develop enough gluten, resulting in a dense, crumbly bread. Knead until the dough feels smooth and elastic, and springs back when gently poked.
- Over-Proofing or Under-Proofing: An over-proofed dough will collapse in the oven, while an under-proofed dough will be dense and have a tight crumb. Pay attention to the visual cues: the dough should be visibly larger, puffy, and jiggly, but not completely slack. The poke test helps: if it springs back quickly, it’s under-proofed; if it leaves a slight indentation, it’s ready; if it collapses, it’s over-proofed.
- Slicing Too Soon: It’s tempting to cut into a warm loaf
 15")
FAQs
- Can I make these ahead? Yes—prep ahead, refrigerate, then serve when ready.
- How long do leftovers last? Store covered in the fridge for 3–4 days for best texture.
- Can I adjust sweetness? Yes—add more or less sweetener to taste.
- Can I change the fruit? Yes—swap strawberries for blueberries, raspberries, or sliced banana.