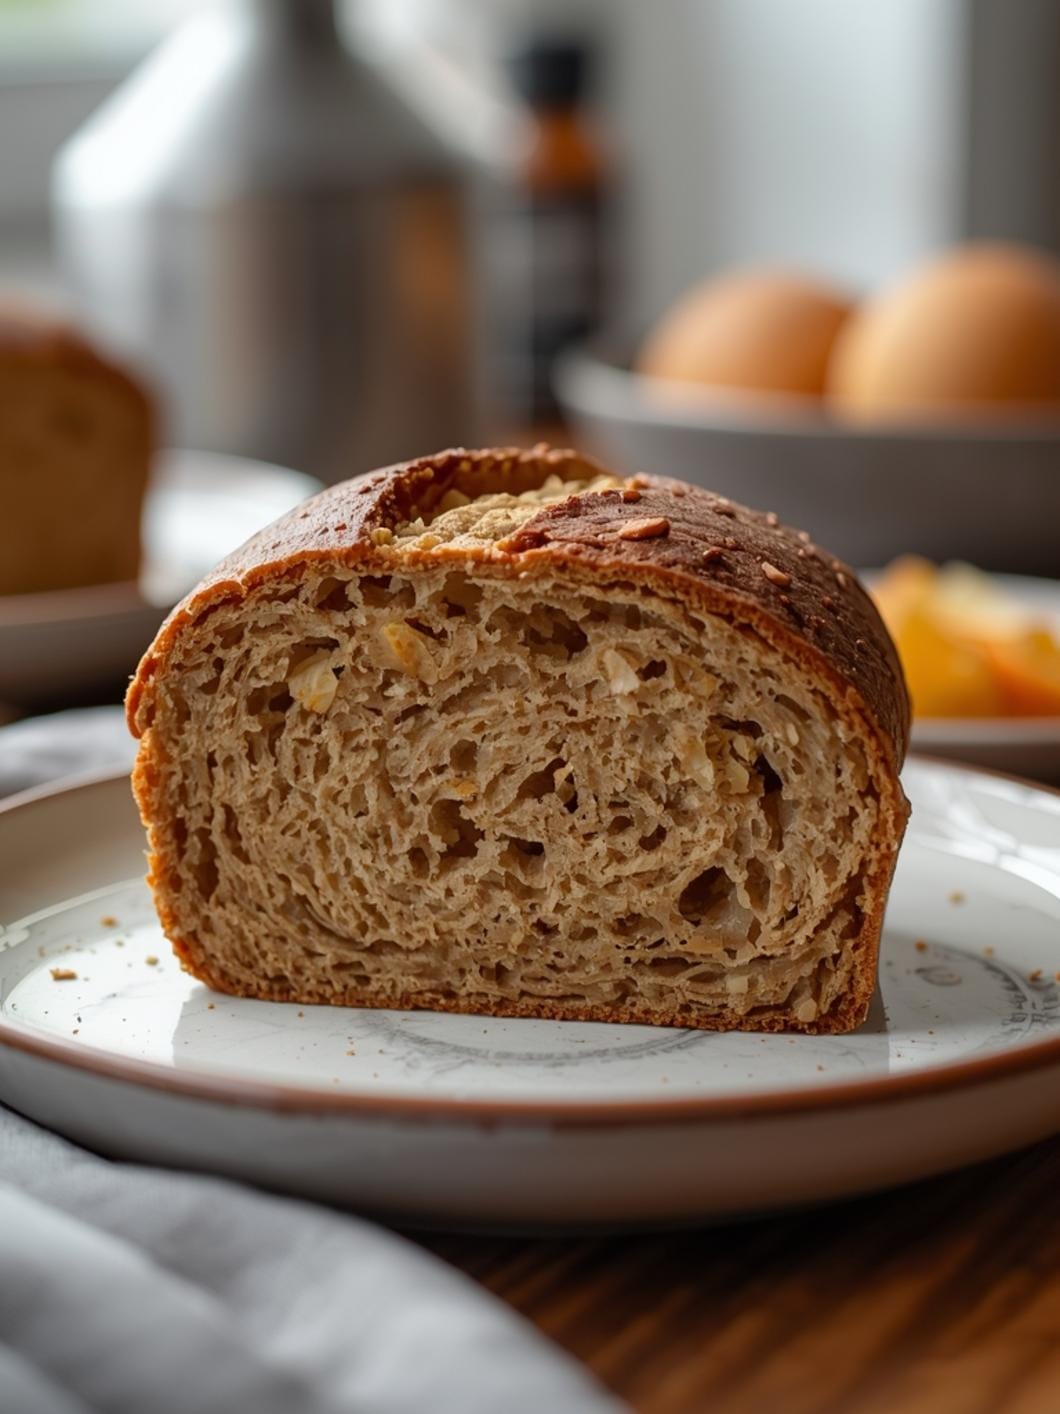
This soft chocolate marble bread recipe creates a beautiful loaf with swirls of rich cocoa, perfect for a delightful breakfast or snack.

It’s a truly impressive yet simple bake that brings a touch of elegance to your table without complicated techniques. Get ready to discover how easy it is to achieve those stunning marbled patterns.
Whether you’re looking for a special treat to share with family or a comforting slice to enjoy with your morning coffee, this recipe delivers on both flavor and visual appeal. We’ll walk you through every step to ensure your chocolate marble bread turns out perfectly soft, moist, and utterly delicious.

Soft Chocolate Marble Bread
- Total Time: 2 hours 50 minutes
- Yield: 1 loaf 1x
Description
This soft chocolate marble bread recipe creates a beautiful loaf with swirls of rich cocoa, perfect for a delightful breakfast or snack. It’s a truly impressive yet simple bake that brings a touch of elegance to your table without complicated techniques. Get ready to discover how easy it is to achieve those stunning marbled patterns.
Ingredients
Instructions
1. 1. Activate the Yeast: In a large mixing bowl, combine the warm milk (1 cup), 1/2 cup granulated sugar, and active dry yeast. Stir gently and let it sit for about 5-10 minutes until the mixture becomes foamy. This foam indicates your yeast is active and ready to work.
2. 2. Combine Wet and Dry Ingredients: To the foamy yeast mixture, add the melted butter and the egg. Whisk until well combined. In a separate bowl, whisk together the 3 cups of all-purpose flour and 1/2 teaspoon of salt. Gradually add the dry ingredients to the wet ingredients, mixing with a wooden spoon or your hands until a shaggy dough forms.
3. 3. Knead the Dough: Turn the dough out onto a lightly floured surface. Knead for about 5-7 minutes until the dough is smooth and elastic. It should spring back slightly when poked. Form the dough into a ball.
4. 4. First Rise: Lightly grease a clean bowl with oil. Place the dough ball in the bowl, turning it once to coat. Cover the bowl with plastic wrap or a clean kitchen towel and let it rise in a warm place for about 1 hour to 1 hour 30 minutes, or until it has doubled in size.
5. 5. Prepare Chocolate Dough and Marble: While the dough is rising, prepare the chocolate mixture. In a small bowl, combine the cocoa powder, 2 tablespoons of sugar, and 2 tablespoons of warm milk. Mix until it forms a thick paste. Once the dough has risen, punch it down gently to release the air. Divide the dough into two equal portions. Leave one portion plain. Knead the cocoa paste into the second portion of dough until the color is uniform. This might take a few minutes and a bit of elbow grease.
6. 6. Shape the Loaf: On a lightly floured surface, roll out the plain dough into a rectangle (about 12×8 inches). Roll out the chocolate dough into a similar-sized rectangle. Place the chocolate dough on top of the plain dough. Gently roll them together slightly to adhere. Now, starting from a long edge, tightly roll the layered dough into a log.
7. 7. Second Rise and Bake: Place the rolled log into a lightly greased 9×5-inch loaf pan. Cover the pan loosely with plastic wrap or a kitchen towel and let it rise in a warm place for another 30 minutes, or until it looks puffy. Preheat your oven to 350 F (175 C). Bake for 30-35 minutes, or until the top is golden brown and the internal temperature reaches 200-210 F (93-99 C) with an instant-read thermometer.
8. 8. Cooling: Once baked, remove the loaf from the oven and let it cool in the pan for 10-15 minutes before transferring it to a wire rack to cool completely. Slicing too early can make the bread gummy.
- Prep Time: 20 minutes
- Cook Time: 30-35 minutes
- Category: bread
- Method: baking
- Cuisine: american
Nutrition
- Serving Size: 1 slice
Keywords: chocolate bread, marble bread, sweet bread, breakfast, snack, easy bread, homemade bread, cocoa bread
What You’ll Love About This Quick And Easy Recipe
This soft chocolate marble bread is a true winner for anyone who loves baking but doesn’t have hours to spend in the kitchen. It’s perfect for busy parents who want to whip up something special for breakfast or an after-school snack, or for new bakers looking to impress without the fuss. The beauty of this recipe lies in its simplicity and the stunning results it yields. You’ll love the soft, tender crumb and the rich pockets of chocolate flavor swirled throughout. It’s a fantastic recipe to make on a lazy weekend morning, for a casual brunch with friends, or simply as a delightful treat to have on hand throughout the week. It’s comforting, satisfying, and looks far more complicated to make than it actually is, making you look like a baking pro!
Everything You Need To Make This Recipe Without Stress
Gathering your ingredients beforehand is the first step to a smooth baking experience. This recipe uses common pantry staples, so you likely have most of what you need already. We’re focusing on simplicity and delicious results, so there’s no need for fancy equipment or hard-to-find items.
INGREDIENTS:

- 3 cups all-purpose flour, plus more for dusting
- 1/2 cup granulated sugar
- 2 1/4 teaspoons active dry yeast (1 packet)
- 1/2 teaspoon salt
- 1 cup warm milk (about 105-115°F)
- 1/4 cup unsalted butter, melted
- 1 large egg
- 1/4 cup unsweetened cocoa powder
- 2 tablespoons granulated sugar (for cocoa mixture)
- 2 tablespoons warm milk (for cocoa mixture)
For the flour, standard all-purpose flour works perfectly here. There’s no need for bread flour or specialty flours unless you prefer them. When choosing your cocoa powder, opt for unsweetened natural cocoa powder for the best chocolate flavor and color. Dutch-processed cocoa can also work, but it might give a slightly darker color and different flavor profile. For the milk, any kind of dairy milk (whole, 2%, or skim) will do, just make sure it’s warm enough to activate the yeast but not so hot that it kills it. If you don’t have unsalted butter, salted butter can be used; just reduce the added salt in the recipe by a tiny pinch.
Time Needed From Start To Finish
This recipe is designed to be approachable and relatively quick for a homemade bread. While there are a couple of rising times involved, the active hands-on work is minimal, making it perfect for a weekend baking project.
Prep time: 20 minutes Rise time: 1 hour 30 minutes (first rise), 30 minutes (second rise) Cook time: 30-35 minutes Total time: Approximately 2 hours 50 minutes
How To Make It Step By Step With Visual Cues

Creating this beautiful marbled loaf is easier than you think. Follow these steps carefully, and you’ll have a stunning bread ready to enjoy.
- Activate the Yeast: In a large mixing bowl, combine the warm milk (1 cup), 1/2 cup granulated sugar, and active dry yeast. Stir gently and let it sit for about 5-10 minutes until the mixture becomes foamy. This foam indicates your yeast is active and ready to work.
- Combine Wet and Dry Ingredients: To the foamy yeast mixture, add the melted butter and the egg. Whisk until well combined. In a separate bowl, whisk together the 3 cups of all-purpose flour and 1/2 teaspoon of salt. Gradually add the dry ingredients to the wet ingredients, mixing with a wooden spoon or your hands until a shaggy dough forms.
- Knead the Dough: Turn the dough out onto a lightly floured surface. Knead for about 5-7 minutes until the dough is smooth and elastic. It should spring back slightly when poked. Form the dough into a ball.
- First Rise: Lightly grease a clean bowl with oil. Place the dough ball in the bowl, turning it once to coat. Cover the bowl with plastic wrap or a clean kitchen towel and let it rise in a warm place for about 1 hour to 1 hour 30 minutes, or until it has doubled in size.
- Prepare Chocolate Dough and Marble: While the dough is rising, prepare the chocolate mixture. In a small bowl, combine the cocoa powder, 2 tablespoons of sugar, and 2 tablespoons of warm milk. Mix until it forms a thick paste. Once the dough has risen, punch it down gently to release the air. Divide the dough into two equal portions. Leave one portion plain. Knead the cocoa paste into the second portion of dough until the color is uniform. This might take a few minutes and a bit of elbow grease.
- Shape the Loaf: On a lightly floured surface, roll out the plain dough into a rectangle (about 12×8 inches). Roll out the chocolate dough into a similar-sized rectangle. Place the chocolate dough on top of the plain dough. Gently roll them together slightly to adhere. Now, starting from a long edge, tightly roll the layered dough into a log.
- Second Rise and Bake: Place the rolled log into a lightly greased 9×5-inch loaf pan. Cover the pan loosely with plastic wrap or a kitchen towel and let it rise in a warm place for another 30 minutes, or until it looks puffy. Preheat your oven to 350°F (175°C). Bake for 30-35 minutes, or until the top is golden brown and the internal temperature reaches 200-210°F (93-99°C) with an instant-read thermometer.
- Cooling: Once baked, remove the loaf from the oven and let it cool in the pan for 10-15 minutes before transferring it to a wire rack to cool completely. Slicing too early can make the bread gummy.
Easy Variations And Serving Ideas That Fit Real Life
This soft chocolate marble bread is delicious on its own, but there are many ways to customize it and enjoy it.
- Sweet Swirls: For an extra touch of sweetness, you can sprinkle a tablespoon of mini chocolate chips over the chocolate dough before rolling it up.
- Nutty Addition: A sprinkle of finely chopped toasted nuts, like pecans or walnuts, can add a delightful crunch and flavor dimension to the chocolate layer.
- Glaze It Up: A simple powdered sugar glaze (powdered sugar mixed with a tiny bit of milk or water) drizzled over the cooled loaf adds an elegant finish and extra sweetness.
- Kid-Friendly Fun: Let kids help with the kneading of the chocolate dough – they love getting their hands a little messy! Serve slices with a side of fruit or a glass of milk for a wholesome snack.
- Breakfast Bliss: Toast a slice and spread with butter, cream cheese, or even a thin layer of hazelnut spread for a decadent breakfast.
- Dessert Delight: Serve warm slices with a scoop of vanilla ice cream or a dollop of whipped cream for a simple yet satisfying dessert.
- Party Perfect: This bread makes a beautiful addition to a brunch buffet or a dessert spread. Slice it into thick pieces and arrange them on a platter.
Common Slip-Ups And How To Avoid Them
Even simple recipes can have their pitfalls. Here are some common mistakes and how to ensure your chocolate marble bread turns out perfectly every time.
- Killing the Yeast: If your milk is too hot (above 120°F/49°C), it will kill the yeast, and your dough won’t rise. If it’s too cold (below 100°F/38°C), the yeast won’t activate properly. Always check the temperature with a thermometer or ensure it’s just comfortably warm to the touch.
- Not Kneading Enough: Under-kneading results in a dense, tough bread. Kneading develops the gluten, which gives the bread its soft, elastic texture. Knead until the dough is smooth and springs back when gently poked.
- Over-Flouring: Adding too much flour during kneading or rolling can make the dough dry and stiff. Use just enough flour to prevent sticking, not to incorporate into the dough.
- Improper Rising Conditions: Dough needs a warm, draft-free place to rise. If your kitchen is cold, try placing the bowl in a slightly warm (but turned off) oven, or near a sunny window. If the dough doesn’t double in size,

FAQs
- Can I make these ahead? Yes—prep ahead, refrigerate, then serve when ready.
- How long do leftovers last? Store covered in the fridge for 3–4 days for best texture.
- Can I adjust sweetness? Yes—add more or less sweetener to taste.
- Can I change the fruit? Yes—swap strawberries for blueberries, raspberries, or sliced banana.