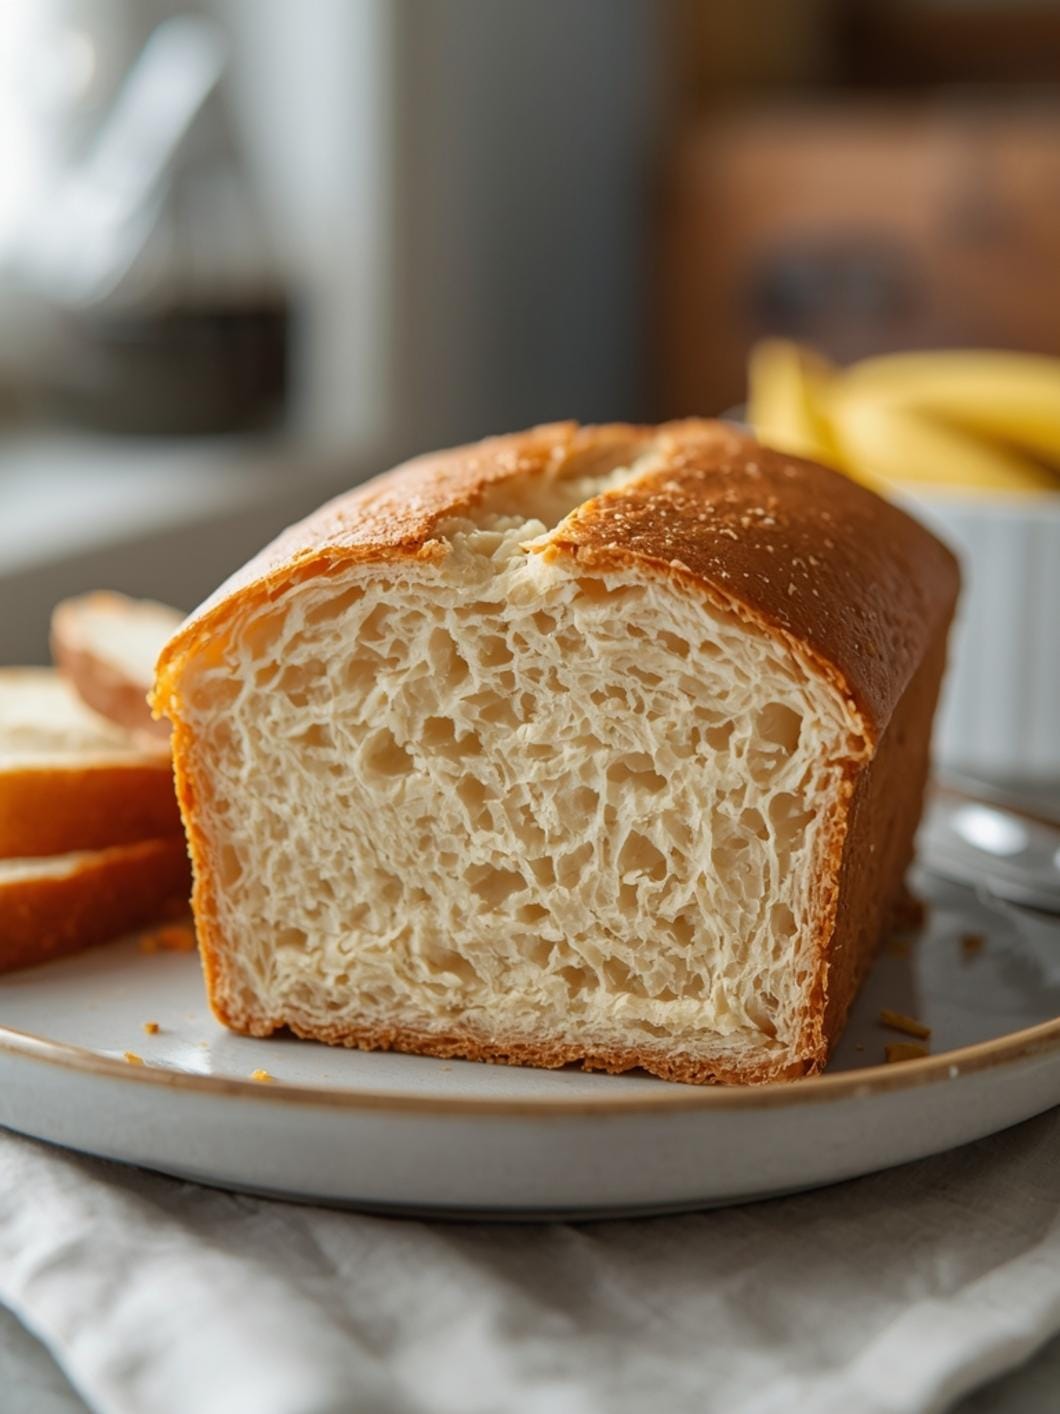
Crafting delicious sourdough bread bowls at home might sound like a project for experienced bakers, but this overnight sourdough discard recipe makes it incredibly simple and rewarding. Imagine serving your favorite hearty soups in these impressive, edible vessels – it’s a game-changer for family dinners and casual gatherings alike.
 11")
This recipe focuses on ease and flavor, utilizing sourdough discard to infuse that wonderful tangy depth without the need for active sourdough starter maintenance. Get ready to impress your family and friends with these homemade bread bowls that are both beautiful and incredibly tasty.
Table of Contents
- What You’ll Love About This Quick And Easy Recipe
- Everything You Need To Make This Recipe Without Stress
- Time Needed From Start To Finish
- How To Make It Step By Step With Visual Cues
- Easy Variations And Serving Ideas That Fit Real Life
- Common Slip-Ups And How To Avoid Them
- How To Store It And Make It Ahead Without Ruining Texture
- Questions People Always Ask Before Making This Recipe
 12")
Overnight Sourdough Discard Bread Bowls
- Total Time: 8-12 hours 50 minutes (mostly passive)
- Yield: 4-6 bread bowls 1x
Description
Craft delicious sourdough bread bowls at home with this simple overnight sourdough discard recipe. Perfect for serving hearty soups, these edible vessels are a game-changer for family dinners and casual gatherings, offering a wonderful tangy depth without active sourdough starter maintenance. Impress your family and friends with these beautiful and incredibly tasty homemade bread bowls.
Ingredients
Instructions
1. Combine Wet Ingredients and Discard: In a large mixing bowl, whisk together the warm water, sourdough discard, granulated sugar, and salt until well combined. The discard doesn’t need to be perfectly dissolved, just mostly incorporated.
2. Add Flour and Mix Dough: Gradually add the all-purpose flour, one cup at a time, mixing with a wooden spoon or your hands until a shaggy dough forms. Once all the flour is added, knead the dough gently in the bowl for about 2-3 minutes until it just comes together. It will still be a bit sticky.
3. First Rise (Bulk Fermentation): Drizzle 2 tablespoons of olive oil into a clean large bowl, turning the dough to coat it. Cover the bowl tightly with plastic wrap or a damp kitchen towel. Place it in the refrigerator for 8-12 hours (or up to 24 hours) for its slow overnight proof. The dough will slowly rise and develop flavor.
4. Shape the Bread Bowls: The next day, remove the dough from the refrigerator. Gently punch it down and divide it into 4-6 equal pieces, depending on your desired bowl size. Shape each piece into a tight, round ball, pulling the edges underneath to create a smooth top surface.
5. Second Proof: Place the shaped dough balls onto a baking sheet lined with parchment paper, leaving ample space between them. Cover loosely with plastic wrap or a clean kitchen towel and let them rest at room temperature for 30-60 minutes, or until slightly puffy. Towards the end of this proofing time, preheat your oven to 400F (200C).
6. Bake to Golden Perfection: If using, brush the tops of the dough balls with the beaten egg wash for a golden crust. Bake for 25-30 minutes, or until the bread bowls are deep golden brown and sound hollow when tapped on the bottom.
7. Cool and Hollow Out: Once baked, transfer the bread bowls to a wire rack to cool completely. Once cool enough to handle, use a sharp serrated knife to carefully cut a circle from the top of each bread bowl. Scoop out the soft interior bread, leaving a sturdy shell about 1/2 to 3/4 inch thick. Save the scooped-out bread for croutons or snacking!
- Prep Time: 20 minutes
- Cook Time: 25-30 minutes
- Category: main dish
- Method: baking
- Cuisine: american
Nutrition
- Serving Size: 1 bread bowl
Keywords: sourdough, bread bowls, discard, overnight, soup, baking, homemade, easy, tangy, edible
What You’ll Love About This Quick And Easy Recipe
This recipe is a true winner for anyone looking to elevate their soup experience with minimal fuss. It’s perfect for busy weeknights when you want something special but don’t have hours to spend in the kitchen, thanks to the overnight proofing that does most of the work while you sleep. Families will adore these bread bowls because they turn a simple soup meal into an interactive and fun dining adventure. Kids especially love tearing off pieces of the bread bowl as they eat their soup! It’s also an excellent way to use up sourdough discard, preventing waste and adding incredible flavor to your bread. Serve these for a cozy family dinner, a casual get-together with friends, or even a potluck where you want to bring something truly memorable.
Everything You Need To Make This Recipe Without Stress
Gathering your ingredients for these sourdough bread bowls is straightforward, focusing on pantry staples you likely already have on hand, plus your sourdough discard. The beauty of this recipe lies in its simplicity and the way it transforms basic components into something extraordinary.
INGREDIENTS:
 13")
- 1 cup active sourdough discard (unfed, straight from the fridge is fine)
- 1 ½ cups warm water (around 100-110°F)
- 1 tablespoon granulated sugar
- 2 teaspoons salt
- 5 cups all-purpose flour, plus more for dusting
- 2 tablespoons olive oil, plus more for greasing
- 1 large egg, beaten (for egg wash, optional)
For the flour, all-purpose works perfectly, but you can experiment with a small amount of bread flour for a chewier texture if you wish. The sugar isn’t just for sweetness; it helps activate the yeast (if your discard has some active yeast) and contributes to a lovely golden-brown crust. If you don’t have olive oil, any neutral-flavored oil like vegetable or canola oil will work just as well for greasing the bowl and dough. The egg wash is optional but highly recommended for a beautiful, shiny, golden crust.
Time Needed From Start To Finish
While this is an “overnight” recipe, the active hands-on time is surprisingly short, making it ideal for fitting into a busy schedule.
- Prep Time: 20 minutes (This includes mixing the dough and initial shaping)
- Overnight Proofing: 8-12 hours (This is passive time, where the dough rests in the refrigerator)
- Bake Time: 25-30 minutes
- Total Time: Approximately 8-12 hours and 50 minutes (mostly passive)
The majority of the work happens while you’re sleeping or away, making the actual baking process quick and efficient on the day you plan to serve them.
How To Make It Step By Step With Visual Cues
 14")
Follow these simple steps to create your perfect sourdough bread bowls. The key is gentle handling and allowing the dough to do its work during the overnight proof.
- Combine Wet Ingredients and Discard: In a large mixing bowl, whisk together the warm water, sourdough discard, granulated sugar, and salt until well combined. The discard doesn’t need to be perfectly dissolved, just mostly incorporated.
- Add Flour and Mix Dough: Gradually add the all-purpose flour, one cup at a time, mixing with a wooden spoon or your hands until a shaggy dough forms. Once all the flour is added, knead the dough gently in the bowl for about 2-3 minutes until it just comes together. It will still be a bit sticky.
- First Rise (Bulk Fermentation): Drizzle 2 tablespoons of olive oil into a clean large bowl, turning the dough to coat it. Cover the bowl tightly with plastic wrap or a damp kitchen towel. Place it in the refrigerator for 8-12 hours (or up to 24 hours) for its slow overnight proof. The dough will slowly rise and develop flavor.
- Shape the Bread Bowls: The next day, remove the dough from the refrigerator. Gently punch it down and divide it into 4-6 equal pieces, depending on your desired bowl size. Shape each piece into a tight, round ball, pulling the edges underneath to create a smooth top surface.
- Second Proof: Place the shaped dough balls onto a baking sheet lined with parchment paper, leaving ample space between them. Cover loosely with plastic wrap or a clean kitchen towel and let them rest at room temperature for 30-60 minutes, or until slightly puffy. Towards the end of this proofing time, preheat your oven to 400°F (200°C).
- Bake to Golden Perfection: If using, brush the tops of the dough balls with the beaten egg wash for a golden crust. Bake for 25-30 minutes, or until the bread bowls are deep golden brown and sound hollow when tapped on the bottom.
- Cool and Hollow Out: Once baked, transfer the bread bowls to a wire rack to cool completely. Once cool enough to handle, use a sharp serrated knife to carefully cut a circle from the top of each bread bowl. Scoop out the soft interior bread, leaving a sturdy shell about 1/2 to 3/4 inch thick. Save the scooped-out bread for croutons or snacking!
Easy Variations And Serving Ideas That Fit Real Life
These sourdough bread bowls are incredibly versatile and can be adapted to suit various tastes and occasions.
For a kid-friendly twist, try making smaller bread bowls, perfect for individual servings of their favorite creamy tomato soup or mac and cheese. You can even let them help hollow out the cooled bread! To add extra flavor to the bread itself, consider mixing in a tablespoon of dried herbs like Italian seasoning or a teaspoon of garlic powder with the dry ingredients. For a cheesy crust, sprinkle some shredded Parmesan or cheddar cheese on top of the dough balls before baking, right after the egg wash.
These bread bowls are, of course, ideal for serving any hearty soup or stew. Think classic clam chowder, creamy broccoli cheddar, a rich beef stew, or a comforting chicken noodle soup. They also make fantastic vessels for chili, spinach dip, or even a thick, cheesy queso. For a party or buffet, arrange several bread bowls with different fillings for a fun and interactive spread. Don’t forget to serve the scooped-out bread pieces alongside for extra dipping!
Common Slip-Ups And How To Avoid Them
Even with a simple recipe, a few common mistakes can occur. Knowing how to avoid them will ensure your sourdough bread bowls turn out perfectly every time.
One frequent issue is not letting the dough proof long enough during the overnight chill. While it’s passive, this slow fermentation is crucial for flavor and texture. If your dough doesn’t seem to have expanded much, give it a little more time in the fridge. Another common slip-up is over-hollowing the bread bowls. If you scoop out too much bread, the walls can become flimsy and might not hold up to a thick soup. Aim for a sturdy 1/2 to 3/4-inch thickness. Conversely, not hollowing enough leaves less room for your delicious soup!
Finally, cutting into the bread bowls while they are still hot can make them gummy and difficult to hollow. Always allow them to cool completely on a wire rack before cutting and scooping. This also helps the crust firm up and prevents the bread from steaming itself.
How To Store It And Make It Ahead Without Ruining Texture
These sourdough bread bowls are best enjoyed fresh, but you can certainly prepare them ahead of time or store leftovers.
Make-Ahead: You can bake the bread bowls completely, let them cool, and then store them whole (un-hollowed) in an airtight container at room temperature for up to 2 days. When ready to serve, simply rewarm them slightly in a 350°F (175°C) oven for 5-7 minutes, then hollow them out and fill.
Storage: If you have leftover bread bowls that have already been filled with soup, it’s best to transfer the soup to a separate container. The bread bowl itself will become soggy if left with soup for too long. Store any empty, un-hollowed leftover bread bowls in an airtight container at room temperature for up to 2-3 days, or freeze them for up to 1 month. To freeze, wrap each cooled bread bowl tightly in plastic wrap, then aluminum foil. Thaw at room temperature and rewarm in the oven before serving.
Questions People Always Ask Before Making This Recipe
Can I use active sourdough starter instead of discard?
Yes, you can! If using active starter, you might find the dough rises a bit faster during the initial proof. Just keep an eye on it.Do I have to do the overnight proof?
The overnight 15")
FAQs
- Can I make these ahead? Yes—prep ahead, refrigerate, then serve when ready.
- How long do leftovers last? Store covered in the fridge for 3–4 days for best texture.
- Can I adjust sweetness? Yes—add more or less sweetener to taste.
- Can I change the fruit? Yes—swap strawberries for blueberries, raspberries, or sliced banana.