Mastering sourdough bulk fermentation is absolutely crucial for anyone looking to achieve that perfect open crumb and avoid the dreaded dense, gummy, or overproofed sourdough loaf. It’s often considered the most challenging part of the sourdough baking process, yet it holds the key to unlocking truly exceptional bread.

Understanding the nuances of bulk fermentation will transform your sourdough baking, moving you from inconsistent results to consistently beautiful, flavorful loaves with a desirable texture. This guide will demystify the process, helping you recognize the signs of proper fermentation and confidently produce your best sourdough yet.

Mastering Sourdough Bulk Fermentation
- Total Time: 4-10 hours
- Yield: 1 loaf
Description
This guide demystifies sourdough bulk fermentation, a crucial stage for achieving an open crumb and flavorful loaf. It focuses on understanding visual cues and dough development rather than fixed timings, helping bakers consistently produce high-quality sourdough.
Ingredients
Instructions
1. After mixing your flour, water, salt, and active sourdough starter, let the dough rest for 30 minutes to an hour. This initial rest allows the flour to fully hydrate and gluten development to begin naturally.
2. Gently transfer your dough into a large, clear container or bowl. This allows you to easily observe its rise and development without disturbing it. Lightly oil the container if you wish, but it’s not strictly necessary if you handle the dough with wet hands.
3. Over the first 2-3 hours of bulk fermentation, perform a series of “stretch and folds” every 30-60 minutes. To do this, wet your hands, grab a portion of the dough from one side, gently stretch it upwards, and fold it over itself towards the center. Rotate the bowl 90 degrees and repeat this process 3-4 times until all sides have been stretched and folded. This develops gluten, strengthens the dough, and redistributes the yeast and bacteria.
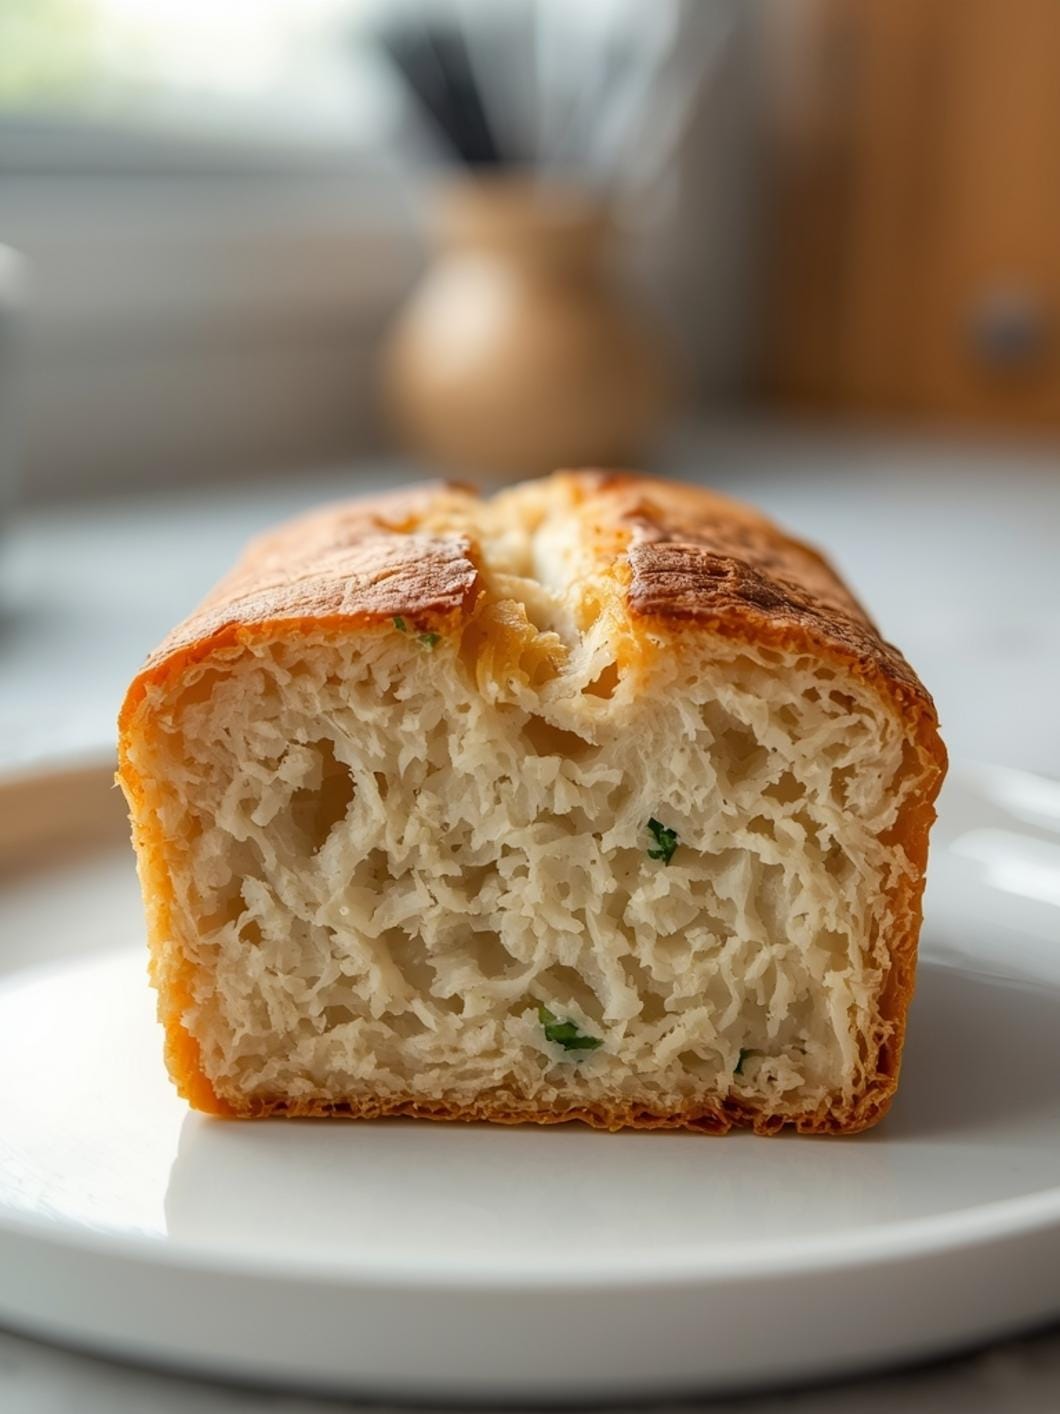
4. After the initial stretch and folds, let the dough rest undisturbed. Your goal is to see a significant increase in volume, typically 30-50% for most recipes. The dough should look visibly puffier and have a domed top.
5. When gently shaking the container, the dough should jiggle like a firm jelly, showing signs of internal gas production and a developed gluten network. It shouldn’t be completely slack or overly stiff.
6. The surface of the dough should become smoother and you’ll likely see small bubbles forming just beneath the surface. These are indicators of active fermentation.
7. If you’re unsure, lightly flour a finger and gently poke the dough about half an inch deep. If the indentation slowly springs back halfway, it’s likely ready. If it springs back immediately, it needs more time. If it collapses completely, it might be overproofed.
8. Remember that warmer temperatures accelerate fermentation, while cooler temperatures slow it down. A kitchen temperature of 72-78 F (22-26 C) is often ideal. If your kitchen is cooler, bulk fermentation will take longer; if warmer, it will be faster. Adjust your timing expectations accordingly.
- Prep Time: 10-15 minutes
- Cook Time: 0 minutes
- Category: baking
- Method: fermentation
- Cuisine: european
Nutrition
- Serving Size: 1 slice
Keywords: sourdough, baking, fermentation, bread, technique, dough, starter, crumb, proofing, homemade
What You’ll Love About This Quick And Easy Recipe
This guide isn’t a recipe in the traditional sense, but rather a deep dive into the most critical stage of sourdough bread making: bulk fermentation. What you’ll love about mastering this technique is the immediate and dramatic improvement in your sourdough loaves. This information is for anyone who bakes sourdough, from beginners struggling with their first few loaves to experienced bakers looking to refine their technique and achieve a more consistent, professional-quality crumb. When you understand bulk fermentation, you’ll produce bread that’s not only delicious but also visually stunning, with that characteristic open, airy structure that sourdough enthusiasts crave. It’s perfect for anyone who has ever pulled an overproofed or underproofed loaf from the oven and wondered what went wrong.
Everything You Need To Make This Recipe Without Stress
While bulk fermentation isn’t a “recipe” with ingredients you consume directly, it relies heavily on the quality of your sourdough starter and the dough you’ve prepared. The “ingredients” here are more about the tools and conditions necessary for successful fermentation.
INGREDIENTS:

- Active sourdough starter (fed and bubbly)
- Your prepared sourdough dough (flour, water, salt, starter)
- Large, clear container or bowl with a lid (for observing dough rise)
- Dough scraper or wet hands (for handling the dough)
- Room temperature thermometer (to monitor ambient temperature)
- Kitchen scale (for precise ingredient measurements in your dough)
After you’ve mixed your sourdough dough, the most important “ingredient” for successful bulk fermentation is an active, healthy sourdough starter. Ensure your starter has been fed 4-12 hours prior and is at its peak activity, showing plenty of bubbles and having a pleasant, tangy aroma. For the dough itself, use good quality bread flour for best results, as its higher protein content provides better structure for the gas produced during fermentation. While brand-specific recommendations aren’t necessary, choosing a reliable all-purpose or bread flour will serve you well.
Time Needed From Start To Finish
The “time” for bulk fermentation is highly variable and depends on several factors, primarily the temperature of your kitchen and the activity of your sourdough starter.
- Active Bulk Fermentation (Hands-on time): 10-15 minutes (for stretching and folding)
- Passive Bulk Fermentation (Waiting time): 3-8 hours (or longer, depending on conditions)
- Total Bulk Fermentation Time: Typically ranges from 4 to 10 hours, but can be shorter or much longer.
It’s crucial to understand that bulk fermentation is not a fixed-time process. You’re looking for visual cues and dough development, not just watching the clock.
How To Make It Step By Step With Visual Cues

Bulk fermentation begins immediately after you’ve mixed your dough and ends when you divide and shape your loaves. This is where the yeast and bacteria in your starter get to work, producing gas and developing flavor and structure.
- Initial Dough Mixing and Rest: After mixing your flour, water, salt, and active sourdough starter, let the dough rest for 30 minutes to an hour. This initial rest, often called autolyse or a brief rest, allows the flour to fully hydrate and gluten development to begin naturally.
- Transfer to a Clear Container: Gently transfer your dough into a large, clear container or bowl. This allows you to easily observe its rise and development without disturbing it. Lightly oil the container if you wish, but it’s not strictly necessary if you handle the dough with wet hands.
- Perform Stretch and Folds: Over the first 2-3 hours of bulk fermentation, perform a series of “stretch and folds” every 30-60 minutes. To do this, wet your hands, grab a portion of the dough from one side, gently stretch it upwards, and fold it over itself towards the center. Rotate the bowl 90 degrees and repeat this process 3-4 times until all sides have been stretched and folded. This develops gluten, strengthens the dough, and redistributes the yeast and bacteria.
- Monitor Dough Volume and Texture: After the initial stretch and folds, let the dough rest undisturbed. Your goal is to see a significant increase in volume, typically 30-50% for most recipes. The dough should look visibly puffier and have a domed top.
- Observe the “Jiggle Test”: When gently shaking the container, the dough should jiggle like a firm jelly, showing signs of internal gas production and a developed gluten network. It shouldn’t be completely slack or overly stiff.
- Look for Surface Bubbles and Smoothness: The surface of the dough should become smoother and you’ll likely see small bubbles forming just beneath the surface. These are indicators of active fermentation.
- The Poke Test (Optional but Helpful): If you’re unsure, lightly flour a finger and gently poke the dough about half an inch deep. If the indentation slowly springs back halfway, it’s likely ready. If it springs back immediately, it needs more time. If it collapses completely, it might be overproofed.
- Consider the Ambient Temperature: Remember that warmer temperatures accelerate fermentation, while cooler temperatures slow it down. A kitchen temperature of 72-78°F (22-26°C) is often ideal. If your kitchen is cooler, bulk fermentation will take longer; if warmer, it will be faster. Adjust your timing expectations accordingly.
Easy Variations And Serving Ideas That Fit Real Life
While bulk fermentation itself isn’t something you “serve,” the successful outcome—a beautifully fermented dough—is the foundation for countless delicious sourdough creations.
- Flavor Infusions: Once bulk fermentation is complete, you can gently fold in inclusions like roasted garlic, finely chopped herbs (rosemary, thyme), olives, sun-dried tomatoes, or cheese before shaping. This adds incredible flavor to your final loaf.
- Different Loaf Shapes: A well-bulk-fermented dough can be shaped into various forms: traditional boules (round loaves), batards (oval loaves), baguettes, or even dinner rolls. The strong gluten structure developed during bulk fermentation will hold these shapes beautifully.
- Serving Suggestions for the Final Bread: Once baked, your perfectly proofed sourdough is incredibly versatile. Serve it simply with good quality olive oil and balsamic vinegar, alongside a hearty soup or stew, as the base for avocado toast, or as part of a cheese board. It also makes fantastic sandwiches.
- Kid-Friendly Uses: Kids often love sourdough toast with butter and jam, or grilled cheese sandwiches made with sturdy sourdough slices. The slightly tangy flavor can be a hit, especially when paired with familiar toppings.
Common Slip-Ups And How To Avoid Them
Bulk fermentation is where many sourdough bakers encounter challenges. Knowing these common pitfalls can help you navigate the process successfully.
- Underproofing: This is a very common mistake. If your dough hasn’t fermented enough during bulk, it will be dense, lack an open crumb, and won’t hold its shape well during baking. The solution is patience! Don’t rely solely on the clock; watch for the visual cues of a 30-50% volume increase, a domed top, and the jiggle test. If your kitchen is cool, extend the bulk fermentation time.
- Overproofing: The opposite problem, overproofing, results in a dough that is very slack, sticky, and difficult to shape. The final bread will often be gummy, have a very weak crust, and may collapse in the oven. To avoid this, pay close attention to the volume increase and the poke test. If the dough feels very airy and fragile, or if the poke test indentation doesn’t spring back at all, it’s likely overproofed. Moving the dough to a cooler spot or the refrigerator can slow down fermentation if you think it’s progressing too quickly.
- Inconsistent Starter Activity: If your sourdough starter isn’t active and bubbly, it won’t effectively ferment your dough. Always use a starter that has been fed and is at its peak. If your starter seems sluggish, give it a few extra feedings to strengthen it before baking.
- Ignoring Ambient Temperature: Temperature is a huge factor. Trying to bulk ferment for a fixed time regardless of your kitchen’s warmth is a recipe for disaster. If it’s cold, fermentation will be slow; if it’s warm, it will be fast. Learn to adjust your timing by observing the dough, not just the clock. You can use a proofing box, your oven with the light on (not the heat!), or a warm spot in your kitchen to maintain a more consistent temperature.
- Rough Handling: While you need to perform stretch and folds, being too aggressive

FAQs
- Can I make these ahead? Yes—prep ahead, refrigerate, then serve when ready.
- How long do leftovers last? Store covered in the fridge for 3–4 days for best texture.
- Can I adjust sweetness? Yes—add more or less sweetener to taste.
- Can I change the fruit? Yes—swap strawberries for blueberries, raspberries, or sliced banana.