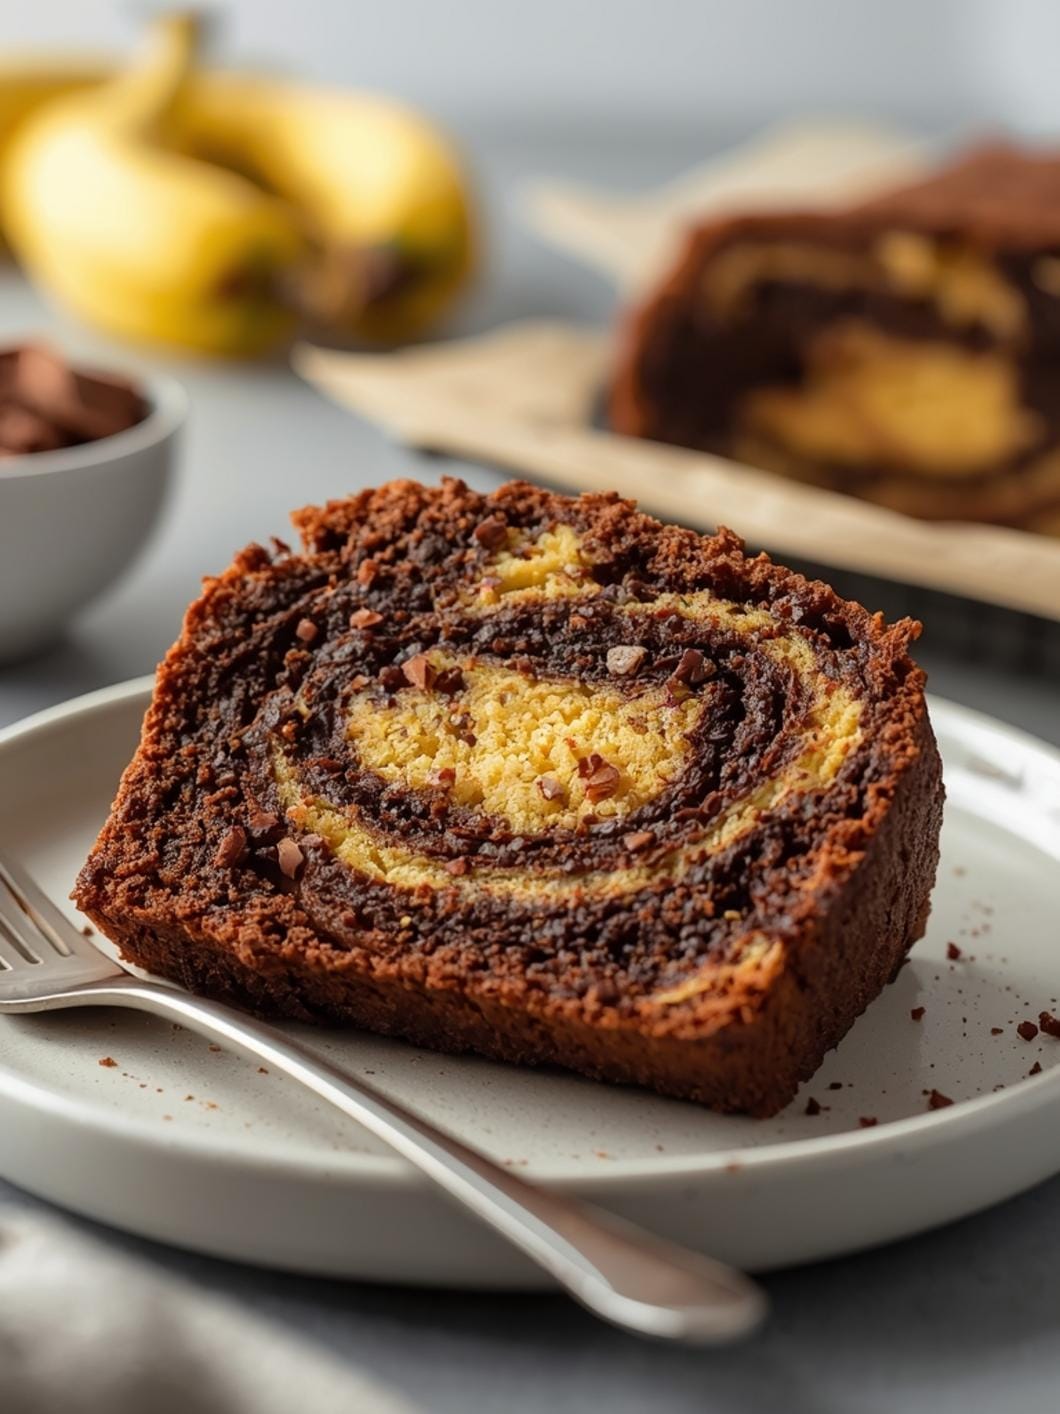
Swirl rich chocolate into your sourdough for a beautiful marble effect and delicious taste, making it a wonderful treat for the colder months.

This recipe brings together the comforting tang of sourdough with the indulgence of chocolate, creating a bread that’s as delightful to look at as it is to eat.
Whether you’re looking for a cozy breakfast, an afternoon snack, or a unique dessert, this Sourdough Chocolate Marble Bread is a fantastic choice. It’s perfect for those chilly days when you crave something warm, sweet, and satisfying.

sourdough chocolate marble bread
- Total Time: 6-9 hours
- Yield: 1 loaf 1x
Description
swirl rich chocolate into your sourdough for a beautiful marble effect and delicious taste, making it a wonderful treat for the colder months. this recipe brings together the comforting tang of sourdough with the indulgence of chocolate, creating a bread that’s as delightful to look at as it is to eat. whether you’re looking for a cozy breakfast, an afternoon snack, or a unique dessert, this sourdough chocolate marble bread is a fantastic choice. it’s perfect for those chilly days when you crave something warm, sweet, and satisfying.
Ingredients
Instructions
1. prepare the sourdough base: in a large mixing bowl, combine the active sourdough starter, warm water, 1 tablespoon of sugar, and salt. stir until the starter is mostly dissolved. gradually add the 5 cups of bread flour, mixing with a wooden spoon or your hands until a shaggy dough forms. cover the bowl with a damp cloth or plastic wrap and let it rest for 30 minutes (autolyse). this step helps the flour fully hydrate.
2. knead and bulk ferment: after the rest, transfer the dough to a lightly floured surface. knead for 5-7 minutes until it becomes smooth and elastic. it should pass the windowpane test (stretch a small piece of dough thin enough to see light through it without tearing). place the dough back in the clean bowl, cover, and let it bulk ferment at room temperature (around 70-75F) for 4-6 hours, or until it has nearly doubled in size. alternatively, you can refrigerate it overnight for a slower, more flavorful fermentation.
3. create the chocolate dough: once the bulk fermentation is complete, gently divide the dough in half. in a separate small bowl, whisk together the unsweetened cocoa powder, 1/4 cup granulated sugar, and 1/4 cup warm water until a smooth paste forms. add this chocolate paste and the melted butter to one half of the dough. gently knead or fold the chocolate mixture into this dough half until the color is uniform. try not to overmix, as this can toughen the dough.
4. shape the marble loaf: on a lightly floured surface, gently flatten both the plain and chocolate doughs into rough rectangles of similar size. place the chocolate dough on top of the plain dough. gently roll them together a few times, then fold the dough in half, and roll again. repeat this folding and rolling process 2-3 times to create distinct marble swirls. avoid overworking it, as you want clear streaks, not a fully blended color. shape the marbled dough into a tight log or boule.
5. second proof (final rise): place the shaped dough into a lightly floured proofing basket (banneton) or a bowl lined with a floured kitchen towel, seam-side up. cover with plastic wrap or a damp cloth and let it proof at room temperature for 1-2 hours, or until visibly puffy and springs back slowly when gently poked. if you refrigerated your bulk fermented dough, you might need a longer second proof.
6. bake the bread: preheat your oven to 450F (230C) with a dutch oven or baking stone inside for at least 30 minutes. carefully transfer the dough from the proofing basket into the hot dutch oven. score the top of the dough with a sharp knife or razor blade (a simple “x” or a few parallel lines work well). cover the dutch oven and bake for 20 minutes. remove the lid, reduce the oven temperature to 425F (220C), and continue baking for another 20-25 minutes, or until the crust is deeply golden brown and the internal temperature reaches 200-210F (93-99C).
7. cool completely: carefully remove the bread from the dutch oven and transfer it to a wire rack. let it cool completely for at least 2-3 hours before slicing. this is crucial for the crumb to set and for the flavors to fully develop. slicing too early can result in a gummy texture.
- Prep Time: 25 minutes
- Cook Time: 40-45 minutes
- Category: bread
- Method: baking
- Cuisine: american
Nutrition
- Serving Size: 1 slice
Keywords: sourdough, chocolate, marble, bread, baking, comfort food, dessert, breakfast, snack, homemade
What You’ll Love About This Quick And Easy Recipe
This recipe is a true gem for anyone who enjoys baking but doesn’t want to spend all day in the kitchen. It’s designed for home bakers of all skill levels, especially those new to working with sourdough inclusions. The beauty of this bread lies in its simplicity and the stunning visual appeal of the marble swirl. It’s perfect for a weekend baking project, a special breakfast, or a lovely gift for friends and family. The combination of the subtle sourdough tang with rich chocolate makes it incredibly comforting, especially during the colder months when you want something hearty and flavorful. It’s a fantastic way to elevate your regular sourdough routine and introduce a delicious twist that everyone will adore.
Everything You Need To Make This Recipe Without Stress
Gathering your ingredients before you start is key to a smooth baking process. This recipe uses common pantry staples, making it accessible and easy to prepare. You won’t need any fancy equipment, just your standard baking tools.
INGREDIENTS:

- 1 cup active sourdough starter
- 1 1/2 cups warm water (around 95-105°F)
- 1 tablespoon granulated sugar
- 2 teaspoons salt
- 5 cups bread flour, plus more for dusting
- 1/2 cup unsweetened cocoa powder
- 1/4 cup granulated sugar (for chocolate dough)
- 1/4 cup warm water (for chocolate dough)
- 2 tablespoons unsalted butter, melted
For the flour, bread flour is recommended for its higher protein content, which gives the bread a better structure. However, if you only have all-purpose flour on hand, it will work, though the texture might be slightly less chewy. When choosing your cocoa powder, opt for unsweetened natural cocoa powder for a deep chocolate flavor without added sweetness. Dutch-processed cocoa can also be used, but it will result in a slightly darker color and a milder chocolate taste. The melted butter adds richness and helps with the texture, but you can substitute it with a neutral oil like vegetable or canola oil if preferred.
Time Needed From Start To Finish
Preparing this delightful Sourdough Chocolate Marble Bread requires a bit of patience, but the hands-on time is quite manageable.
- Prep Time: 25 minutes
- Bulk Fermentation: 4-6 hours (or overnight in the fridge)
- Shape & Second Proof: 1-2 hours
- Bake Time: 40-45 minutes
- Total Time: Approximately 6-9 hours (active + inactive time), plus cooling
While the total time might seem long due to the fermentation, most of it is inactive, allowing you to go about your day while the dough does its magic.
How To Make It Step By Step With Visual Cues

Creating this beautiful marbled bread is a rewarding process. Follow these steps carefully for the best results, paying attention to the texture and appearance of your dough.
- Prepare the Sourdough Base: In a large mixing bowl, combine the active sourdough starter, warm water, 1 tablespoon of sugar, and salt. Stir until the starter is mostly dissolved. Gradually add the 5 cups of bread flour, mixing with a wooden spoon or your hands until a shaggy dough forms. Cover the bowl with a damp cloth or plastic wrap and let it rest for 30 minutes (autolyse). This step helps the flour fully hydrate.
- Knead and Bulk Ferment: After the rest, transfer the dough to a lightly floured surface. Knead for 5-7 minutes until it becomes smooth and elastic. It should pass the windowpane test (stretch a small piece of dough thin enough to see light through it without tearing). Place the dough back in the clean bowl, cover, and let it bulk ferment at room temperature (around 70-75°F) for 4-6 hours, or until it has nearly doubled in size. Alternatively, you can refrigerate it overnight for a slower, more flavorful fermentation.
- Create the Chocolate Dough: Once the bulk fermentation is complete, gently divide the dough in half. In a separate small bowl, whisk together the unsweetened cocoa powder, 1/4 cup granulated sugar, and 1/4 cup warm water until a smooth paste forms. Add this chocolate paste and the melted butter to one half of the dough. Gently knead or fold the chocolate mixture into this dough half until the color is uniform. Try not to overmix, as this can toughen the dough.
- Shape the Marble Loaf: On a lightly floured surface, gently flatten both the plain and chocolate doughs into rough rectangles of similar size. Place the chocolate dough on top of the plain dough. Gently roll them together a few times, then fold the dough in half, and roll again. Repeat this folding and rolling process 2-3 times to create distinct marble swirls. Avoid overworking it, as you want clear streaks, not a fully blended color. Shape the marbled dough into a tight log or boule.
- Second Proof (Final Rise): Place the shaped dough into a lightly floured proofing basket (banneton) or a bowl lined with a floured kitchen towel, seam-side up. Cover with plastic wrap or a damp cloth and let it proof at room temperature for 1-2 hours, or until visibly puffy and springs back slowly when gently poked. If you refrigerated your bulk fermented dough, you might need a longer second proof.
- Bake the Bread: Preheat your oven to 450°F (230°C) with a Dutch oven or baking stone inside for at least 30 minutes. Carefully transfer the dough from the proofing basket into the hot Dutch oven. Score the top of the dough with a sharp knife or razor blade (a simple “X” or a few parallel lines work well). Cover the Dutch oven and bake for 20 minutes. Remove the lid, reduce the oven temperature to 425°F (220°C), and continue baking for another 20-25 minutes, or until the crust is deeply golden brown and the internal temperature reaches 200-210°F (93-99°C).
- Cool Completely: Carefully remove the bread from the Dutch oven and transfer it to a wire rack. Let it cool completely for at least 2-3 hours before slicing. This is crucial for the crumb to set and for the flavors to fully develop. Slicing too early can result in a gummy texture.
Easy Variations And Serving Ideas That Fit Real Life
This Sourdough Chocolate Marble Bread is incredibly versatile and can be enjoyed in many ways. For a simple breakfast, toast a slice and spread it with a little butter or cream cheese. It’s also fantastic on its own with a cup of coffee or hot cocoa, especially during those chilly winter mornings.
To make it even more decadent, you could add a handful of chocolate chips (milk, dark, or white) to the chocolate dough section in step 3. For a hint of warmth, try adding 1/2 teaspoon of cinnamon or a pinch of cayenne pepper to the cocoa mixture, which pairs wonderfully with chocolate. A few drops of peppermint extract would also be delightful for a festive touch.
This bread makes a wonderful base for a unique French toast. Simply slice, dip in an egg mixture, and pan-fry until golden. Serve with maple syrup and fresh berries. For a more dessert-like experience, consider a light dusting of powdered sugar after it cools, or a drizzle of chocolate ganache. It’s also a fantastic addition to a brunch spread or a cozy afternoon tea.
Common Slip-Ups And How To Avoid Them
Even experienced bakers can encounter small challenges, but knowing what to look out for can save your loaf.
- Under-Proofing or Over-Proofing: This is one of the most common issues. If your dough is under-proofed, it will be dense and have a tight crumb. If it’s over-proofed, it might collapse in the oven and have a very open, airy, and sometimes gummy texture. Pay attention to the visual cues: the dough should be visibly puffy and should spring back slowly when gently poked. Temperature plays a huge role, so adjust proofing times accordingly.
- Not Activating the Sourdough Starter: An inactive starter won’t provide enough lift for your bread, resulting in a flat, dense loaf. Always use an active starter that has been fed 4-12 hours prior and is bubbly and nearly doubled in size.
- Overworking the Chocolate Dough: When incorporating the cocoa mixture, it’s easy to overmix, which can develop too much gluten and make the chocolate portion tough. Mix just until the color is uniform, then stop. For the marbling,

FAQs
- Can I make these ahead? Yes—prep ahead, refrigerate, then serve when ready.
- How long do leftovers last? Store covered in the fridge for 3–4 days for best texture.
- Can I adjust sweetness? Yes—add more or less sweetener to taste.
- Can I change the fruit? Yes—swap strawberries for blueberries, raspberries, or sliced banana.