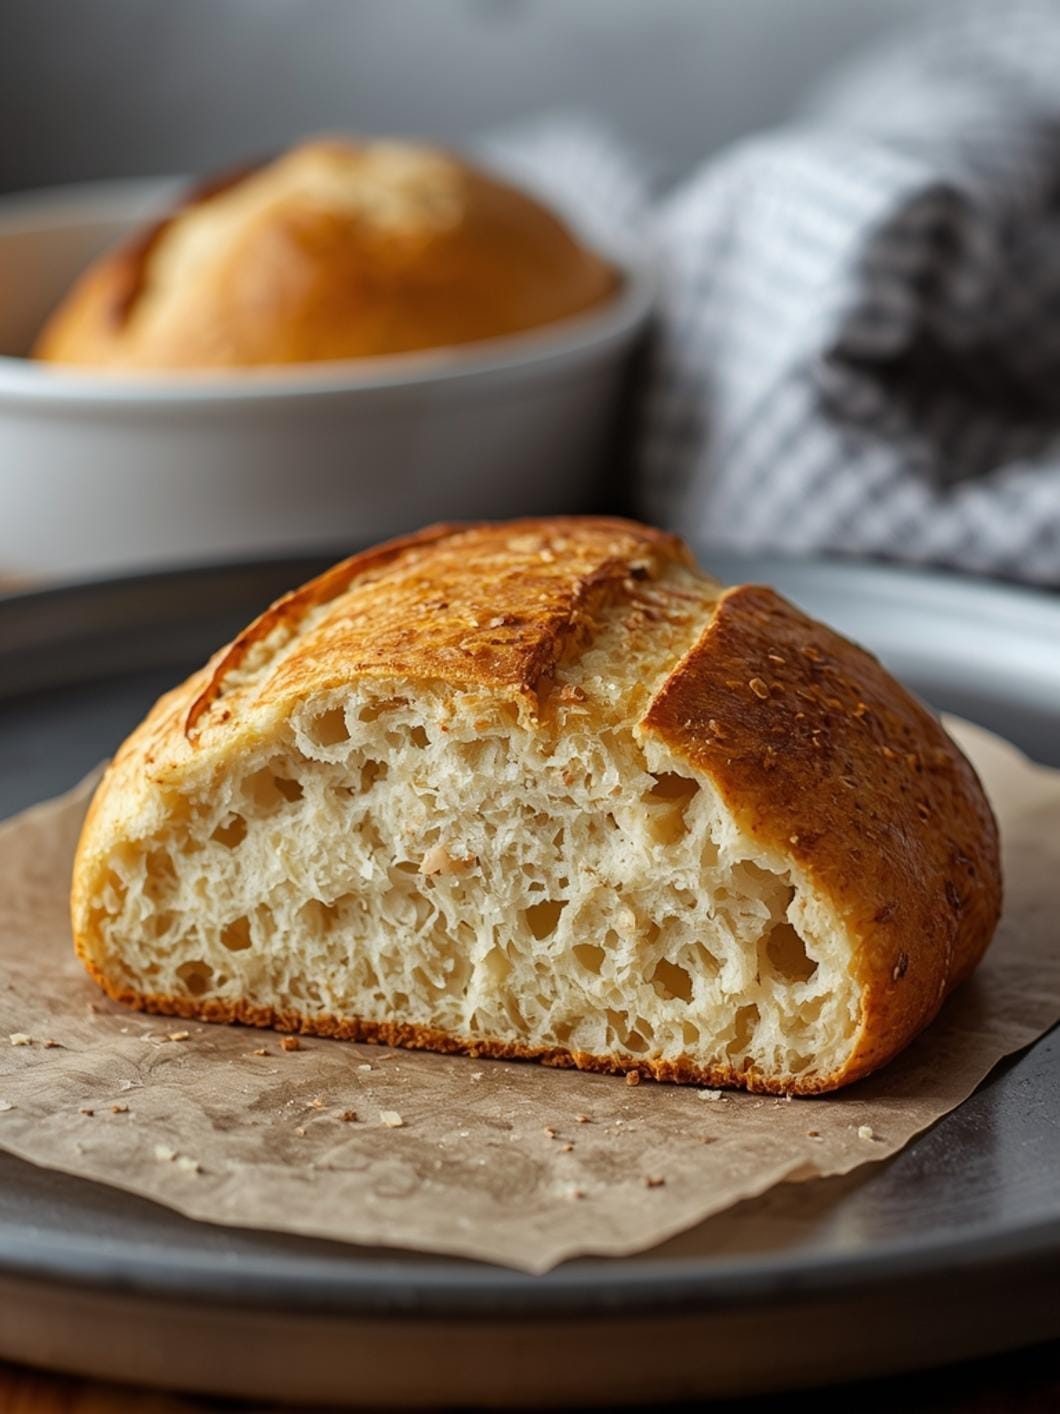
Achieving that beautiful, open crumb in your sourdough is a hallmark of successful baking, showcasing the fermentation process and the care put into each loaf.

This guide is dedicated to helping you understand the factors that contribute to an airy, well-developed crumb structure, moving beyond just a pretty crust to reveal the intricate network within.
We’ll dive into practical tips and active sourdough recipes that will consistently deliver the texture you’re aiming for. From understanding hydration to mastering shaping techniques, discover the details that make all the difference in creating a truly exceptional sourdough crumb.
Table of Contents
- What You’ll Love About This Quick And Easy Recipe
- Everything You Need To Make This Recipe Without Stress
- Time Needed From Start To Finish
- How To Make It Step By Step With Visual Cues
- Easy Variations And Serving Ideas That Fit Real Life
- Common Slip-Ups And How To Avoid Them
- How To Store It And Make It Ahead Without Ruining Texture

Open Crumb Sourdough Bread
- Total Time: 13-20 hours
- Yield: 1 loaf 1x
Description
This guide helps you achieve an airy, well-developed open crumb in your sourdough bread, focusing on practical tips and techniques for both beginners and experienced bakers. It covers everything from hydration to shaping, ensuring consistent and satisfying results.
Ingredients
Instructions
1. Autolyse and Initial Mix: In a large bowl, combine the warm water and active sourdough starter. Stir until the starter is mostly dissolved. Add the bread flour and mix with a spoon or your hand until no dry streaks of flour remain. The dough will be shaggy. Cover the bowl with a damp cloth or plastic wrap and let it rest for 30 minutes to 1 hour. This “autolyse” step allows the flour to fully hydrate and gluten development to begin without the salt.
2. Adding the Salt and First Knead: After the autolyse, sprinkle the salt over the dough. Using wet hands, gently work the salt into the dough by squeezing and folding it for about 2-3 minutes. The dough will feel a bit stiffer initially. Continue to mix until the salt is fully incorporated.
3. Perform Stretch and Folds (Bulk Fermentation): Over the next 2-3 hours, you will perform a series of “stretch and folds.” For each set, wet your hands, grab a portion of the dough from one side, stretch it upwards, and fold it over itself towards the center. Rotate the bowl 90 degrees and repeat this action three more times until all four sides have been stretched and folded. Do this every 30 minutes for the first 2 hours, then every hour for the remaining bulk fermentation time. The dough should become noticeably smoother, more elastic, and increase in volume by about 30-50%. Look for bubbles forming on the surface.
4. Pre-Shaping the Dough: Gently turn the dough out onto a lightly floured surface. Divide it if making multiple loaves. Lightly dust the top of the dough with flour. Using a bench scraper or your hands, gently form the dough into a loose round or rectangle. Avoid pressing out too much gas. Cover with a damp cloth and let it rest for 20-30 minutes. This “bench rest” allows the gluten to relax, making final shaping easier.
5. Final Shaping for Structure: Lightly flour your work surface again. Gently flip the dough over. For a round loaf (boule), gently pull the edges of the dough towards the center, creating tension on the surface. Flip the dough seam-side up into a floured banneton or a bowl lined with a floured kitchen towel. Ensure the seam is tight to hold the shape.
6. Cold Proofing (Retardation): Cover the banneton with plastic wrap or place it in a plastic bag and refrigerate for 8-12 hours, or up to 24 hours. Cold proofing slows down fermentation, develops flavor, and makes the dough easier to score and handle. The dough should feel springy but not overly puffy when gently poked.
7. Baking in a Dutch Oven: Preheat your oven to 475 F (245 C) with a Dutch oven inside for at least 30-45 minutes. Carefully remove the hot Dutch oven. Gently invert the cold dough into the hot Dutch oven. Score the top of the dough with a sharp razor blade or knife (a single deep cut or a pattern). Cover the Dutch oven and bake for 20 minutes.
8. Finishing the Bake: After 20 minutes, remove the lid from the Dutch oven. Reduce the oven temperature to 450 F (230 C) and continue baking for another 20-30 minutes, or until the crust is deep golden brown and the internal temperature reaches 200-210 F (93-99 C). Transfer the loaf to a wire rack to cool completely for at least 2 hours before slicing. Slicing too early can compromise the crumb structure.
- Prep Time: 20-30 minutes active
- Cook Time: 40-50 minutes
- Category: bread
- Method: baking
- Cuisine: american
Nutrition
- Serving Size: 1 slice
Keywords: sourdough, bread, open crumb, baking, homemade, fermentation, gluten, artisan, yeast, crusty
What You’ll Love About This Quick And Easy Recipe
This approach to perfecting your sourdough crumb is designed for both enthusiastic beginners and seasoned bakers looking to refine their technique. You’ll love how these practical tips demystify the process, making that coveted open crumb feel entirely achievable rather than a happy accident. This guide is perfect for anyone who has ever sliced into a homemade sourdough loaf only to find a dense interior and wished for more airiness. It’s for the home baker who wants to understand the “why” behind each step, leading to more consistent and satisfying results. Serve these insights with every sourdough loaf you bake, impressing yourself and your loved ones with beautifully textured bread that’s a joy to eat. It’s about building confidence in your sourdough journey, one perfectly crusted, open-crumbed loaf at a time.
Everything You Need To Make This Recipe Without Stress
To achieve an open crumb, you’ll need your active sourdough starter, along with basic bread-making ingredients. The focus here is on technique and understanding, rather than exotic ingredients.
INGREDIENTS:

- 100 grams active sourdough starter (fed and bubbly)
- 350 grams warm water (around 90-95°F or 32-35°C)
- 500 grams strong bread flour (high protein content)
- 10 grams fine sea salt
For the flour, using a high-protein bread flour is crucial as it develops stronger gluten, which is essential for trapping gas and creating an open crumb. While all-purpose flour can work, bread flour will give you superior results for this goal. For salt, fine sea salt dissolves easily and distributes evenly. Avoid iodized table salt, which can sometimes impart an off-flavor and inhibit yeast activity.
Time Needed From Start To Finish
The process of achieving an open crumb in sourdough is more about active time spread out over a longer period, rather than intense, continuous work.
- Active Prep Time: 20-30 minutes (mixing, stretching, folding, shaping)
- Bulk Fermentation: 4-6 hours (depending on ambient temperature and starter activity)
- Cold Proofing: 8-12 hours (or up to 24 hours)
- Baking Time: 40-50 minutes
- Total Process Time: Approximately 13-20 hours (mostly hands-off waiting)
How To Make It Step By Step With Visual Cues

Creating that beautiful open crumb involves a few key stages, each contributing to the final texture. Follow these steps carefully for the best results.
- Autolyse and Initial Mix: In a large bowl, combine the warm water and active sourdough starter. Stir until the starter is mostly dissolved. Add the bread flour and mix with a spoon or your hand until no dry streaks of flour remain. The dough will be shaggy. Cover the bowl with a damp cloth or plastic wrap and let it rest for 30 minutes to 1 hour. This “autolyse” step allows the flour to fully hydrate and gluten development to begin without the salt.
- Adding the Salt and First Knead: After the autolyse, sprinkle the salt over the dough. Using wet hands, gently work the salt into the dough by squeezing and folding it for about 2-3 minutes. The dough will feel a bit stiffer initially. Continue to mix until the salt is fully incorporated.
- Perform Stretch and Folds (Bulk Fermentation): Over the next 2-3 hours, you will perform a series of “stretch and folds.” For each set, wet your hands, grab a portion of the dough from one side, stretch it upwards, and fold it over itself towards the center. Rotate the bowl 90 degrees and repeat this action three more times until all four sides have been stretched and folded. Do this every 30 minutes for the first 2 hours, then every hour for the remaining bulk fermentation time. The dough should become noticeably smoother, more elastic, and increase in volume by about 30-50%. Look for bubbles forming on the surface.
- Pre-Shaping the Dough: Gently turn the dough out onto a lightly floured surface. Divide it if making multiple loaves. Lightly dust the top of the dough with flour. Using a bench scraper or your hands, gently form the dough into a loose round or rectangle. Avoid pressing out too much gas. Cover with a damp cloth and let it rest for 20-30 minutes. This “bench rest” allows the gluten to relax, making final shaping easier.
- Final Shaping for Structure: Lightly flour your work surface again. Gently flip the dough over. For a round loaf (boule), gently pull the edges of the dough towards the center, creating tension on the surface. Flip the dough seam-side up into a floured banneton or a bowl lined with a floured kitchen towel. Ensure the seam is tight to hold the shape.
- Cold Proofing (Retardation): Cover the banneton with plastic wrap or place it in a plastic bag and refrigerate for 8-12 hours, or up to 24 hours. Cold proofing slows down fermentation, develops flavor, and makes the dough easier to score and handle. The dough should feel springy but not overly puffy when gently poked.
- Baking in a Dutch Oven: Preheat your oven to 475°F (245°C) with a Dutch oven inside for at least 30-45 minutes. Carefully remove the hot Dutch oven. Gently invert the cold dough into the hot Dutch oven. Score the top of the dough with a sharp razor blade or knife (a single deep cut or a pattern). Cover the Dutch oven and bake for 20 minutes.
- Finishing the Bake: After 20 minutes, remove the lid from the Dutch oven. Reduce the oven temperature to 450°F (230°C) and continue baking for another 20-30 minutes, or until the crust is deep golden brown and the internal temperature reaches 200-210°F (93-99°C). Transfer the loaf to a wire rack to cool completely for at least 2 hours before slicing. Slicing too early can compromise the crumb structure.
Easy Variations And Serving Ideas That Fit Real Life
While the goal is a perfect plain sourdough crumb, you can easily incorporate additions to your dough after the salt is mixed in, or serve it in creative ways. For a kid-friendly twist, try adding a handful of shredded cheddar cheese and a sprinkle of dried herbs like chives or dill during the last set of stretch and folds. This creates a savory loaf that’s great for sandwiches or alongside soup. You could also mix in some toasted sesame seeds or poppy seeds for a subtle nutty flavor and texture.
For serving, a beautiful open-crumb sourdough is fantastic on its own with just a good quality olive oil for dipping. It’s also the ideal base for avocado toast, bruschetta, or alongside a hearty stew. For a party or buffet, slice the loaf and arrange it with various spreads like hummus, cream cheese, or a simple butter board. The open crumb holds toppings beautifully.
Common Slip-Ups And How To Avoid Them
Achieving an open crumb can be tricky, but many common issues are easily fixed. One frequent slip-up is under-proofing the dough. If your dough hasn’t fermented enough during bulk fermentation or cold proofing, it won’t have enough gas trapped to create those large air pockets. The solution is to pay close attention to the dough’s volume increase (aim for 30-50% rise) and its feel (it should be jiggly and full of air). Another mistake is over-handling the dough during shaping. Too much pressing or deflating can push out all the precious gas you’ve worked to create. Be gentle, using a light touch to create surface tension without squishing the interior.
Insufficient gluten development is another culprit. If your stretch and folds aren’t effective, or if you’re using a low-protein flour, the dough won’t have the strength to hold its structure. Ensure you’re using strong bread flour and performing the stretch and folds with purpose, feeling the dough gain strength with each set. Finally, slicing the loaf too soon can make a perfectly good crumb appear gummy and dense. The internal structure is still setting as it cools, so patience is key. Always allow your sourdough to cool completely on a wire rack for at least 2 hours before cutting into it.
How To Store It And Make It Ahead Without Ruining Texture
Once your sourdough loaf has cooled completely, proper storage is key to maintaining its beautiful crumb and crust. For short-term storage (1-2

FAQs
- Can I make these ahead? Yes—prep ahead, refrigerate, then serve when ready.
- How long do leftovers last? Store covered in the fridge for 3–4 days for best texture.
- Can I adjust sweetness? Yes—add more or less sweetener to taste.
- Can I change the fruit? Yes—swap strawberries for blueberries, raspberries, or sliced banana.