Unlocking the secrets to perfect sourdough can feel like a lifelong quest, but understanding your loaf’s crumb is a crucial step on that journey.

The internal structure of your bread, known as the crumb, tells a story about your dough’s fermentation, hydration, and handling. It’s a roadmap to diagnosing what went right, and more importantly, what might have gone wrong, allowing you to consistently bake better loaves.
This guide will take a deep dive into the various crumb textures you might encounter, helping you identify common issues like an overproofed sourdough and offering practical advice to improve your next bake. Whether you’re a seasoned baker or just starting your sourdough adventure, deciphering the crumb is key to achieving that ideal open, airy, and delicious loaf.
Table of Contents
- What You’ll Love About This Quick And Easy Recipe
- Everything You Need To Make This Recipe Without Stress
- Time Needed From Start To Finish
- How To Make It Step By Step With Visual Cues
- Easy Variations And Serving Ideas That Fit Real Life
- Common Slip-Ups And How To Avoid Them
- How To Store It And Make It Ahead Without Ruining Texture

Sourdough Crumb Analysis: A Guide to Perfect Loaves
- Total Time: continuous
- Yield: 1 loaf 1x
Description
This guide helps bakers understand and diagnose their sourdough loaf’s internal structure, known as the crumb. By analyzing the crumb, bakers can identify issues related to fermentation, hydration, and handling, leading to consistent improvement in their sourdough baking. It covers various crumb textures, common problems like overproofing, and practical advice for achieving an ideal open, airy, and delicious loaf.
Ingredients
Instructions
1. 1. Allow Your Loaf to Cool Completely: This is perhaps the most crucial step. Slicing into a warm loaf will compress the crumb, making it appear denser than it actually is and potentially ruining its true structure. Wait at least 2-3 hours, or even overnight, for your loaf to cool down to room temperature.
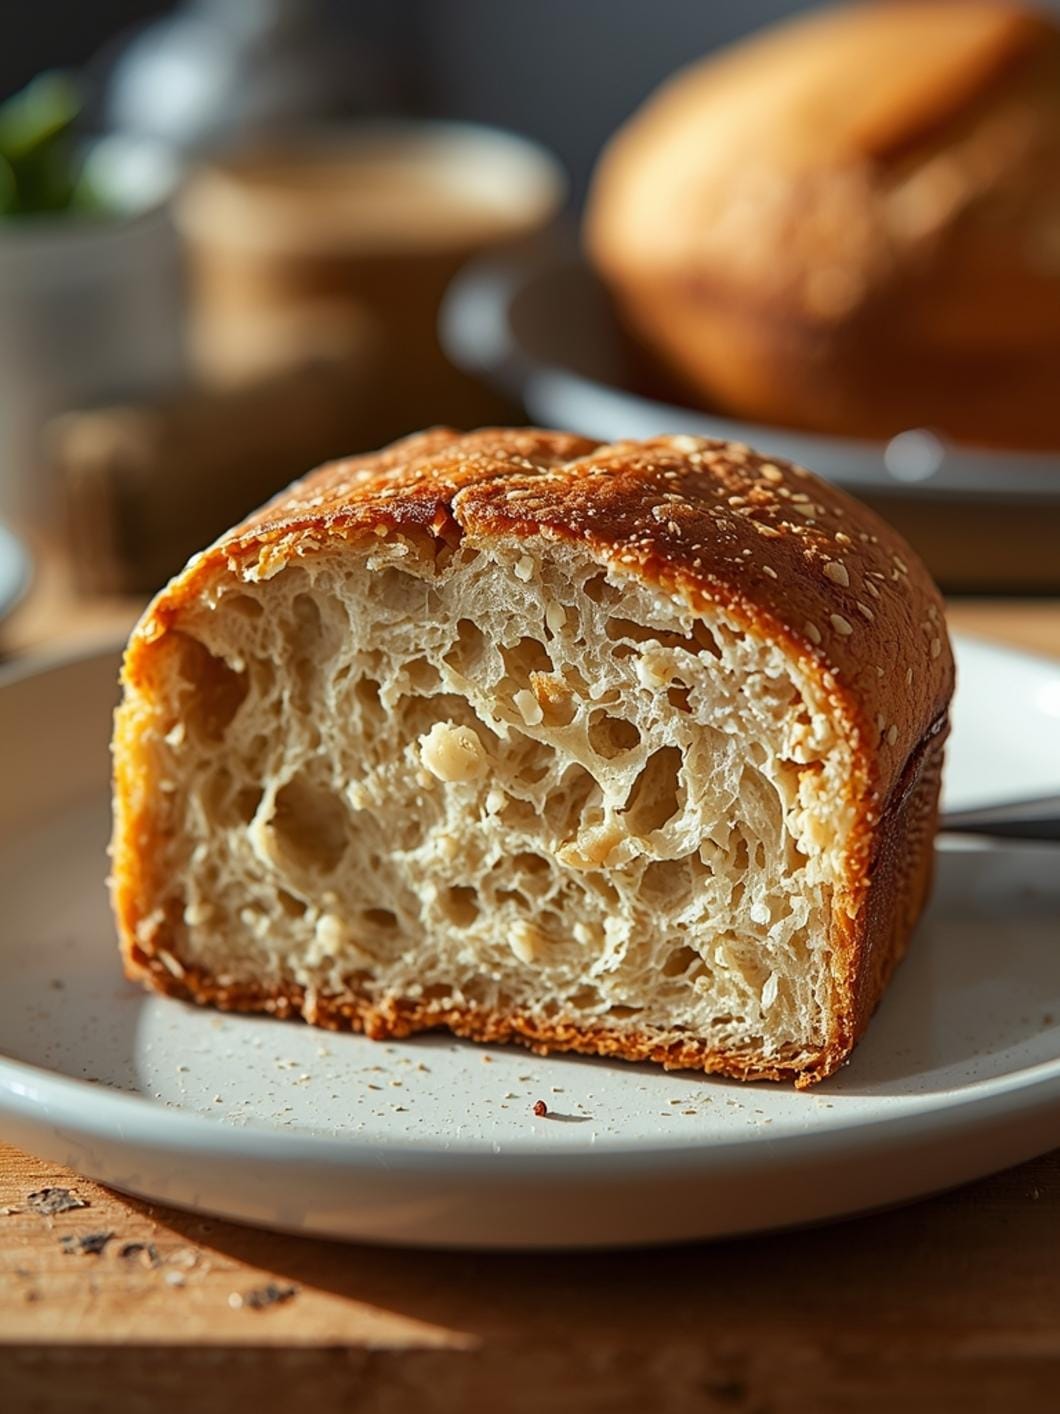
2. 2. Slice the Loaf in Half: Using a sharp bread knife, cut your cooled sourdough loaf directly in half, from top to bottom, through the center. This gives you the best cross-section for examination.
3. 3. Observe the Overall Structure: Look at the exposed surface. Is it uniform, or are there large, irregular holes? Is the crumb dense and heavy, or light and airy? Take a mental note of your initial impressions.
4. 4. Examine the Hole Distribution: Pay close attention to the size and distribution of the air pockets (alveoli). Are they evenly spread throughout the loaf? Are there large tunnels, or is it a tight, uniform network of small holes?
5. 5. Assess the Crumb Texture: Gently press the crumb with your finger. Does it spring back easily, or does it feel gummy and dense? A good crumb should be soft, moist, and resilient.
6. 6. Check for Any Dense Spots or Tunnels: Look for areas that are significantly denser than the rest of the loaf, particularly at the bottom or edges. Conversely, note if there are very large, isolated tunnels, often referred to as “flying crust.
7. 7. Compare with Ideal Crumb Characteristics: Mentally (or physically, if you have reference photos) compare your loaf’s crumb to what is generally considered an ideal sourdough crumb: an open, irregular, but well-distributed network of holes, a moist and tender texture, and no large, dense patches.
- Prep Time: 5-10 minutes
- Cook Time: 0 minutes
- Category: baking
- Method: observation
- Cuisine: european
Nutrition
- Serving Size: 1 slice
Keywords: sourdough, baking, crumb, analysis, bread, fermentation, hydration, proofing, technique, guide
What You’ll Love About This Quick And Easy Recipe
This guide isn’t a recipe in the traditional sense, but rather a practical manual for anyone baking sourdough bread. What you’ll love about this resource is its ability to demystify one of the most critical aspects of sourdough success: the crumb. It works by breaking down complex baking science into accessible, actionable insights. This information is perfect for home bakers of all skill levels, from beginners struggling with their first few loaves to experienced bakers looking to fine-tune their technique. You’ll find yourself referring back to these explanations whenever a new loaf comes out of the oven, using it as a diagnostic tool to understand and improve your baking process.
Everything You Need To Make This Recipe Without Stress
Since this is a guide for understanding sourdough crumb rather than a recipe for a specific dish, there are no ingredients in the traditional sense. However, to apply the knowledge gained from this guide, you will need to have baked a sourdough loaf.
INGREDIENTS:

- 1 baked sourdough loaf (homemade is best for analysis)
To get the most out of this guide, you’ll simply need a freshly baked sourdough loaf to examine. The more loaves you bake and analyze, the better you’ll become at identifying crumb characteristics and adjusting your process. No special tools are required beyond a good bread knife for slicing and your own keen observation skills.
Time Needed From Start To Finish
- Observation Time: 5-10 minutes (per loaf, immediately after cooling)
- Analysis & Learning Time: Varies (can be ongoing as you bake more loaves)
- Total Learning Time: Continuous
The real “time” investment comes from applying this knowledge to your subsequent bakes, which will naturally integrate into your regular sourdough baking schedule.
How To Make It Step By Step With Visual Cues

Analyzing your sourdough crumb is a straightforward process that involves careful observation. Follow these steps to effectively diagnose your loaf’s internal structure.
- Allow Your Loaf to Cool Completely: This is perhaps the most crucial step. Slicing into a warm loaf will compress the crumb, making it appear denser than it actually is and potentially ruining its true structure. Wait at least 2-3 hours, or even overnight, for your loaf to cool down to room temperature.
- Slice the Loaf in Half: Using a sharp bread knife, cut your cooled sourdough loaf directly in half, from top to bottom, through the center. This gives you the best cross-section for examination.
- Observe the Overall Structure: Look at the exposed surface. Is it uniform, or are there large, irregular holes? Is the crumb dense and heavy, or light and airy? Take a mental note of your initial impressions.
- Examine the Hole Distribution: Pay close attention to the size and distribution of the air pockets (alveoli). Are they evenly spread throughout the loaf? Are there large tunnels, or is it a tight, uniform network of small holes?
- Assess the Crumb Texture: Gently press the crumb with your finger. Does it spring back easily, or does it feel gummy and dense? A good crumb should be soft, moist, and resilient.
- Check for Any Dense Spots or Tunnels: Look for areas that are significantly denser than the rest of the loaf, particularly at the bottom or edges. Conversely, note if there are very large, isolated tunnels, often referred to as “flying crust.”
- Compare with Ideal Crumb Characteristics: Mentally (or physically, if you have reference photos) compare your loaf’s crumb to what is generally considered an ideal sourdough crumb: an open, irregular, but well-distributed network of holes, a moist and tender texture, and no large, dense patches.
Easy Variations And Serving Ideas That Fit Real Life
While this guide focuses on analysis, the ultimate goal is to bake delicious sourdough bread that you can enjoy. Once you’ve achieved a crumb you’re proud of, the serving possibilities are endless and fit perfectly into any family meal or gathering.
- Classic Toast: A thick slice of well-crumbed sourdough, toasted and slathered with butter, avocado, or your favorite jam, is a simple yet sublime pleasure.
- Sandwich Foundation: The sturdy, open crumb of good sourdough makes it an excellent base for hearty sandwiches. Think grilled cheese, turkey and swiss, or a classic BLT.
- Soup Dippers: A crusty piece of sourdough is perfect for soaking up rich stews and creamy soups. The open crumb allows it to absorb flavor beautifully.
- Bruschetta or Crostini: Slice thin, toast lightly, and top with fresh tomatoes, basil, garlic, and olive oil for an elegant appetizer.
- With Cheese and Charcuterie: A beautiful sourdough loaf is a natural partner for a cheese board, offering texture and a slight tang that complements various cheeses and cured meats.
- French Toast: If you have a day-old loaf, sourdough makes surprisingly delicious French toast, offering a delightful chewiness.
The “variation” here isn’t in the crumb itself, but in how you enjoy the fruits of your labor once you’ve mastered the art of baking.
Common Slip-Ups And How To Avoid Them
When analyzing sourdough crumb, several common issues can arise, each pointing to a specific area for improvement in your baking process. Understanding these “slip-ups” is the first step to correcting them.
- Dense, Gummy Crumb: This is a very common issue, often indicating underproofing. The dough didn’t have enough time for the yeast and bacteria to produce sufficient gas to create an open structure. It can also be a sign of insufficient hydration (too dry a dough) or not enough strength developed during mixing and folding. To fix this, extend your bulk fermentation, consider increasing hydration slightly, and ensure you’re performing adequate stretch and folds.
- Large, Irregular Tunnels (Flying Crust): These large, cavernous holes, often just beneath the crust, suggest overproofing or insufficient shaping. Overproofing causes the gas bubbles to coalesce into large pockets and then collapse. Poor shaping might not create enough surface tension to hold the structure. Try reducing bulk fermentation time or proofing temperature, and focus on creating a tight, strong skin on your dough during shaping.
- Tight, Uniform Crumb (Like Sandwich Bread): While not necessarily “bad,” if you’re aiming for an open, airy sourdough, a very tight crumb means the dough didn’t develop enough gas or wasn’t hydrated enough. It can also point to not allowing enough time for fermentation. Revisit your starter’s activity, increase hydration, and ensure adequate bulk fermentation.
- Wet, Undercooked Interior: Even if the crust looks good, a wet, sticky interior suggests the loaf didn’t bake long enough or at a high enough temperature. Ensure your oven is properly preheated and consider extending the baking time, especially if baking in a Dutch oven, by removing the lid for the latter part of the bake to allow moisture to escape.
- Dense Bottom or Edges: This can be due to uneven heat distribution in your oven, or the dough being too cold when it goes into a hot oven, preventing a good oven spring. Using a preheated baking stone or Dutch oven can help, and ensure your dough isn’t excessively cold from a long cold proof.
By recognizing these crumb characteristics and understanding their root causes, you can make targeted adjustments to your sourdough process, leading to more consistent and satisfying results.
How To Store It And Make It Ahead Without Ruining Texture
Since this guide is about analyzing baked sourdough, the “make ahead” aspect refers to the baking process itself. However, proper storage of your finished loaf is crucial to maintain the crumb texture you worked so hard to achieve.
- Storing Freshly Baked Loaves: Once your sourdough loaf has completely cooled (this is non-negotiable for preserving crumb texture), store it at room temperature. The best way to keep the crust crisp and the crumb fresh is to store it cut-side down on a cutting board, or in a breathable linen bread bag. Avoid airtight plastic bags for the first day or two, as they can soften the crust and make the crumb gummy. A whole loaf will stay fresh for 2-3 days this way.
- For Longer Storage: If you won’t finish the loaf within a few days, slicing it and freezing the slices is an excellent option. Place parchment paper between slices to prevent

FAQs
- Can I make these ahead? Yes—prep ahead, refrigerate, then serve when ready.
- How long do leftovers last? Store covered in the fridge for 3–4 days for best texture.
- Can I adjust sweetness? Yes—add more or less sweetener to taste.
- Can I change the fruit? Yes—swap strawberries for blueberries, raspberries, or sliced banana.