Making homemade bagels might sound intimidating, but with sourdough discard, it becomes an incredibly rewarding and surprisingly simple process.

This recipe focuses on creating those perfectly chewy, fluffy bagels right in your own kitchen, utilizing that often-overlooked sourdough discard.
This guide will walk you through each step, paying special attention to the crucial proofing stage, ensuring your bagels rise beautifully and achieve that classic texture. Get ready to enjoy fresh, warm bagels anytime you crave them!
Table of Contents
- What You’ll Love About This Quick And Easy Recipe
- Everything You Need To Make This Recipe Without Stress
- Time Needed From Start To Finish
- How To Make It Step By Step With Visual Cues
- Easy Variations And Serving Ideas That Fit Real Life
- Common Slip-Ups And How To Avoid Them
- How To Store It And Make It Ahead Without Ruining Texture
- Questions People Always Ask Before Making This Recipe

Sourdough Discard Bagels
- Total Time: 2 hours 40 minutes to 3 hours 5 minutes
- Yield: 8 bagels 1x
Description
Making homemade bagels might sound intimidating, but with sourdough discard, it becomes an incredibly rewarding and surprisingly simple process. This recipe focuses on creating those perfectly chewy, fluffy bagels right in your own kitchen, utilizing that often-overlooked sourdough discard. This guide will walk you through each step, paying special attention to the crucial proofing stage, ensuring your bagels rise beautifully and achieve that classic texture. Get ready to enjoy fresh, warm bagels anytime you crave them!
Ingredients
Instructions
1. 1. Activate the Yeast: In a large mixing bowl, combine the warm water, granulated sugar (or honey), and active dry yeast. Stir gently and let it sit for 5-10 minutes until the mixture becomes foamy. This indicates your yeast is active and ready to go.
2. 2. Combine Wet Ingredients: Add the sourdough discard to the foamy yeast mixture and stir until well combined. The mixture will be slightly bubbly from the yeast and discard.
3. 3. Mix Dry Ingredients and Form Dough: In a separate bowl, whisk together the all-purpose flour and salt. Gradually add the dry ingredients to the wet ingredients, mixing with a wooden spoon or your hands until a shaggy dough forms.
4. 4. Knead the Dough: Turn the dough out onto a lightly floured surface and knead for 8-10 minutes. The dough should become smooth, elastic, and less sticky. If using a stand mixer, knead with the dough hook for 6-8 minutes on medium-low speed.
5. 5. First Proofing: Place the kneaded dough into a lightly oiled bowl, turning it once to coat. Cover the bowl with plastic wrap or a clean kitchen towel and let it rise in a warm place for 1.5 to 2 hours, or until doubled in size. This is your bulk fermentation.
6. 6. Shape the Bagels: Gently punch down the risen dough and divide it into 8 equal pieces. Roll each piece into a smooth ball. To form the bagel shape, poke a hole in the center of each ball with your thumb, then gently stretch the hole to about 1-1.5 inches in diameter. Place the shaped bagels on a lightly floured baking sheet lined with parchment paper.
7. 7. Second Proofing: Cover the shaped bagels loosely with plastic wrap or a clean towel and let them rest for another 20-30 minutes. They should look slightly puffy but not fully doubled. This is a crucial step for achieving the right texture.
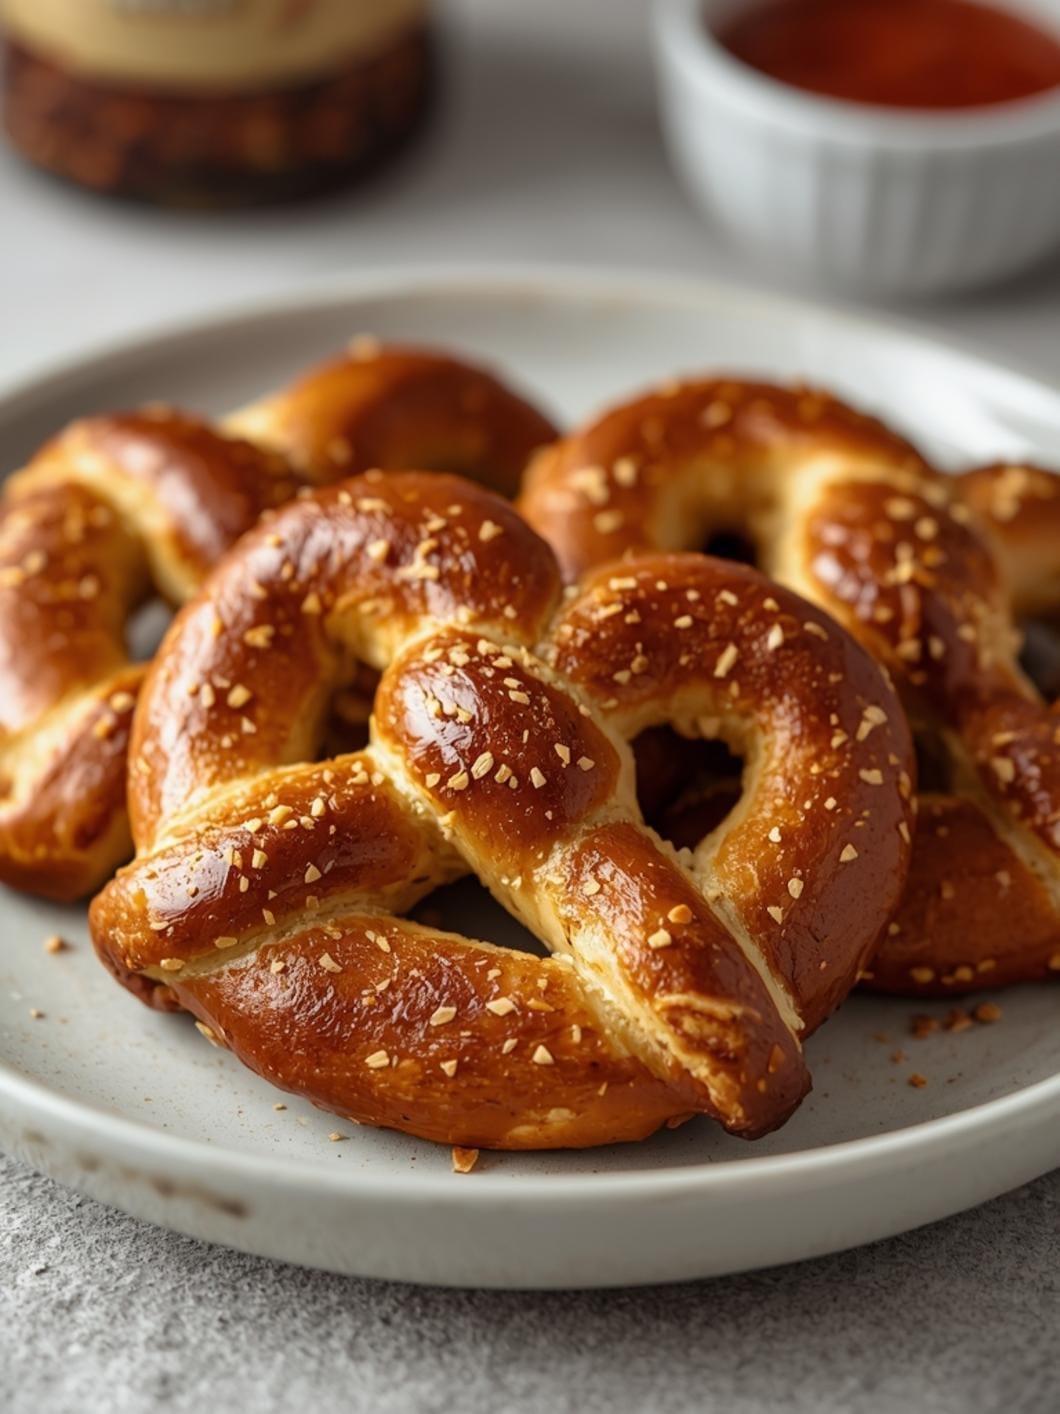
8. 8. Boil and Bake: Preheat your oven to 425 F (220 C). Bring a large pot of water to a rolling boil and add the baking soda. Gently drop 2-3 bagels into the boiling water at a time, cooking for 30 seconds to 1 minute per side. Remove with a slotted spoon and place them back on the parchment-lined baking sheet. If desired, sprinkle with your chosen toppings immediately after boiling. Bake for 18-22 minutes, or until golden brown and cooked through.
- Prep Time: 20 minutes
- Cook Time: 20-25 minutes
- Category: main dish
- Method: baking
- Cuisine: american
Nutrition
- Serving Size: 1 bagel
Keywords: sourdough, bagels, discard, homemade, baking, breakfast, brunch, yeast, chewy, fluffy
What You’ll Love About This Quick And Easy Recipe
This recipe is a game-changer for anyone who maintains a sourdough starter and finds themselves with an abundance of discard. It transforms what might otherwise be waste into delicious, satisfying bagels. You’ll love how approachable this method is, even if you’re new to making bread or bagels from scratch. It’s perfect for a weekend breakfast, a special brunch, or even as a make-ahead option for busy weekdays. Families will appreciate the wholesome goodness and the fun of customizing their own toppings. Plus, the process is incredibly satisfying, from shaping the dough to seeing those perfectly puffed bagels emerge from the oven.
Everything You Need To Make This Recipe Without Stress
Gathering your ingredients before you begin will make the entire process smooth and stress-free. Most of these items are likely already in your pantry, making this a convenient recipe to whip up whenever the craving strikes.
INGREDIENTS:

- 1 cup active sourdough discard (unfed, 100% hydration)
- 1 cup warm water (about 100-110°F)
- 1 tablespoon granulated sugar or honey
- 1 teaspoon active dry yeast
- 3 cups all-purpose flour, plus more for dusting
- 1 teaspoon salt
- 1 tablespoon baking soda (for boiling water)
- Optional toppings: sesame seeds, poppy seeds, everything bagel seasoning, coarse sea salt
For the sourdough discard, ensure it’s at room temperature for best results. If you don’t have active dry yeast, instant yeast can be used, and you can skip the step of proofing it in warm water with sugar; simply add it directly to the flour mixture. All-purpose flour works wonderfully for these bagels, but bread flour can also be used for an even chewier texture. Feel free to experiment with different sweeteners like maple syrup instead of sugar or honey if you prefer.
Time Needed From Start To Finish
This recipe is designed to be manageable without taking up your entire day, though it does require some waiting for the dough to proof.
- Prep time: 20 minutes (mixing and shaping)
- Proofing time: 1.5 to 2 hours (first rise), 30 minutes (second rise after shaping)
- Boiling and Baking time: 20-25 minutes
- Total time: Approximately 2 hours 40 minutes to 3 hours 5 minutes
While the total time might seem long, much of it is hands-off, allowing you to attend to other tasks while the dough works its magic.
How To Make It Step By Step With Visual Cues

Follow these steps carefully to ensure your sourdough discard bagels turn out perfectly fluffy and chewy.
- Activate the Yeast: In a large mixing bowl, combine the warm water, granulated sugar (or honey), and active dry yeast. Stir gently and let it sit for 5-10 minutes until the mixture becomes foamy. This indicates your yeast is active and ready to go.
- Combine Wet Ingredients: Add the sourdough discard to the foamy yeast mixture and stir until well combined. The mixture will be slightly bubbly from the yeast and discard.
- Mix Dry Ingredients and Form Dough: In a separate bowl, whisk together the all-purpose flour and salt. Gradually add the dry ingredients to the wet ingredients, mixing with a wooden spoon or your hands until a shaggy dough forms.
- Knead the Dough: Turn the dough out onto a lightly floured surface and knead for 8-10 minutes. The dough should become smooth, elastic, and less sticky. If using a stand mixer, knead with the dough hook for 6-8 minutes on medium-low speed.
- First Proofing: Place the kneaded dough into a lightly oiled bowl, turning it once to coat. Cover the bowl with plastic wrap or a clean kitchen towel and let it rise in a warm place for 1.5 to 2 hours, or until doubled in size. This is your bulk fermentation.
- Shape the Bagels: Gently punch down the risen dough and divide it into 8 equal pieces. Roll each piece into a smooth ball. To form the bagel shape, poke a hole in the center of each ball with your thumb, then gently stretch the hole to about 1-1.5 inches in diameter. Place the shaped bagels on a lightly floured baking sheet lined with parchment paper.
- Second Proofing: Cover the shaped bagels loosely with plastic wrap or a clean towel and let them rest for another 20-30 minutes. They should look slightly puffy but not fully doubled. This is a crucial step for achieving the right texture.
- Boil and Bake: Preheat your oven to 425°F (220°C). Bring a large pot of water to a rolling boil and add the baking soda. Gently drop 2-3 bagels into the boiling water at a time, cooking for 30 seconds to 1 minute per side. Remove with a slotted spoon and place them back on the parchment-lined baking sheet. If desired, sprinkle with your chosen toppings immediately after boiling. Bake for 18-22 minutes, or until golden brown and cooked through.
Easy Variations And Serving Ideas That Fit Real Life
These sourdough discard bagels are incredibly versatile and can be customized to suit any taste or occasion. For a classic feel, sprinkle them with sesame seeds, poppy seeds, or a generous layer of everything bagel seasoning before baking. If you’re a fan of savory flavors, consider adding grated cheddar cheese or chopped jalapeños to the dough during the kneading stage, or sprinkle them on top before baking. For a touch of sweetness, a cinnamon-sugar topping is always a hit, especially with kids.
When it comes to serving, the possibilities are endless. Of course, a schmear of cream cheese is the quintessential bagel companion. Elevate it with flavored cream cheese like chive and onion, strawberry, or honey-nut. For a heartier meal, turn your bagel into a breakfast sandwich with scrambled eggs, bacon, and cheese. They also make excellent bases for lunch sandwiches with deli meats, fresh veggies, and your favorite spreads. Don’t forget to toast them for that extra crunch!
Common Slip-Ups And How To Avoid Them
Even experienced bakers can encounter small challenges, but knowing what to look out for can save you a lot of frustration.
- Bagels not rising: This is often due to inactive yeast or cold proofing conditions. Ensure your water is warm (not hot!) enough to activate the yeast, and find a warm spot in your kitchen for the dough to rise. If your discard isn’t very active, adding the yeast is key.
- Bagels are dense or hard: This can happen if you add too much flour during kneading, making the dough stiff. Always add flour gradually. Over-kneading can also lead to a tough texture, so stick to the recommended kneading times.
- Holes closing during baking: If the hole in your bagel disappears, it usually means you didn’t stretch it wide enough in the first place, or the second proofing was too long. Make sure the hole is at least 1-1.5 inches wide before boiling.
- Bagels sticking to the baking sheet: Always use parchment paper on your baking sheet, especially after boiling. The wet surface of the boiled bagels can easily stick to an unlined pan.
- Uneven browning: If your oven has hot spots, rotate the baking sheet halfway through the baking time to ensure all your bagels brown evenly.
How To Store It And Make It Ahead Without Ruining Texture
Proper storage is key to enjoying your homemade sourdough discard bagels for days. Once completely cooled, store them in an airtight container or a large zip-top bag at room temperature for up to 2-3 days. For longer storage, bagels freeze beautifully. Slice them first (if desired), then place them in a freezer-safe bag or container, removing as much air as possible. They will keep well in the freezer for up to 3 months. When ready to eat, simply toast them directly from frozen.
To make them ahead, you can prepare the dough through the first proofing stage, then shape the bagels and place them on a parchment-lined baking sheet. Cover tightly with plastic wrap and refrigerate overnight (up to 24 hours). The next morning, let them come to room temperature for about 30-60 minutes before proceeding with the boiling and baking steps. This cold proofing can even enhance the flavor!
Questions People Always Ask Before Making This Recipe
- Can I use whole wheat flour? While all-purpose flour gives the classic chewy texture, you can substitute up to half of the all-purpose flour with whole wheat flour for a nuttier, heartier bagel. The texture will be slightly denser.
- **What if

FAQs
- Can I make these ahead? Yes—prep ahead, refrigerate, then serve when ready.
- How long do leftovers last? Store covered in the fridge for 3–4 days for best texture.
- Can I adjust sweetness? Yes—add more or less sweetener to taste.
- Can I change the fruit? Yes—swap strawberries for blueberries, raspberries, or sliced banana.