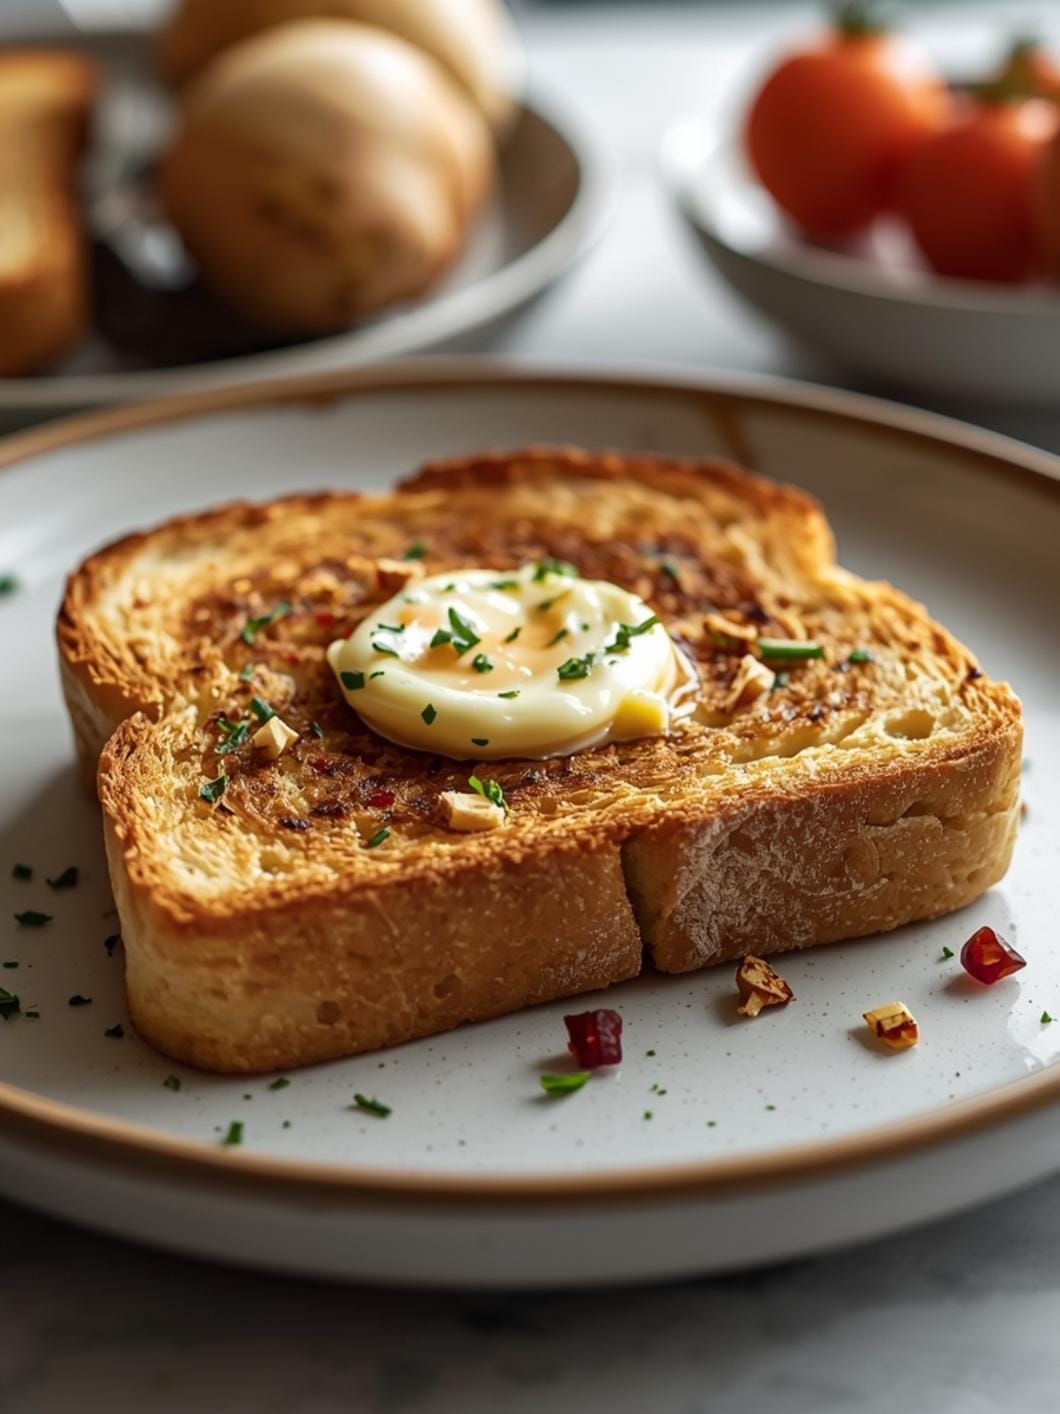
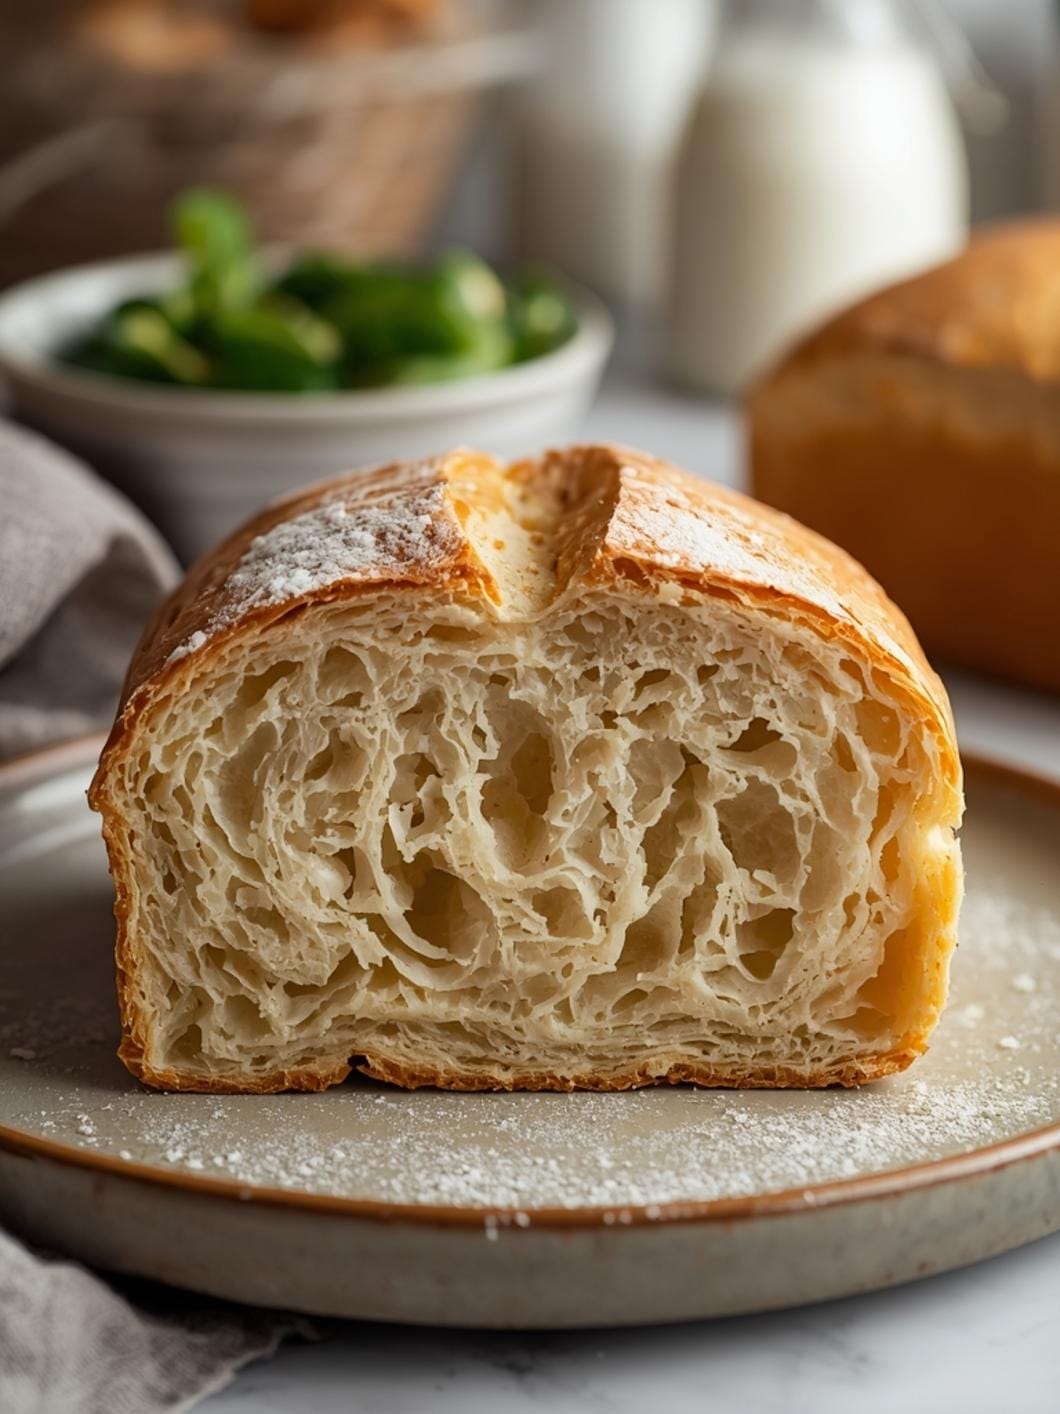
Achieving that coveted “sourdough ear” on your homemade artisan bread is often seen as the hallmark of a truly successful loaf.

It’s not just about aesthetics; a well-formed ear indicates good oven spring, a strong gluten structure, and a beautiful crumb. Many bakers strive for this perfect lift and crisp edge, and while it might seem intimidating, it’s entirely within reach with the right understanding and technique.
This comprehensive guide will demystify the process, breaking down the essential elements that contribute to a magnificent sourdough ear. We’ll explore the critical role of scoring, dough handling, and oven conditions, providing you with the knowledge and practical tips you need to consistently bake loaves that are as stunning to look at as they are delicious to eat.

Mastering the Sourdough Ear: A Comprehensive Guide
- Total Time: 47 minutes
- Yield: 1 loaf
Description
This guide demystifies achieving the coveted “sourdough ear” on homemade artisan bread, focusing on essential elements like scoring, dough handling, and oven conditions. It provides practical tips for consistently baking loaves that are both visually stunning and delicious, suitable for bakers of all experience levels.
Ingredients
Instructions
1. 1. Ensure Your Dough is Properly Proofed: An under-proofed dough will hinder ear formation, while an over-proofed dough won’t hold the score. Your dough should feel light, airy, and slightly jiggly, with some structure. A poke test (where the dough slowly springs back) is a good indicator.
2. 2. Preheat Your Oven and Dutch Oven Thoroughly: Preheat your oven to 450-500 F (230-260 C) with your Dutch oven inside for at least 30-60 minutes. High heat is essential for good oven spring.
3. 3. Gently Transfer and Dust Your Dough: Carefully invert your proofed dough from its banneton onto parchment paper or directly into your hot Dutch oven. Lightly dust the top surface of the dough with rice flour or all-purpose flour to help the lame glide smoothly.
4. 4. Prepare Your Lame for Scoring: Ensure your lame or razor blade is extremely sharp. A dull blade will drag the dough. Hold the lame firmly, ready to make a swift, confident cut.
5. 5. Execute the Primary Score for the Ear: For a classic ear, make one long, deep, and angled cut. Hold your lame at about a 30-45 degree angle to the dough surface. Start from one end and move swiftly to the other, aiming for a depth of about 1/2 to 3/4 inch (1.25-2 cm). The angle creates a flap that will lift.
6. 6. Add Secondary Decorative Scores (Optional): After your primary score, you can add shallower (about 1/4 inch or 0.6 cm deep), decorative scores for aesthetics.
7. 7. Bake with Steam: Immediately after scoring, carefully place the dough into the preheated oven. If using a Dutch oven, cover it. If using a baking stone, create steam in your oven. Steam keeps the crust soft for the first 15-20 minutes, allowing the dough to expand fully.
8. 8. Uncover and Finish Baking: After 15-20 minutes, remove the lid from your Dutch oven or vent the steam. This allows the crust to dry and crisp up. Continue baking until the internal temperature reaches 200-210 F (93-99 C) and the crust is deeply golden brown.
- Prep Time: 2 minutes
- Cook Time: 45 minutes
- Category: bread
- Method: baking
- Cuisine: american
Nutrition
- Serving Size: 1 slice
Keywords: sourdough, bread, baking, ear, scoring, artisan, homemade, technique, dutch oven, crusty
What You’ll Love About This Quick And Easy Recipe
This guide is designed for anyone eager to elevate their sourdough baking, from enthusiastic beginners to those who have baked a few loaves and are looking to refine their technique. It works because it breaks down a seemingly complex aspect of sourdough into manageable, actionable steps. You don’t need years of experience to understand and implement these tips. We focus on practical advice that directly impacts ear formation, helping you understand the “why” behind each technique. This isn’t a recipe for a specific sourdough loaf, but rather a universal set of principles that can be applied to almost any artisan sourdough bread recipe you’re already using. It’s perfect for a weekend baking project or whenever you want to impress yourself and your family with a truly professional-looking loaf.
Everything You Need To Make This Recipe Without Stress
While this guide focuses on technique rather than a specific ingredient list for a sourdough recipe, understanding the tools that facilitate ear formation is crucial. You’ll primarily need your standard sourdough baking equipment, with a few key items specifically for scoring.
INGREDIENTS:

- Your prepared sourdough dough (fermented and ready for shaping)
- Rice flour or all-purpose flour (for dusting)
- A sharp lame or a very sharp razor blade (essential for scoring)
- A banneton or proofing basket (for holding the dough shape during proofing)
- A Dutch oven or baking stone with a steam setup (for baking)
- Parchment paper (optional, for easy transfer)
When it comes to your scoring tool, a dedicated bread lame is highly recommended. Its thin, sharp blade allows for clean, precise cuts that are difficult to achieve with a regular knife, no matter how sharp. If you don’t have a lame, a new, unused razor blade held securely can work in a pinch. The rice flour or all-purpose flour is used to dust the dough before scoring, which helps the blade glide smoothly and makes the score more visible.
Time Needed From Start To Finish
Understanding and implementing the techniques for sourdough ear formation doesn’t add significant time to your existing sourdough baking schedule. The actual scoring process takes mere seconds, perhaps a minute or two at most. The “time” involved is more about careful observation and practice over several baking sessions.
- Preparation for Scoring: 1-2 minutes (dusting the dough, preparing your lame)
- Scoring the Dough: 15-30 seconds
- Overall Impact on Baking Time: 0 minutes (it’s integrated into your existing bake)
- Total Learning Curve: Varies, but noticeable improvement can be seen after 2-3 loaves.
This isn’t about adding extra steps, but rather refining existing ones. The time investment is in learning and precision, which pays off with consistently beautiful results.
How To Make It Step By Step With Visual Cues

Achieving a perfect sourdough ear is primarily about mastering the scoring technique and understanding dough readiness. Here’s how to approach it:
- Ensure Your Dough is Properly Proofed: This is perhaps the most critical step. An under-proofed dough will have too much tension and won’t expand properly, hindering ear formation. An over-proofed dough will be slack and won’t hold the score well, leading to a flat ear or no ear at all. Your dough should feel light, airy, and slightly jiggly, but still have some structure. A poke test (where the dough slowly springs back) is a good indicator.
- Preheat Your Oven and Dutch Oven Thoroughly: High heat is essential for a good oven spring, which directly contributes to ear formation. Preheat your oven to a high temperature (typically 450-500°F or 230-260°C) with your Dutch oven inside for at least 30-60 minutes. The hot surface helps the dough expand rapidly.
- Gently Transfer and Dust Your Dough: Carefully invert your proofed dough from its banneton onto a piece of parchment paper or directly into your hot Dutch oven. If using parchment, gently dust the top surface of the dough with a light layer of rice flour or all-purpose flour. This helps the lame glide smoothly and provides contrast for your score.
- Prepare Your Lame for Scoring: Ensure your lame or razor blade is extremely sharp. A dull blade will drag the dough, creating a jagged, less effective score. Hold the lame firmly, ready to make a swift, confident cut.
- Execute the Primary Score for the Ear: This is where the magic happens. For a classic ear, you want to make one long, deep, and angled cut. Hold your lame at about a 30-45 degree angle to the surface of the dough. Start the cut from one end of the loaf and move swiftly and smoothly to the other end, aiming for a depth of about 1/2 to 3/4 inch (1.25-2 cm). The angle is crucial; it creates a flap that will lift and crisp into the ear. Think of it as creating a “hinge.”
- Add Secondary Decorative Scores (Optional): After your primary ear-forming score, you can add shallower, more decorative scores if desired. These are typically straight cuts across the loaf or intricate patterns. These secondary scores should be much shallower (about 1/4 inch or 0.6 cm deep) and serve more for aesthetics and to control where the dough expands.
- Bake with Steam: Immediately after scoring, carefully place the dough (in its Dutch oven or on a baking stone) into the preheated oven. If using a Dutch oven, cover it. If using a baking stone, create steam in your oven (e.g., by pouring hot water into a preheated pan on the bottom rack). Steam keeps the crust soft and pliable for the first 15-20 minutes of baking, allowing the dough to expand fully and the ear to develop without prematurely hardening.
- Uncover and Finish Baking: After the initial steamed baking period (usually 15-20 minutes), remove the lid from your Dutch oven or vent the steam from your oven. This allows the crust to dry out, crisp up, and brown beautifully, setting that perfect ear. Continue baking until the internal temperature reaches 200-210°F (93-99°C) and the crust is deeply golden brown.
Easy Variations And Serving Ideas That Fit Real Life
While the goal is a beautiful ear, the bread itself is meant to be enjoyed! Once you’ve mastered the scoring, the serving possibilities are endless.
- Classic Pairing: Serve thick slices with good quality olive oil and a sprinkle of flaky sea salt. This simple presentation truly lets the bread shine.
- Breakfast Favorite: Toast slices and top with avocado, a fried egg, or your favorite jam. The crisp ear adds a delightful texture.
- Soup and Stew Companion: A crusty sourdough loaf is the ultimate accompaniment to hearty soups, stews, or chili. The sturdy crust and open crumb are perfect for soaking up flavorful broths.
- Sandwich Base: Use it for open-faced sandwiches or substantial grilled cheese. The robust flavor stands up well to various fillings.
- Bruschetta or Crostini: Slice thinly, toast, and top with fresh tomatoes, basil, garlic, or a creamy spread for an elegant appetizer.
- Kid-Friendly Approach: For younger eaters, a slice of sourdough with butter or a simple cheese spread is often a hit. The satisfying chewiness can be very appealing.
- Party Platter: Arrange slices around a cheese board with various cheeses, cured meats, and fruit for an impressive spread.
Common Slip-Ups And How To Avoid Them
Even with the best intentions, achieving that perfect sourdough ear can sometimes be elusive. Here are some common mistakes and how to sidestep them:
- Dull Scoring Blade: Using a dull knife or lame is the number one culprit for a ragged, non-existent ear. A dull blade will drag and tear the dough instead of making a clean cut. Solution: Always use a brand new, very sharp razor blade or a dedicated bread lame. Replace blades frequently.
- Incorrect Scoring Angle: A straight, vertical cut won’t create an ear; it will just make a split. The dough needs that angled flap to expand and lift. Solution: Always hold your lame at a 30-45 degree angle to the dough surface for the primary ear-forming score.
- Insufficient Scoring Depth: If

FAQs
- Can I make these ahead? Yes—prep ahead, refrigerate, then serve when ready.
- How long do leftovers last? Store covered in the fridge for 3–4 days for best texture.
- Can I adjust sweetness? Yes—add more or less sweetener to taste.
- Can I change the fruit? Yes—swap strawberries for blueberries, raspberries, or sliced banana.