Description
This guide demystifies sourdough fermentation, providing essential visual and tactile cues to help bakers determine when their dough is perfectly proofed for baking. It focuses on practical observations to ensure consistent, delicious results every time.
Ingredients
Instructions
1. Observe the Volume Increase: During bulk fermentation, your dough should visibly increase in volume (20-50%). For the final proof, look for a significant increase (30-70%).
2. Look for Surface Bubbles and Activity: The surface of your dough should show small bubbles, indicating gas production. If in a clear container, you’ll see bubbles on the sides and bottom.
3. Check for a Domed, Smooth Surface: A well-fermented dough will often have a slightly domed, taut surface, especially after shaping and during the final proof. It shouldn’t look slack or deflated.
4. Perform the “Poke Test” (for Final Proof): Gently flour your finger and lightly press it into the dough about half an inch deep. If under-proofed, it springs back immediately. If perfectly proofed, it springs back slowly, about halfway. If over-proofed, the indentation remains completely.
5. Assess the Dough’s Jiggle and Movement: Gently shake your proofing container or banneton. A well-proofed dough will have a slight jiggle, indicating it’s airy but still holds its shape.
6. Smell the Dough: A perfectly fermented sourdough dough will have a pleasant, slightly tangy, yeasty aroma. It shouldn’t smell overly sour or like alcohol.
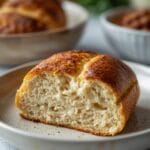
7. Consider the Dough’s Texture: When gently handled, the dough should feel light, airy, and somewhat elastic. It shouldn’t feel dense, heavy, or unmanageably sticky.
- Prep Time: Varies (observation time)
- Cook Time: N/A
- Category: baking
- Method: fermentation
- Cuisine: european
Nutrition
- Serving Size: 1 slice
Keywords: sourdough, fermentation, proofing, baking, bread, dough, starter, homemade, technique, guide