Get ready to transform your breakfast or dessert routine with these incredibly delightful sweet sourdough focaccia breadsticks.

This recipe takes the unique tang of your sourdough starter and marries it with a soft, airy focaccia texture, all finished with a luscious glaze that will have everyone asking for more. It’s a fantastic way to use your sourdough discard or active starter, creating a treat that’s both comforting and a little bit fancy.
Whether you’re looking for a special weekend breakfast, a sweet snack, or a unique dessert to share, these breadsticks are sure to impress. They’re surprisingly simple to make, making them perfect for bakers of all skill levels. Let’s dive into creating this irresistible sweet sourdough creation!
Table of Contents
- What You’ll Love About This Quick And Easy Recipe
- Everything You Need To Make This Recipe Without Stress
- Time Needed From Start To Finish
- How To Make It Step By Step With Visual Cues
- Easy Variations And Serving Ideas That Fit Real Life
- Common Slip-Ups And How To Avoid Them
- How To Store It And Make It Ahead Without Ruining Texture

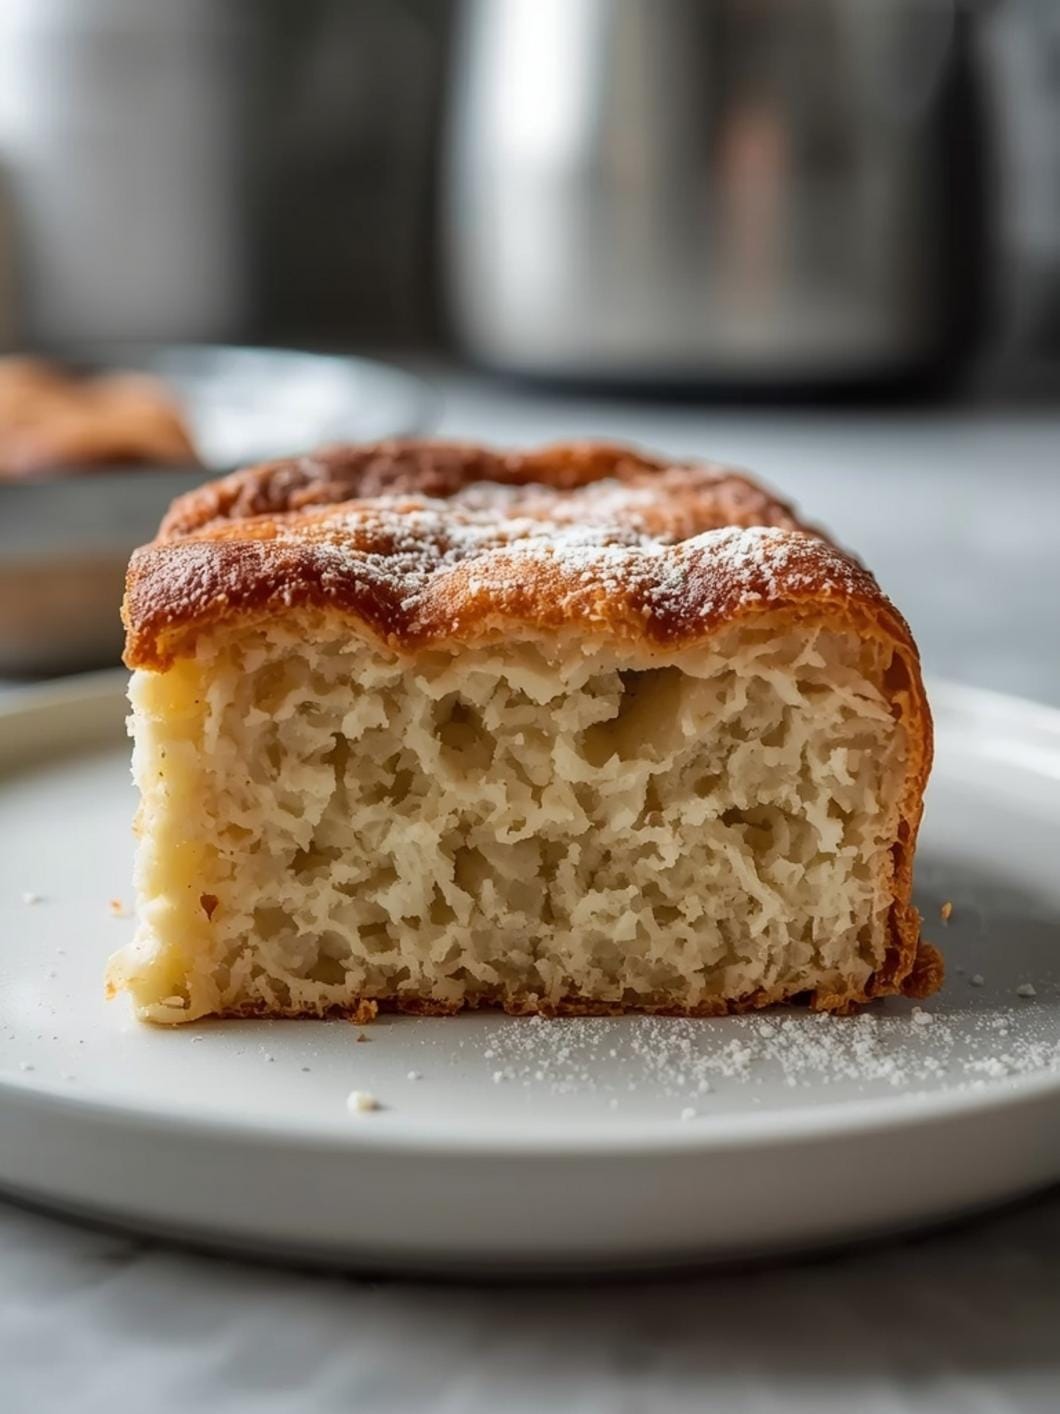
Sweet Sourdough Focaccia Breadsticks
- Total Time: 1 hour 35 minutes to 2 hours 40 minutes
- Yield: 12-16 breadsticks 1x
Description
Transform your breakfast or dessert with these delightful sweet sourdough focaccia breadsticks. This recipe combines the unique tang of sourdough with a soft, airy focaccia texture, finished with a luscious glaze. It’s a fantastic way to use sourdough discard or active starter, creating a comforting and fancy treat perfect for any occasion.
Ingredients
Instructions
1. 1. Combine Wet Ingredients and Starter: In a large mixing bowl, combine the warm milk, granulated sugar, and active dry yeast. Stir gently to dissolve the sugar and yeast, then let it sit for about 5 minutes until the yeast becomes foamy. This indicates your yeast is active. Next, add your sourdough starter (active or discard) and the melted butter to the mixture, stirring until well combined.
2. 2. Add Dry Ingredients to Form Dough: Gradually add the all-purpose flour and salt to the wet ingredients. Mix with a wooden spoon or your hands until a shaggy dough forms. It will be sticky, but don’t worry. Once combined, turn the dough out onto a lightly floured surface.
3. 3. Knead the Dough Until Smooth: Knead the dough for 5-7 minutes. The dough should become smoother and more elastic, though it will still be soft. Avoid adding too much extra flour during kneading, as this can make the focaccia dense. A slightly sticky dough is what you’re aiming for.
4. 4. First Rise (Bulk Fermentation): Lightly grease a clean bowl with a little olive oil. Place the kneaded dough in the bowl, turning it once to coat. Cover the bowl with plastic wrap or a clean kitchen towel and let it rise in a warm place for 1 to 2 hours, or until it has roughly doubled in size. The exact time will depend on the warmth of your kitchen and the activity of your sourdough starter.
5. 5. Prepare for Baking and Second Rise: Preheat your oven to 375 F (190 C). Drizzle 1 tablespoon of olive oil into a 9×13 inch baking pan, ensuring the bottom is well coated. Gently transfer the risen dough into the prepared pan. Use your fingertips to gently press and stretch the dough to fill the pan, creating those signature focaccia dimples.
6. 6. Second Rise and Baking: Cover the pan loosely with plastic wrap or a kitchen towel and let the dough rise for another 20-30 minutes while your oven finishes preheating. This brief second rise helps create a lighter texture. Once risen, remove the cover and bake for 20-25 minutes, or until the focaccia is golden brown on top and cooked through.
7. 7. Cool and Glaze: Once baked, remove the focaccia from the oven and let it cool in the pan for about 10-15 minutes. While it’s cooling, prepare the glaze by whisking together the powdered sugar, milk (or water), and vanilla extract in a small bowl until smooth. The consistency should be pourable but not too thin.
8. 8. Slice and Serve: Once the focaccia has cooled slightly, drizzle the glaze generously over the top. You can then slice it into breadsticks or squares and serve warm or at room temperature. Enjoy your sweet sourdough focaccia!
- Prep Time: 15 minutes
- Cook Time: 20-25 minutes
- Category: dessert
- Method: baking
- Cuisine: american
Nutrition
- Serving Size: 1 breadstick
Keywords: sourdough, focaccia, sweet, breadsticks, dessert, breakfast, easy, glaze, discard, baking
What You’ll Love About This Quick And Easy Recipe
This recipe is a true winner because it combines the beloved chewy texture of focaccia with a delightful sweetness, all while incorporating the subtle, complex flavor of sourdough. It’s perfect for anyone who loves baking with their sourdough starter but wants to venture beyond traditional loaves. This dish works beautifully as a unique breakfast pastry, a sweet accompaniment to coffee, or even a light dessert after dinner. It’s a fantastic way to use up sourdough discard, turning it into something truly special rather than letting it go to waste. Families will adore these breadsticks because they’re soft, flavorful, and a little bit different from the usual sweet treats. They’re also surprisingly quick to prepare, making them ideal for busy mornings or an impromptu baking session.
Everything You Need To Make This Recipe Without Stress
Gathering your ingredients before you begin ensures a smooth and enjoyable baking process. This recipe uses common pantry staples alongside your trusty sourdough starter, making it accessible and straightforward.
INGREDIENTS:

- 1 cup active sourdough starter or discard
- 1 cup warm milk (around 100-110°F)
- 1/4 cup granulated sugar
- 1 teaspoon active dry yeast
- 1 teaspoon salt
- 3 cups all-purpose flour, plus more for dusting
- 1/4 cup unsalted butter, melted
- 1 tablespoon olive oil, for the pan
- 1 cup powdered sugar
- 2-3 tablespoons milk or water
- 1/2 teaspoon vanilla extract
For the ingredients, feel free to use your preferred brand of all-purpose flour. For the milk, any dairy milk will work, and you can also substitute with a non-dairy milk like almond or oat milk if you prefer. When choosing your sourdough starter, either an active, bubbly starter or a fed discard will work well for this recipe, giving you that signature sourdough tang. For the yeast, make sure it’s active dry yeast, not instant, to ensure proper rise.
Time Needed From Start To Finish
Preparing these sweet sourdough focaccia breadsticks is a relatively quick process, especially for a sourdough recipe. The hands-on time is minimal, with most of the duration dedicated to the dough rising.
- Preparation Time: 15 minutes
- Rise Time: 1-2 hours (depending on room temperature and starter activity)
- Baking Time: 20-25 minutes
- Total Time: Approximately 1 hour 35 minutes to 2 hours 40 minutes
How To Make It Step By Step With Visual Cues

Creating these sweet sourdough focaccia breadsticks is a simple and rewarding process. Follow these steps for perfect results every time.
- Combine Wet Ingredients and Starter: In a large mixing bowl, combine the warm milk, granulated sugar, and active dry yeast. Stir gently to dissolve the sugar and yeast, then let it sit for about 5 minutes until the yeast becomes foamy. This indicates your yeast is active. Next, add your sourdough starter (active or discard) and the melted butter to the mixture, stirring until well combined.
- Add Dry Ingredients to Form Dough: Gradually add the all-purpose flour and salt to the wet ingredients. Mix with a wooden spoon or your hands until a shaggy dough forms. It will be sticky, but don’t worry. Once combined, turn the dough out onto a lightly floured surface.
- Knead the Dough Until Smooth: Knead the dough for 5-7 minutes. The dough should become smoother and more elastic, though it will still be soft. Avoid adding too much extra flour during kneading, as this can make the focaccia dense. A slightly sticky dough is what you’re aiming for.
- First Rise (Bulk Fermentation): Lightly grease a clean bowl with a little olive oil. Place the kneaded dough in the bowl, turning it once to coat. Cover the bowl with plastic wrap or a clean kitchen towel and let it rise in a warm place for 1 to 2 hours, or until it has roughly doubled in size. The exact time will depend on the warmth of your kitchen and the activity of your sourdough starter.
- Prepare for Baking and Second Rise: Preheat your oven to 375°F (190°C). Drizzle 1 tablespoon of olive oil into a 9×13 inch baking pan, ensuring the bottom is well coated. Gently transfer the risen dough into the prepared pan. Use your fingertips to gently press and stretch the dough to fill the pan, creating those signature focaccia dimples.
- Second Rise and Baking: Cover the pan loosely with plastic wrap or a kitchen towel and let the dough rise for another 20-30 minutes while your oven finishes preheating. This brief second rise helps create a lighter texture. Once risen, remove the cover and bake for 20-25 minutes, or until the focaccia is golden brown on top and cooked through.
- Cool and Glaze: Once baked, remove the focaccia from the oven and let it cool in the pan for about 10-15 minutes. While it’s cooling, prepare the glaze by whisking together the powdered sugar, milk (or water), and vanilla extract in a small bowl until smooth. The consistency should be pourable but not too thin.
- Slice and Serve: Once the focaccia has cooled slightly, drizzle the glaze generously over the top. You can then slice it into breadsticks or squares and serve warm or at room temperature. Enjoy your sweet sourdough focaccia!
Easy Variations And Serving Ideas That Fit Real Life
These sweet sourdough focaccia breadsticks are wonderfully versatile and can be adapted to suit various tastes and occasions. For a kid-friendly twist, you can add chocolate chips or sprinkles to the dough before the second rise, making them an even more exciting treat. Another simple variation is to sprinkle a little cinnamon sugar on top of the dough before baking, giving it a cinnamon roll-like flavor profile that pairs beautifully with the sweet glaze.
If you’re serving these for a brunch or a party, consider offering a side of fresh berries or a dollop of whipped cream for an extra touch of elegance. They also make a fantastic addition to a dessert platter, alongside other small sweets. For a more adult-oriented serving, a light dusting of orange zest over the glaze can add a bright, citrusy note that complements the sourdough tang. Don’t be afraid to experiment with different extracts in the glaze too; almond extract instead of vanilla can offer a lovely alternative flavor.
Common Slip-Ups And How To Avoid Them
Even experienced bakers can encounter small challenges, but knowing what to watch out for can save your sweet sourdough focaccia.
One common mistake is using milk that is too hot, which can kill the yeast and prevent your dough from rising. Always aim for warm milk, around 100-110°F (38-43°C), which feels comfortably warm to the touch but not scalding. If your yeast doesn’t foam after 5 minutes, it’s best to start over with fresh yeast.
Another pitfall is over-flouring the dough during kneading. While it’s tempting to add more flour to reduce stickiness, too much flour will result in a dense, dry focaccia. Embrace the slightly sticky nature of the dough; a light dusting on your surface and hands is usually sufficient.
Not allowing enough time for the dough to rise is another common issue. Sourdough can sometimes be slower to rise than commercial yeast alone. Be patient and ensure your dough has visibly doubled in size during the first rise. A warm spot in your kitchen (like near a sunny window or in a slightly warm, turned-off oven) can help speed this along.
Finally, ensure your oven is fully preheated before placing the focaccia inside. Baking in a cold oven can affect the rise and texture of your breadsticks. Use an oven thermometer if you’re unsure about your oven’s accuracy.
How To Store It And Make It Ahead Without Ruining Texture
These sweet sourdough focaccia breadsticks are best enjoyed fresh, but they can certainly be stored and even prepared ahead of time with excellent results.
To store leftover breadsticks, place them in an airtight container at room temperature for up to 2-3 days. If you want to keep them longer, they can be stored in the refrigerator for up to 5 days. For the best texture, especially after refrigeration, you can gently warm them in a toaster oven or microwave for a few seconds before serving.
For making ahead, you have a couple of options. You can prepare the dough through the first rise

FAQs
- Can I make these ahead? Yes—prep ahead, refrigerate, then serve when ready.
- How long do leftovers last? Store covered in the fridge for 3–4 days for best texture.
- Can I adjust sweetness? Yes—add more or less sweetener to taste.
- Can I change the fruit? Yes—swap strawberries for blueberries, raspberries, or sliced banana.