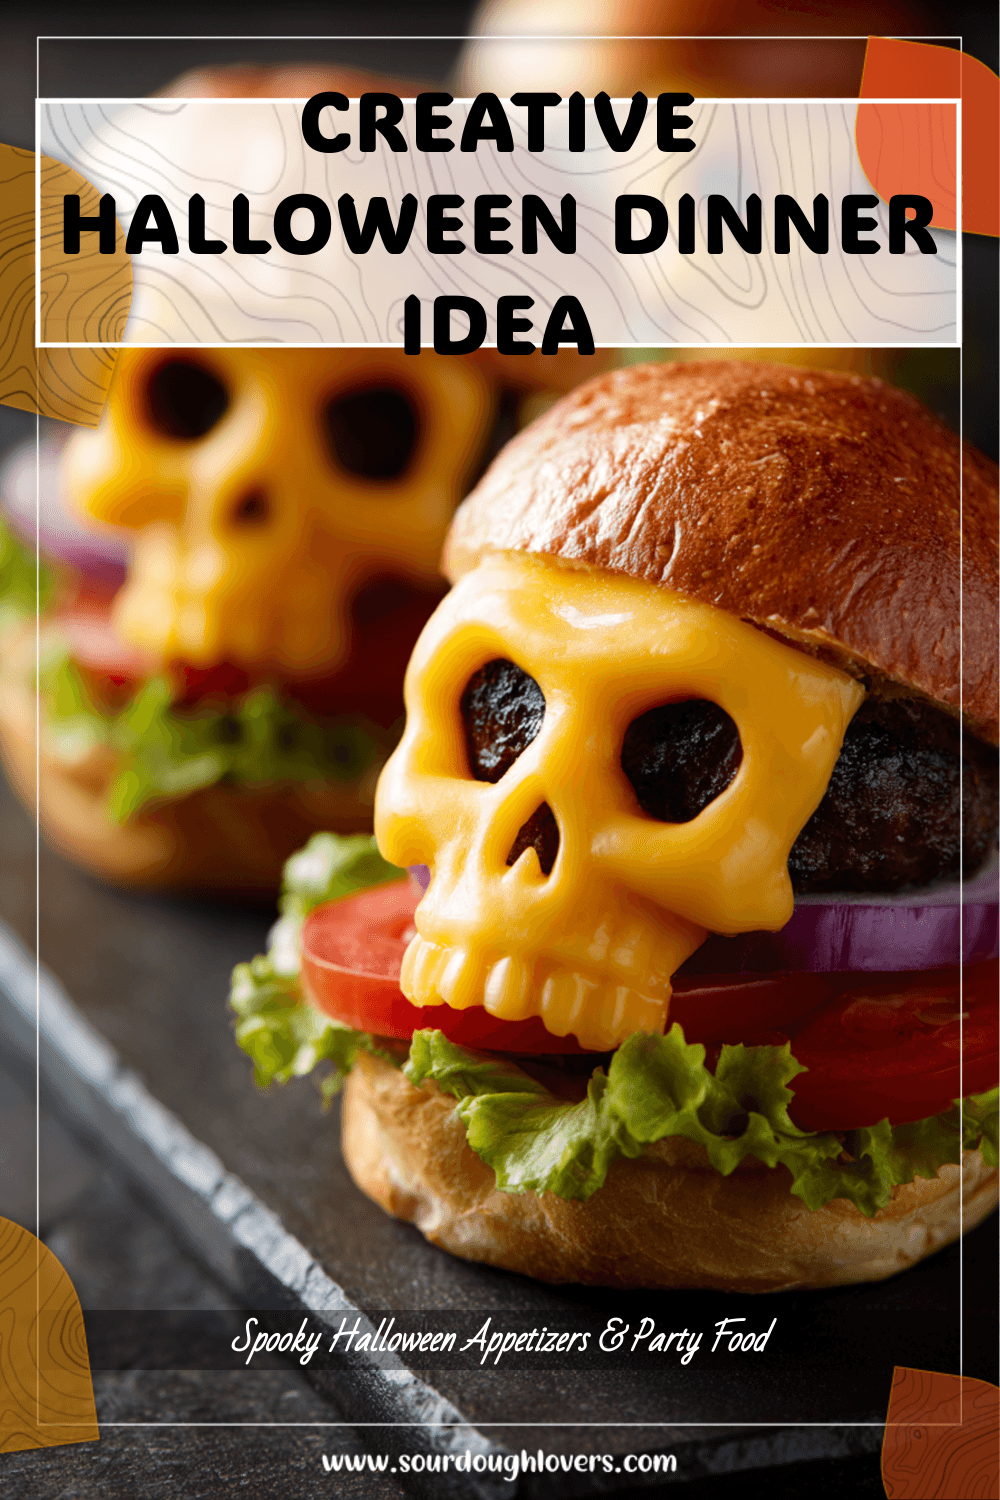
`Halloween is the perfect excuse to turn everyday comfort food into spooky showstoppers, and nothing captures that spirit better than Creative Halloween Dinner Cheeseburger Skulls. These creepy yet delicious cheeseburgers bring the charm of Adams Family food vibes straight to your dinner table, combining comfort with a frightfully fun twist. Unlike the usual candy or appetizers, this recipe creates a filling, family-friendly main course that doubles as edible décor. In this article, we’ll explore the story behind cheeseburger skulls, the simple recipe you can make at home, creative serving and presentation ideas, plus answers to your most common Halloween dinner questions.
A Family Halloween Dinner Memory
One of the best parts about Halloween is how the holiday transforms ordinary evenings into magical (and spooky) family traditions. A couple of years ago, while planning Halloween dinners for family, I realized that I wanted more than just bowls of candy and quick snacks. The kids were excited to decorate pumpkins, and the adults were hungry for something hearty after a long night of trick-or-treating. That’s when I stumbled onto the idea of creative Halloween dinner cheeseburger skulls.
The concept struck me as the perfect combination — food that felt like it jumped off an “Adams Family food” menu while still satisfying everyone’s appetite. The first time I served them, the reaction was priceless: wide eyes, laughter at the eerie skull shapes, and silence the moment people took their first bite. From then on, they became our go-to Halloween dinner centerpiece, proving that a spooky meal can also be satisfying, filling, and fun.
Halloween has no shortage of themed treats, but most of them are geared toward desserts and bite-sized snacks. That’s why cheeseburger skulls are such a game-changer. They take a classic favorite — the cheeseburger — and transform it into something spine-chillingly festive for Halloween food dinner without losing its role as a hearty main dish.
Print
Creative Halloween Cheeseburger Skulls
- Total Time: 45 mins
- Yield: Makes 6 skulls 1x
Description
Juicy bunless cheeseburgers shaped like spooky skulls, stuffed with melty cheddar and baked in a skull mold—perfect for a fun, family-friendly Halloween dinner.
Ingredients
1 1/2 lb ground beef (80/20)
1/2 cup seasoned breadcrumbs
1 large egg
1/4 cup minced onion
2 cloves garlic, minced
1 tbsp Worcestershire sauce
1 tsp kosher salt
1/2 tsp black pepper
4 oz cheddar cheese, cut into small cubes
Cooking spray or oil, for mold
2 tbsp ketchup or BBQ sauce (optional, for glaze)
Instructions
1. Heat oven to 375°F (190°C). Set a skull-shaped silicone mold on a sheet pan and lightly coat with cooking spray.
2. In a bowl, gently mix beef, breadcrumbs, egg, onion, garlic, Worcestershire, salt, and pepper until just combined.
3. Press a thin layer of meat into each mold cavity, pushing into facial details and creating a small well.
4. Place a cube or two of cheddar into each well, then cover with more meat and seal edges firmly to prevent leaks.
5. Bake 20–25 minutes, or until centers reach 160°F (71°C) and edges are browned.
6. Rest 5 minutes, then carefully unmold the cheeseburger skulls onto a platter.
7. Brush with ketchup or BBQ sauce if desired and serve with fries, salad, and pickles.
- Prep Time: 20 mins
- Cook Time: 25 mins
Unlike candy corn, cookies, or miniature cupcakes, these skull burgers carry the weight of a dinner Halloween meal. The comfort of juicy beef, gooey cheese, and soft bread mixed with the eerie skull-shaped mold puts them a step above traditional themed appetizers. They aren’t just novelty items; they’re dishes you’ll want to serve year after year.
Plus, the mix of spook factor and savory flavors makes them appealing to all ages. Kids are thrilled by the creepy design, while adults appreciate the creativity paired with a satisfying bite. When it comes to Halloween themes food, cheeseburger skulls strike the perfect balance between fun, festive, and filling.
Ingredients You’ll Need
What makes creative Halloween dinner cheeseburger skulls so appealing is that they use simple, readily available ingredients, but the presentation makes them truly special. Here’s a clear breakdown of what you’ll need to bring these spooky creations to life:
| Ingredient | Quantity | Notes |
|---|---|---|
| Ground beef (80/20 blend) | 1 to 1.5 pounds | Juicy and flavorful base |
| Seasoned breadcrumbs | ½ cup | Helps bind the mixture |
| Egg | 1 large | Keeps the burgers firm |
| Onion (finely diced) | 1 small | Adds flavor and moisture |
| Garlic (minced) | 2 cloves | Optional, for depth of flavor |
| Cheddar or American cheese | 6–8 slices | Cut into small cubes for stuffing |
| Salt & black pepper | To taste | Basic seasoning |
| Worcestershire sauce | 1 tbsp | Boosts savory richness |
| Skull-shaped baking mold | — | Silicone molds work best |
| Optional extras | — | Pickles, jalapeños, sautéed mushrooms |
Family-friendly tip: You can easily swap beef for ground turkey or chicken, use plant-based meat alternatives, or adjust spice levels depending on your guests. These ingredient swaps make the recipe inclusive for Halloween dinners for family no matter everyone’s preferences.
Step-by-Step Preparation
Once you’ve gathered your ingredients, it’s time for the fun part—bringing your skull burgers to “life.” This spooky recipe is simple enough for beginners yet impressive enough to wow your Halloween dinner guests.
Step 1: Prepare the Meat Mixture
In a large bowl, combine the ground beef with breadcrumbs, egg, Worcestershire sauce, diced onion, garlic, salt, and pepper. Mix just until blended—over-mixing can make the burgers tough. For extra flavor, let the mixture rest in the fridge for about 15 minutes. This helps the seasoning absorb and makes it easier to mold.
Step 2: Grease the Skull Mold
Lightly coat your skull baking mold with cooking spray or butter. This prevents sticking and ensures the final skulls release cleanly, keeping the creepy face details intact.
Step 3: Shape the Skull Burgers
Take a small handful of the seasoned meat mixture and press it into the skull mold, creating a hollow pocket in the center. Place a cube of cheese into the pocket, then cover with more meat to seal. Press gently so no gaps remain. Press firmly into the facial detail areas of the mold to give your skulls more definition once baked.
Step 4: Bake to Juicy Perfection
Preheat your oven to 375°F (190°C). Place the filled skull mold on a baking sheet for stability and bake for about 20–25 minutes, depending on mold size. Check for doneness: internal temperature should reach 160°F (71°C).
Step 5: Cool & Release
Allow the skulls to cool for about 5 minutes before unmolding. Gently invert the mold onto a tray and lift carefully to reveal your eerie cheeseburger skulls.
Extra Cooking Tips
- Brush the tops lightly with barbecue sauce or ketchup before serving for a bloody finish.
- Seal meat tightly around cheese to prevent leaks.
- Cooking for a crowd? Use multiple molds to bake batches at once.
Make Dinner Spooky and Fun
The magic of Halloween isn’t only in costumes and decorations — it’s how those little eerie touches show up in everything you serve. Once your creative Halloween dinner cheeseburger skulls are baked, you can bring them to life with imaginative sides and presentation.
- Bloody ketchup dip: Serve ketchup or sriracha ketchup with a drizzle along plates for a “bloody” effect.
- Pumpkin potato fries: Carve ridges into sweet potato fries for pumpkin-like appearance.
- Green “witch” salad: Create a green salad with cucumbers, avocado, and green grapes with green goddess dressing.
- Fog effect: Place a bowl of water with dry ice (away from food) near the table for ghostly vibes.
Add simple props like plastic spiders, orange napkins, or faux cobwebs to elevate your dinner Halloween table into something truly memorable.
Variations for Families & Kids
What makes cheeseburger skulls a hit for Halloween dinners for family is their versatility. Here are easy tweaks:
- Cheese options: Try mozzarella for a stretchy “brain” effect or pepper jack for spice.
- Veggie boost: Mix grated zucchini, carrots, or mushrooms into the meat blend.
- Vegetarian swap: Use plant-based ground meat and vegan cheese.
- Kid-friendly: Stick to mild cheeses and avoid strong spices.
- Mini versions: Use small molds or shape sliders for kid-sized treats.
FAQs about Creative Halloween Dinner Cheeseburger Skulls
Can I make cheeseburger skulls ahead of time?
Yes, shape them in advance and refrigerate before baking, or bake fully and reheat in the oven later.
What mold works best?
Silicone skull molds are ideal as they release easily and preserve details.
How do I keep the cheese from leaking out?
Seal edges tightly around the cube of cheese. Using cubed cheese instead of shredded helps too.
Can I make a vegetarian version?
Yes! Use plant-based protein and vegan cheese for a spooky vegan meal option.
How should I store leftovers?
Refrigerate up to 3 days in an airtight container, or freeze wrapped individually and reheat in the oven.
Conclusion
When it comes to creating a Halloween meal that’s festive, filling, and full of character, creative Halloween dinner cheeseburger skulls rise to the occasion. They double as spooky décor and a hearty main dish, making them the perfect centerpiece for any dinner Halloween celebration.
Best of all, they’re adaptable for all diets and taste preferences — classic beef and cheddar, veggie-loaded mixes, or plant-based versions for vegetarian guests. Combine them with eerie side dishes and themed table styling, and you’ll have a Halloween themes food menu sure to impress kids and adults alike.
This Halloween, go beyond appetizers and desserts — serve cheeseburger skulls and watch your guests light up with spooky delight, just like the Addams Family would.
“`


