There’s something irresistibly comforting about the aroma of freshly baked breadsticks wafting through the kitchen. With this Simple Bread Maker Recipe, you can have soft, buttery, and cheesy Easy Garlic Parmesan Breadsticks ready with minimal effort. The bread maker takes care of the mixing and kneading, ensuring perfect texture every time. This foolproof Garlic Breadsticks Recipe transforms pantry staples into warm, golden sticks of homemade bliss. Ahead, you’ll find a detailed step-by-step guide, expert flavor tips, creative serving ideas, and answers to common questions—all designed to help you master Homemade Garlic Breadsticks like a pro baker.

Why Garlic Parmesan Breadsticks Are a Must‑Try
A Family Memory That Started It All
My love for Garlic Parmesan Breadsticks began on quiet Sunday evenings when my family gathered for pasta night. The table would fill with laughter, clinking glasses, and the rich aroma of garlic butter mingling with melted parmesan. As a child, I remember eagerly waiting for that first warm breadstick to come out of the oven—soft, golden, and brushed with buttery perfume. Those memories inspired me to recreate that comforting flavor at home, using a Simple Bread Maker Recipe that eliminates the fuss yet captures the same cozy magic.
When I first discovered how effortlessly my bread maker could whip up a batch of Garlic Parmesan Breadsticks, it felt like uncovering a kitchen secret. No more hand-kneading or worrying about dough consistency—the machine did the heavy lifting while my kitchen filled with the mouthwatering scent of baking bread. Each batch turned out consistently light and airy, ready to be brushed with garlic butter and sprinkled with fresh parmesan.
The best part? Sharing them. Whether it’s a simple dinner with my spouse or a gathering of friends, these Garlic Parmesan Breadsticks never fail to bring everyone together. Breaking a warm stick open, steam escaping, parmesan melting into the soft crumb—it’s a small but deeply satisfying moment of homemade happiness. And all thanks to a Simple Bread Maker Recipe that even a beginner can master. It’s more than just a side dish; it’s a reminder that the best comfort food starts right in your own kitchen.
Print
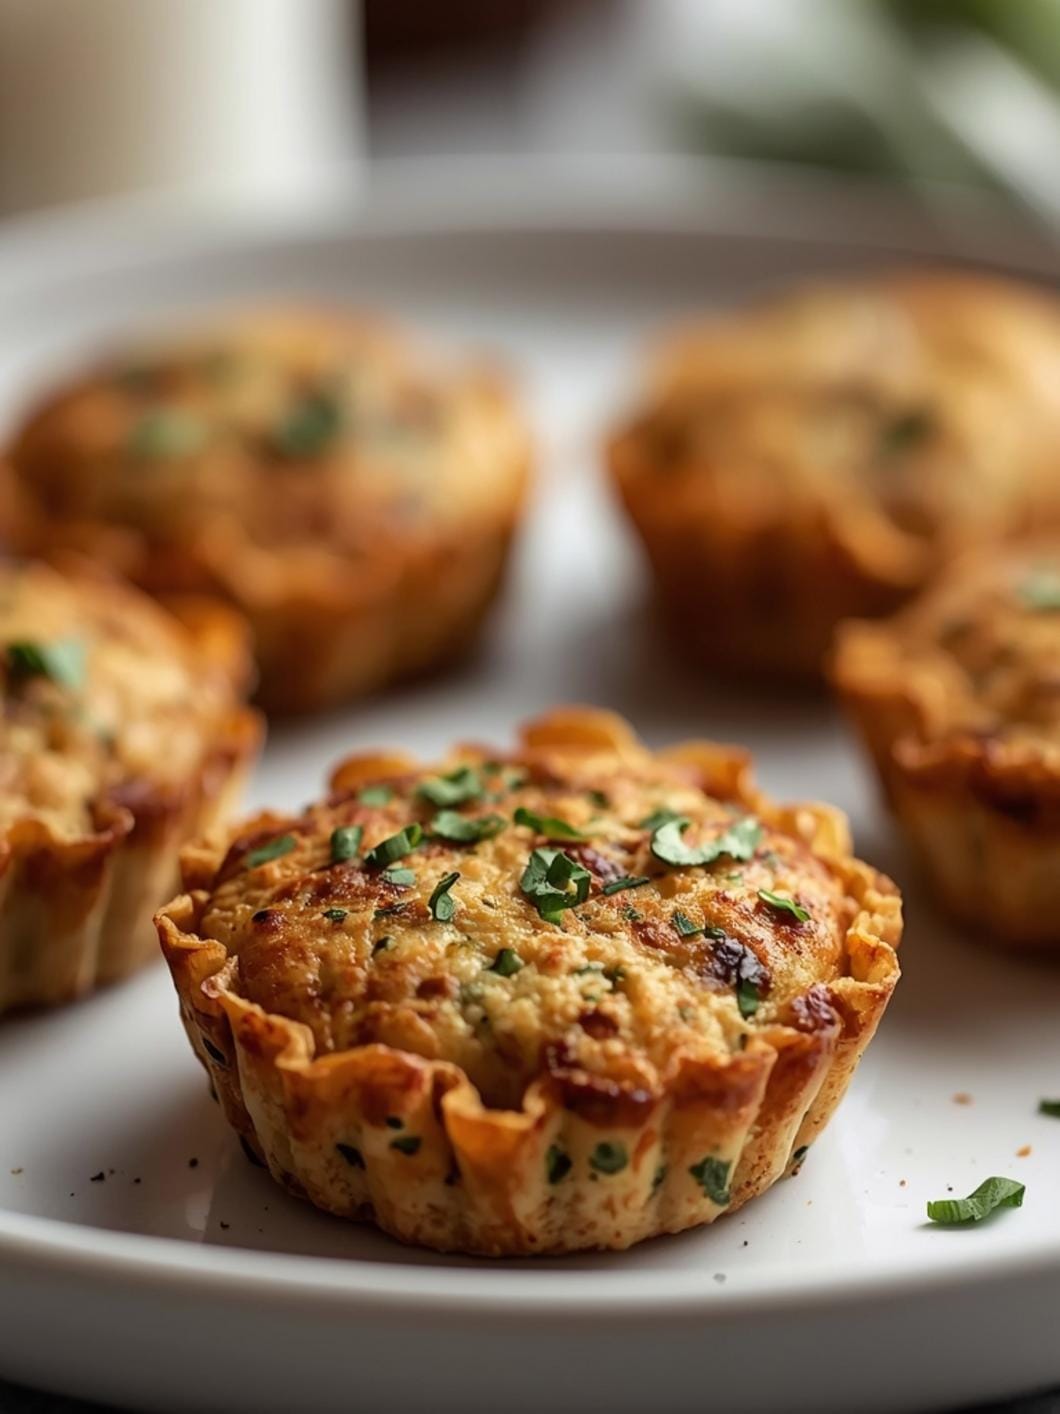
Easy Garlic Parmesan Breadsticks
- Total Time: 2 hours
- Yield: 12 breadsticks 1x
Description
Soft, buttery breadsticks flavored with garlic and parmesan, made effortlessly in a bread maker. This simple recipe yields light, tender sticks brushed with garlic butter and topped with nutty cheese, perfect for snacking or pairing with soups and pastas.
Ingredients
Instructions
1. Add warm water to the bread maker pan, then melted butter, sugar, and salt, followed by flour and yeast in the recommended order for your machine.
2. Select the dough cycle on the bread maker and allow it to mix, knead, and rise until the cycle completes.
3. While the dough mixes, prepare a baking sheet by greasing it or lining it with parchment paper and combine melted butter, garlic powder, and parmesan cheese in a small bowl.
4. Turn the dough onto a lightly floured surface when the cycle ends and gently punch it down to release air.
5. Roll the dough into a 9×12-inch rectangle about ½ inch thick and slice it into 1-inch-wide strips.
6. Twist each strip once or twice and place them 1–2 inches apart on the prepared baking sheet.
7. Cover the shaped sticks with a clean towel and let them rise for 20–25 minutes until slightly puffy.
8. Preheat the oven to 375°F (190°C) and brush the breadsticks with the butter-garlic-parmesan mixture, adding extra parmesan if desired.
9. Bake for 12–15 minutes until golden brown and hollow-sounding when tapped.
10. Brush hot breadsticks with melted butter or herb-infused oil, then cool on a wire rack for 5–10 minutes before serving.
- Prep Time: 30 minutes
- Cook Time: 15 minutes
- Category: Appetizer
- Method: bread maker
- Cuisine: Italian-American
Nutrition
- Serving Size: 1 breadstick
Keywords: easy, garlic, parmesan, breadsticks, simple, bread maker, homemade, appetizer, garlic parmesan
Why Bread Maker Garlic Breadsticks Beat Store‑Bought Ones
Let’s be honest—store-bought breadsticks can’t compete with the freshness of Homemade Garlic Breadsticks. Most pre-packaged versions lack the tender texture and buttery flavor that makes freshly baked breadsticks irresistible. With a Simple Bread Maker Recipe, you can easily control every element—from the amount of garlic and parmesan to the softness of the crumb. The bread maker handles the technical side—mixing, kneading, and rising—so you can focus on shaping and baking to golden perfection.
Beyond convenience, there’s an undeniable satisfaction in creating Bread Maker Breadsticks from scratch. You know exactly what’s going into your dough—pure ingredients without preservatives. The flavor bursts with warmth and authenticity, making them ideal for busy weeknights, cozy dinners, or casual get-togethers. Serve them alongside pasta, soup, or salad, and you’ll instantly elevate any meal. Once you experience how easy and rewarding these Garlic Parmesan Breadsticks are to make, you’ll never reach for the store-bought kind again.
Ingredients & Step‑by‑Step Directions
Gathering What You’ll Need
Before you begin, clear a bit of counter space and make sure your bread maker pan and paddles are clean and dry. The beauty of this Simple Bread Maker Recipe is that everything is made with everyday ingredients you probably already have. Measure carefully for the right dough texture—light, pliable, and soft enough to shape easily into Easy Garlic Parmesan Breadsticks.
| Ingredient | Quantity | Notes |
|---|---|---|
| All‑purpose flour | 3 cups | Spoon and level for accuracy—too much packs the dough |
| Warm water | 1 cup | About 110°F for proper yeast activation |
| Butter | 3 tbsp | Melted for brushing before and after baking |
| Garlic powder | 1½ tsp | Adjust depending on how garlicky you like it |
| Grated Parmesan cheese | ½ cup | Freshly grated gives the best flavor |
| Active dry yeast | 2¼ tsp | Standard bread‑maker yeast |
| Sugar | 1 tbsp | Helps the yeast activate and adds slight sweetness |
| Salt | 1 tsp | Rounds out the flavor of the dough |
Optional toppings:
- Sprinkle of dried parsley or Italian seasoning for color and aroma
- Extra melted butter mixed with minced fresh garlic for brushing
- A handful of shredded mozzarella if you want Homemade Garlic Breadsticks with a gooey twist
Making this Garlic Breadsticks Recipe using a Simple Bread Maker Recipe takes all the guesswork out of mixing and kneading. Once the basic ingredients are in, your job mainly becomes shaping, brushing, and baking to golden‑brown perfection.
Step‑by‑Step Preparation in the Bread Maker
- Load ingredients in the correct order. Follow your bread maker’s recommended sequence. Typically, pour the warm water first, then add melted butter, sugar, and salt. Add the flour to cover the liquids, make a small well, and place the yeast inside. This layering promotes the best rise.
- Select the dough cycle. Choose the Dough or Pizza Dough setting—about 90 minutes of mixing, kneading, and the first rise. The kitchen will soon fill with the yeasty perfume of fresh dough—your Homemade Garlic Breadsticks are underway.
- Prepare your work area while you wait. Dust a surface with flour, grease a baking sheet, and melt two tablespoons of butter in a bowl with garlic powder and Parmesan cheese—half for before baking, half for after.
- Shape the breadsticks. Turn out the dough, punch down gently, roll into a 9×12‑inch rectangle about ½ inch thick, then cut into 1‑inch strips. Twist each strip once or twice for classic rippled Parmesan Breadsticks. Set on the sheet with space to rise.
- Second rise. Cover loosely and let rest 20–25 minutes in a warm spot until puffy. This ensures soft, tender Bread Maker Breadsticks.
- Preheat and brush. Heat the oven to 375°F (190°C). Brush each stick with the butter–garlic–Parmesan mix; add extra cheese if desired.
- Bake to golden perfection. Bake 12–15 minutes until the breadsticks are golden. Watch closely—the cheese browns fast near the end.
- Add finishing touches. Brush again with melted butter as soon as they emerge. A touch of herbs or salt enhances color and shine.
- Cool slightly before serving. Rest on a rack for 5–10 minutes. The result: crisp edges, a fluffy center, and melting servings of garlic‑Parmesan flavor.
- Make‑ahead and reheating tips.
- Freeze shaped, unbaked dough on a tray, then bag for up to a month. Thaw and rise before baking.
- To reheat baked breadsticks, wrap in foil and warm at 300°F (150°C) 5–7 minutes, brushing with butter to refresh.
Follow these steps and your Simple Bread Maker Recipe will always yield bakery‑quality Easy Garlic Parmesan Breadsticks—golden, fragrant, and irresistibly soft.
Flavor Tips and Serving Ideas
Perfecting the Garlic Parmesan Balance
The beauty of Homemade Garlic Breadsticks is the freedom to shape their flavor to your taste. The classic Garlic Breadsticks Recipe relies on simple ingredients, yet subtle tweaks make each batch unique. Garlic powder adds gentle flavor; minced fresh garlic gives bold aroma. For mellow sweetness, stir in roasted garlic. Love intensity? Blend roasted and powdered together for layers of rich, buttery depth.
Cheese also transforms flavor. Freshly grated Parmesan melts into golden crisps that contrast crumbly interiors. Mix in Asiago or Romano for sharper edges, or sprinkle mozzarella for stretchy texture. Always grate cheese yourself—pre‑shredded blends dull flavor and melt.
To keep Bread Maker Breadsticks tender, brush with butter while hot so it seeps into every swirl. Add a teaspoon of olive oil to the glaze to lock in moisture. Herbs such as parsley, rosemary, or basil give color and brightness to counter the garlic richness.
To prevent burnt garlic, brush butter near the end or just after baking. Overheated garlic turns bitter; correct timing delivers the signature golden aroma of authentic Easy Garlic Parmesan Breadsticks. This Simple Bread Maker Recipe welcomes experimentation—adjust seasoning until every bite matches your perfect balance of garlic, butter, and cheese.
Serving and Pairing Suggestions
Fresh from the oven, Garlic Parmesan Breadsticks pair beautifully with creamy soups, pasta Alfredo, or tomato‑basil combinations. Their golden exterior easily absorbs sauces while adding warmth to simple meals. For lighter fare, serve beside crisp salads or antipasto platters.
For parties, slice your Homemade Garlic Breadsticks into smaller bites and offer dipping bowls of marinara, ranch, or garlic‑herb butter. Their glossy sheen and inviting aroma instantly elevate any gathering.
Craving a twist? Replace the topping butter with honey butter for a faint sweetness or drizzle melted mozzarella and herbs before serving. To store, cool thoroughly and place in a sealed container lined with paper towel. They’ll keep soft two days at room temperature or freeze easily—just reheat gently at 300°F to restore that fresh‑baked charm.
Whether at a family dinner or as appetizers for friends, each chewy, buttery bite of this Garlic Breadsticks Recipe captures the joy of Homemade Garlic Breadsticks made through a Simple Bread Maker Recipe. It’s proof that comfort food can be quick, delicious, and endlessly shareable.
FAQs & Conclusion
Frequently Asked Questions
Can I use instant yeast instead of active dry yeast?
Yes. Instant yeast works perfectly in this Simple Bread Maker Recipe. Substitute 1:1 and add directly with the flour. Your Easy Garlic Parmesan Breadsticks may rise faster—watch the dough closely.
How long will leftovers stay fresh?
Stored in an airtight container, Homemade Garlic Breadsticks remain soft about two days. Reheat gently in a warm oven for the best texture.
What if I don’t have a bread maker?
You can knead by hand. Combine dry ingredients, mix in warm water and butter, knead about ten minutes until elastic, let rise, then shape and bake. Results are just as soft and flavorful as the Bread Maker Breadsticks.
Can I freeze dough or baked breadsticks?
Yes. Freeze shaped raw dough up to one month or baked sticks the same way. Reheat in foil at 300°F (150°C) for five minutes to regain softness.
How do I keep them soft after baking?
Brush with butter immediately after baking and cover loosely with a clean towel as they cool. A small slice of bread in the container helps maintain that tender crumb typical of Garlic Parmesan Breadsticks.
Conclusion
Making Easy Garlic Parmesan Breadsticks proves that simple ingredients can deliver big comfort. With a Simple Bread Maker Recipe, even first‑time bakers achieve soft, fragrant breadsticks layered with garlic butter and melted Parmesan in under two hours. The aroma that fills your kitchen and the smiles of those you share them with confirm that nothing beats homemade.
Warm up your bread maker, gather your staples, and bake a batch of Homemade Garlic Breadsticks to enjoy with soups, pasta, or dips. Once you taste that buttery, garlicky perfection, you’ll find countless reasons to create—and share—this delightful Garlic Breadsticks Recipe again and again.