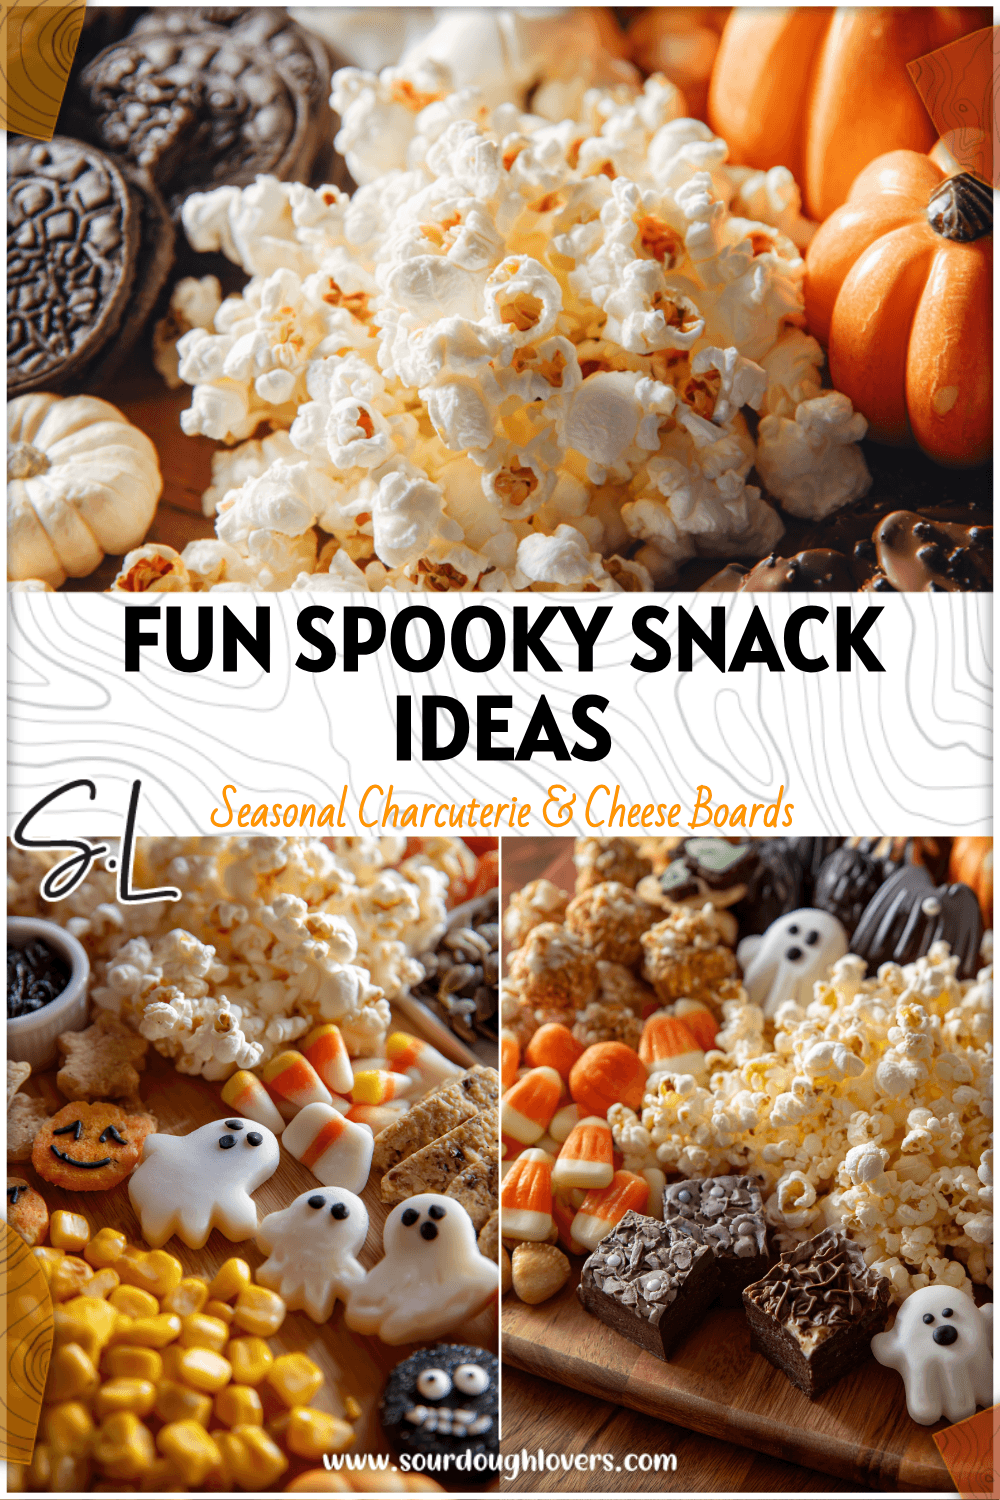
Get ready to conjure up some seriously spooky fun with a Halloween charcuterie board that’s as delightful as it is eerie! This isn’t just a platter of snacks; it’s a centerpiece, a conversation starter, and a delicious way to celebrate the season. Perfect for a ghoulish gathering or a family fright night, these creative ideas will transform simple ingredients into a festive feast.

Whether you’re hosting a full-blown Halloween bash or just looking for some creative appetizers for a spooky tea party, this guide will help you assemble a show-stopping display. We’ll dive into crafting adorable mozzarella skulls, arranging a vibrant fruit board with a Halloween twist, and incorporating other themed treats that are sure to impress your guests and delight the little monsters in your life.
Table of Contents
- What You’ll Love About This Quick And Easy Recipe
- Everything You Need To Make This Recipe Without Stress
- Time Needed From Start To Finish
- How To Make It Step By Step With Visual Cues
- Easy Variations And Serving Ideas That Fit Real Life
- Common Slip-Ups And How To Avoid Them
- How To Store It And Make It Ahead Without Ruining Texture

Spooky Halloween Charcuterie Board
- Total Time: 30-35 minutes
- Yield: 1 large board 1x
Description
Create a fun and festive Halloween charcuterie board with a mix of savory and sweet treats, including mozzarella skulls, colorful fruits, cheeses, crackers, and candies. This versatile and easy-to-assemble board is perfect for parties or family fright nights.
Ingredients
Instructions
1. Drain the fresh mozzarella balls. Using a small paring knife, carefully cut out two small, round “eye sockets” from each mozzarella ball. Then, cut a small, horizontal slit below the eyes for a “mouth.” For an extra spooky touch, gently press a small piece of sliced black olive into each eye socket. If you have edible googly eyes, you can also attach those with a tiny dab of cream cheese or dip.
2. Wash and core the red and orange bell peppers. Slice them into thin strips or use small cookie cutters to create bat or pumpkin shapes. These will add color and a healthy crunch to your board.
3. Wash all your fruit thoroughly. Cut the cantaloupe and honeydew into small, bite-sized cubes or use a melon baller for perfectly round pieces. Keep the grapes on their stems or pull them off into small clusters.
4. Start by placing your larger items and bowls (if using for dips) onto your chosen serving board or platter. Think about creating distinct “zones” for different food types. Place your prepared mozzarella skulls in a prominent spot.
5. Artfully arrange the green and purple grapes, melon pieces, blackberries, raspberries, and bell pepper strips around the board. Try to create a sense of flow and color balance. You can make a “river” of grapes or a “patch” of berries.
6. Place your sliced or cubed cheeses in various spots on the board. Fan out crackers or breadsticks around the cheeses, making them easily accessible for dipping and pairing.
7. Scatter pretzel sticks and mini cheese crackers in empty spaces, filling in gaps and adding texture. These are great for munching between bites of cheese and fruit.
8. Finally, add your candy corn and gummy worms (or other Halloween candies) to complete the festive look. You can create small piles or sprinkle them throughout the board for pops of color and sweetness.
- Prep Time: 20 minutes
- Category: appetizer
- Method: no cook
- Cuisine: american
Nutrition
- Serving Size: 8-10 servings
Keywords: halloween, charcuterie, appetizer, party food, snack, kid-friendly, easy, no bake, spooky, fruit board
What You’ll Love About This Quick And Easy Recipe
This recipe is a true lifesaver for anyone looking to add a touch of Halloween magic without spending hours in the kitchen. It’s incredibly versatile, allowing you to tailor it to your family’s preferences or your party’s theme. Parents will appreciate how easily kids can get involved in the assembly, making it a fun activity as well as a delicious outcome. This charcuterie board is perfect for a casual family dinner leading up to Halloween, a school party contribution, or the star attraction at your annual spooky celebration. It caters to various tastes, offering both savory and sweet elements, and can easily be scaled up or down depending on your guest list.
Everything You Need To Make This Recipe Without Stress
Gathering your ingredients for this Halloween charcuterie board is a breeze, focusing on readily available items that come together quickly for maximum impact. The beauty of a charcuterie board is its flexibility, so feel free to swap out items based on what you have on hand or what your guests prefer.
INGREDIENTS:

- 1 (8-ounce) package small fresh mozzarella balls (bocconcini)
- 1 (4-ounce) can sliced black olives
- 1 small red bell pepper
- 1 small orange bell pepper
- 1 cup green grapes
- 1 cup purple grapes
- 1 cup cantaloupe, cut into small cubes or melon balls
- 1 cup honeydew melon, cut into small cubes or melon balls
- 1 cup blackberries
- 1 cup raspberries
- 1 cup pretzel sticks
- 1 cup mini cheese crackers (e.g., goldfish crackers)
- 1 cup candy corn
- 1 cup gummy worms or other Halloween-themed candies
- Various cheeses, sliced or cubed (e.g., cheddar, Colby Jack, provolone)
- Assorted crackers or breadsticks
- Small cookie cutters (ghost, bat, pumpkin shapes)
- Optional: small edible googly eyes
- Optional: small bowl of ranch dip or hummus
- Optional: small bowl of chocolate dipping sauce
For the mozzarella skulls, the small fresh mozzarella balls are key for their shape and soft texture. Sliced black olives provide the perfect contrast for eyes, and a small red bell pepper can be used for tiny mouths. For the fruit board, a colorful assortment like green and purple grapes, cantaloupe, honeydew, blackberries, and raspberries creates a vibrant, eye-catching display. Pretzel sticks and mini cheese crackers offer savory crunch, while candy corn and gummy worms bring in the classic Halloween sweetness. Don’t forget a selection of your favorite cheeses and crackers to round out the board.
Time Needed From Start To Finish
This Halloween charcuterie board is designed for quick assembly, making it ideal for busy schedules.
- Prep time: 20 minutes
- Assembly time: 10-15 minutes
- Total time: 30-35 minutes
The majority of the time is spent on simple chopping and arranging, allowing you to create an impressive spread without a lot of fuss.
How To Make It Step By Step With Visual Cues

Creating your spooky charcuterie board is all about assembly and a little creative flair. Follow these steps to build a fantastic Halloween display.
- Prepare Your Mozzarella Skulls: Drain the fresh mozzarella balls. Using a small paring knife, carefully cut out two small, round “eye sockets” from each mozzarella ball. Then, cut a small, horizontal slit below the eyes for a “mouth.” For an extra spooky touch, gently press a small piece of sliced black olive into each eye socket. If you have edible googly eyes, you can also attach those with a tiny dab of cream cheese or dip.
- Cut Your Bell Peppers: Wash and core the red and orange bell peppers. Slice them into thin strips or use small cookie cutters to create bat or pumpkin shapes. These will add color and a healthy crunch to your board.
- Prepare Your Melons and Grapes: Wash all your fruit thoroughly. Cut the cantaloupe and honeydew into small, bite-sized cubes or use a melon baller for perfectly round pieces. Keep the grapes on their stems or pull them off into small clusters.
- Arrange Your Main Board Elements: Start by placing your larger items and bowls (if using for dips) onto your chosen serving board or platter. Think about creating distinct “zones” for different food types. Place your prepared mozzarella skulls in a prominent spot.
- Build Your Fruit and Veggie Sections: Artfully arrange the green and purple grapes, melon pieces, blackberries, raspberries, and bell pepper strips around the board. Try to create a sense of flow and color balance. You can make a “river” of grapes or a “patch” of berries.
- Add Cheeses and Crackers: Place your sliced or cubed cheeses in various spots on the board. Fan out crackers or breadsticks around the cheeses, making them easily accessible for dipping and pairing.
- Incorporate Savory Snacks: Scatter pretzel sticks and mini cheese crackers in empty spaces, filling in gaps and adding texture. These are great for munching between bites of cheese and fruit.
- Place Your Sweet Treats: Finally, add your candy corn and gummy worms (or other Halloween candies) to complete the festive look. You can create small piles or sprinkle them throughout the board for pops of color and sweetness.
Easy Variations And Serving Ideas That Fit Real Life
This Halloween charcuterie board is incredibly adaptable, making it perfect for any family or party setting. For a truly kid-friendly approach, focus on items they already love. You can use cookie cutters to make fun shapes out of cheese slices, deli meats (like turkey or ham), or even slices of bread for mini spooky sandwiches. Offer a variety of dips like ranch for veggies, hummus, or even a sweet chocolate dip for fruit.
To elevate your board for a party, consider adding a small bowl of “bloody” marinara sauce for dipping mozzarella or breadsticks, or a “spider web” dip made by drizzling sour cream over guacamole in concentric circles and dragging a toothpick from the center outwards. You can also include some themed cookies or cupcakes if you have extra time. For a fruit board Halloween, focus heavily on the colorful fruits and use the cookie cutters on melon slices to create ghost or pumpkin shapes. Don’t forget to add a few plastic spiders or other small Halloween decorations directly onto the board (just make sure they’re food-safe!).
Common Slip-Ups And How To Avoid Them
Even with a simple charcuterie board, a few common mistakes can impact the overall presentation and enjoyment.
- Overcrowding the Board: While you want a bountiful look, too many items crammed together can make it difficult for guests to pick up food and can look messy. Leave a little breathing room between different sections. Arrange items in clusters rather than spreading them too thinly.
- Forgetting Dipping Utensils: If you include dips, make sure to provide small spoons or knives for serving. No one wants to double-dip!
- Lack of Variety: A good charcuterie board offers a balance of flavors and textures. Ensure you have a mix of sweet, savory, crunchy, and soft items to keep things interesting.
- Not Considering Allergies/Preferences: If you know your guests have specific dietary needs, try to include a few options that cater to them, or label items clearly.
- Placing Wet Items Next to Dry Ones: Juicier fruits or dips can make crackers and cheeses soggy if they’re touching for too long. Use small bowls for wet items or create a clear separation.
- Not Having Enough of Popular Items: If you know certain items (like the mozzarella skulls or specific candies) will be a hit, make sure you have enough to replenish them as needed.
How To Store It And Make It Ahead Without Ruining Texture
The beauty of a charcuterie board is that many components can be prepped in advance, and the assembled board can be stored for a short period.
- Mozzarella Skulls: Prepare the mozzarella skulls up to 24 hours in advance. Store them in an airtight container in the refrigerator.
- Chopped Fruits and Veggies: Cut and prepare all your fruits and bell peppers a day ahead. Store them in separate airtight containers in the refrigerator. For apples or other fruits that brown, toss them with a little lemon juice.
- Cheeses: Slice or cube cheeses a day before and store them in an airtight container.
- Dips: Prepare any

FAQs
- Can I make these ahead? Yes—prep ahead, refrigerate, then serve when ready.
- How long do leftovers last? Store covered in the fridge for 3–4 days for best texture.
- Can I adjust sweetness? Yes—add more or less sweetener to taste.
- Can I change the fruit? Yes—swap strawberries for blueberries, raspberries, or sliced banana.